STILL BEING EDITED – PUBLISHED FOR FORMAT TESTING
Hanamura Map Strategy Guide: (P1): Point A | (P2): Point B
Hanamura Point A: General | Attacking Strategy | Defending Strategy
Hanamura Point A Strategy
Here we will talk about all you need to know about Hanamura control point A. Like most Point A’s in 2CP maps – it favors the attacker. First off, let’s start with key locations and high ground. This guide was made assuming you have played in Hanamura before, and are generally familiar with the basics of the map.
Walking back to Point A itself after spawning:
Attacker (average) will take: 26 seconds walk time.
Defender (average) will take: 20 seconds walk time.
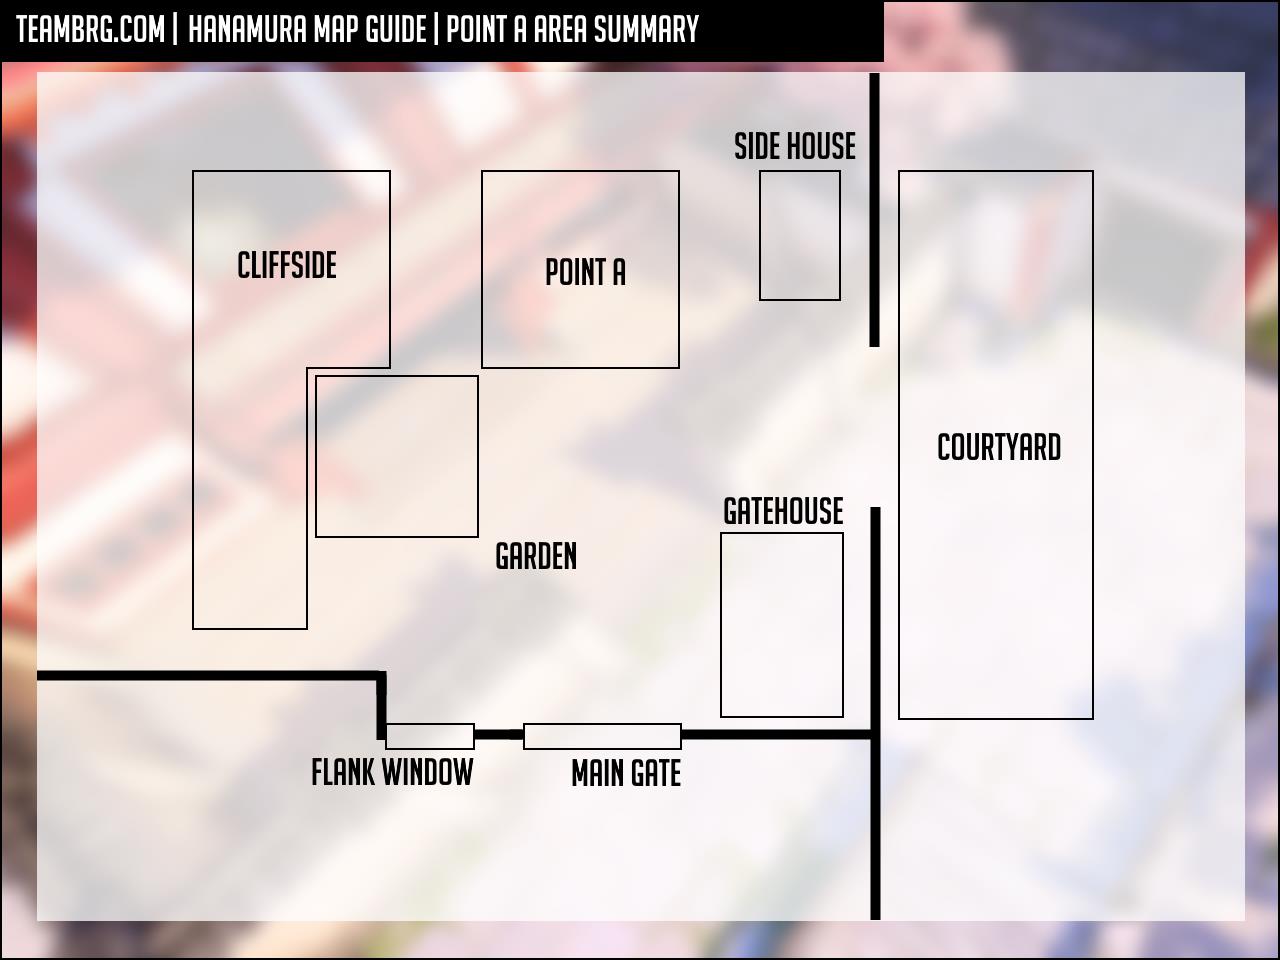
Hanamura A: Key Locations summary
The image helps you visualize what and where exactly we’re talking about in this guide.
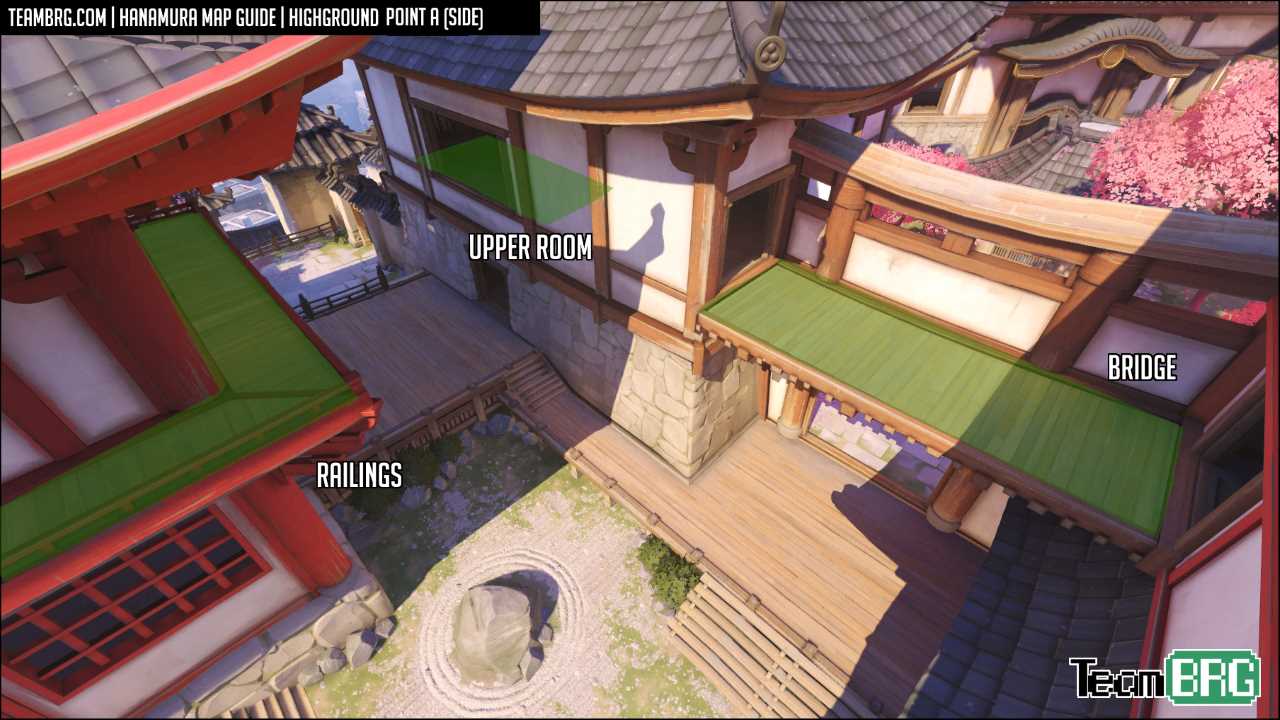
Hanamura A: High Ground
Here we discuss all the relevant high ground in and around Hanamura Point A. Click on the images to familiarize yourself with them, and the boxes below for notes.

Wooden Platform is the most used high ground. It’s accessible and gives a great view of ALL relevant areas, unless the fight gets really thick in the cliffside of Point A. You even have access to a big health nearby, and easily shift position to shoot cliffside flankers.
Cons: Cannot shoot while in/near cover. It’s quite exposed.
Cliffside Rooftop is an amazing high ground spot but difficult to access. While it doesn’t have cover in the classical sense, it’s very easy to LoS would be attackers by moving back a bit and/or crouching. You can quickly get to TWO big healths here. This place is GODLIKE.
Cons: Can’t shoot into Point A itself – but you can easily shift to Wooden Platform!
Railings provide some insane tactical positioning. It goes ALL THE WAY AROUND POINT A! You can LoS in the corners for cover fire, or hang out here to catch a breather. It’s not often that high ground also grants good map mobility.
Cons: It’s kind of exposed, especially if the garden isn’t yours – but this is always a path you should be AWARE of, and leverage if your character allows it.
Flank Pillar is usually used by the attacking team. Hanging out here while your team brawls on point can be devastating as Junkrat or a sniper. The small rectangular holes on the gate also serve a similar purpose to those who can reach it.
Cons: It can’t really be used in many scenarios. Most times you’re a sitting duck here.
Bridge: I don’t use this often, but on paper it’s a great place. Decent cover by the doors, and access to a couple small health packs. You can easily transition from here to many places.
Cons: Ehh… I can’t put my finger on it. It’s a great place to be on paper but I struggle to find myself here in live games. Thoughts are appreciated.
Upper Room: Is usually used by Torb/Bastion… this offers a great PoV on Point A itself. This is more of a niche spot as its usefulness heavily depends on the enemies positioning. It’s great when they’re stacked on A – but pretty terrible any other time.
Cons: Heavily dependent on enemy team positioning. Narrow transition options.
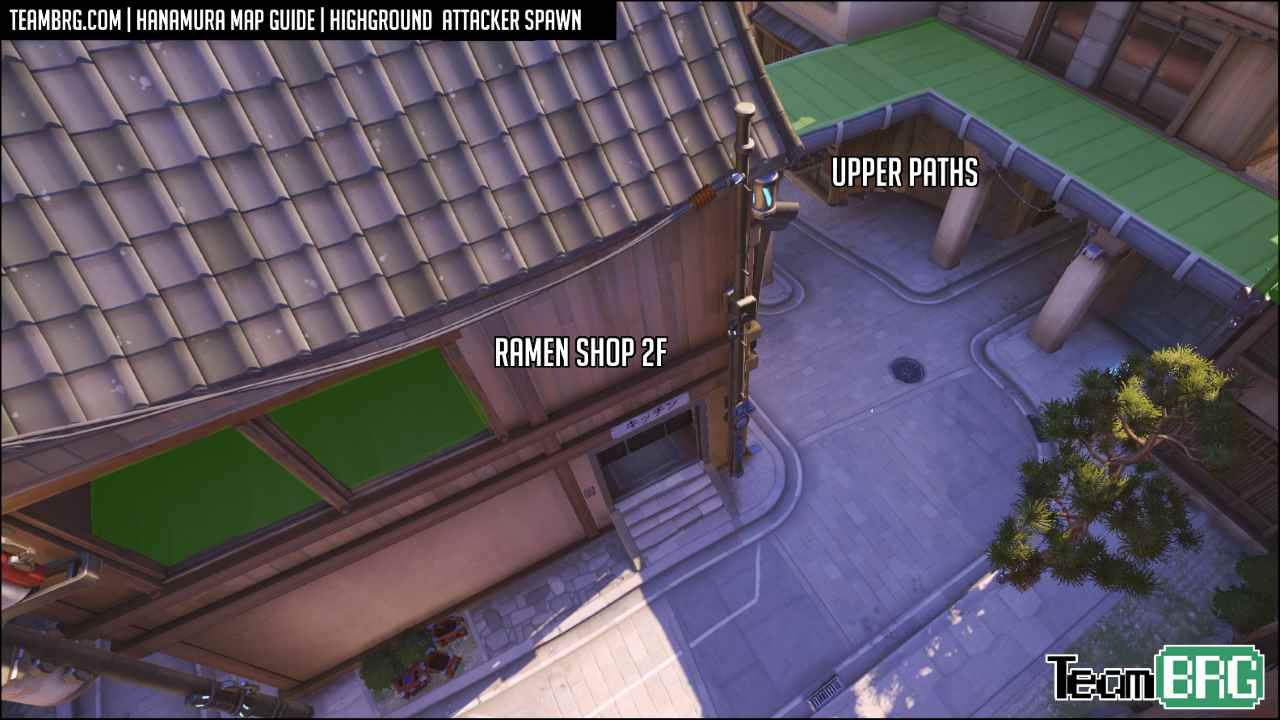
These are rarely used, but let’s talk about ’em anyway.
Ramen Shop 2F is where you’d often see snipers in the early game trying to get a pick. It’s also used by sneaky dudes to backstab the attacking team.
Cons: You can’t really go anywhere meaningful from here. Mostly a sniper perch.
Upper Paths… AKA “Annoying flanker heaven”, we’ve all seen a Genji harass the bejesus out of our team using the upper paths. It’s very notable that you can easily access ALL the attacker spawn health packs from here. This is honestly a great place to disrupt teams that love to siege from the gate.
Cons: It’s a very niche spot only suitable for flankers.
Consider supporting TeamBRG on Patreon!
Attacking Hanamura A
Main Gate in Hanamura A: BUSTING THROUGH!
Going center (garden)? Is not very wise… it heavily depends on many factors. As you walk you will be vulnerable from all sides and unless your assault is FAST and without hesitation a full frontal assault on Hanamura A isn’t a good idea. Only for more coordinated teams.
Haphazardly going forward is saying “I want to fight an uphill battle and win”. While this may or may not go your way – more often than not you will be punished for your arrogance.
Apply pressure first before proceeding. This is very popular with the “dive comps” using Winston and Genji. Contesting the garden and surrounding highground means they must draw attention AWAY from the main gate.
Going left (cliffside) is the best option all things considered! It’s something that should be practiced more. It’s difficult to fire onto this area, and is easy to dig your heels into. There’s two big and a small health pack here too. Reaching the point from here automatically gives your team high ground!
There’s so much you can do here especially with a siege heavy composition. The defense can only respond one of two ways…
Try and follow into the cliffside is a pseudo suicide mission now that your team occupies this area. This is what most of the defenders assigned to main gate will do, and it isn’t often that it will end up well for them.
Turtle in Point A is the other option and only because it’s the very last place afforded to them. You have high ground here, and you are very favored to win this fight.
If their team splits their reaction between the two? You’ve already won.
Going right (gatehouse)? Is so-so. Entering the gatehouse is only half the battle! The more important part is where to go from the gatehouse?
Exiting the other door to the garden/courtyard is only slightly better than continuing your forward assault from the main gate.
Upstairs? Is okay, it’s better than just exiting from 1F. The Bridge is great high ground, but the time investment it takes to get up here after such an obvious assault gives the enemy team much time to reposition. The end goal here is the Side House.
Making your way to the Side House area is always a solid choice (no matter how you end up getting there), and you’re likely forcing the defending team to pile up and turtle in Point A which is a good thing. From here it will devolve into an outright BRAWL, and 50/50 is a good a chance as any – given how we will respawn and walk back faster.
Going to the courtyard is great for a “breather” for the more mobile characters. Skirmishers can also bait people into chasing here and getting a duel kill. This substrategy relies solely on the defenders making an arrogant mistake. Last I heard, relying on enemy misplay is a bad idea. This does give a very safe way to enter the sidehouse.
The problem with going right from the main gate is “friction”. There’s simply too many lines of attack that your team might fall apart just “getting there”.
More about the “right side” (Gatehouse / Sidehouse / Courtyard) in the flanking section.
Flanking or Diving Hanamura A
Flanking Hanamura A Is not for the faint of heart in this map – as you will likely be seen no matter how you enter – losing the element of surprise, running the risk of enemies piling up on you, and depending on team coordination they might leave you out to dry once you’re in since they can’t break the main gate.
Success isn’t enough – even if you pick one guy off (a huge success), your team may not switch gears and capitalize this opportunity, or end up dying uselessly at the gates. Communicate with them!!!
Going here is the ‘default’ flank objective, since a vast majority of the defenders will not have line of sight here. By contesting this area, you can easily split up the enemy defense, or go for a more fair 1v1. Make this 1v1 UNFAIR by taking the two big and 1 small health pack here!!! This can serve as the first step of releasing pressure from main gate.
Getting out of here is no easy task once you’re knee deep behind enemy lines. So make sure you don’t end up being the pick – instead of the one picking off.
While you wont find yourself here via “conventional means”, the right side has great lines of attack for flankers and skirmishers alike.
Courtyard is a great place to “rest up” – there’s a big health pack right in the middle. While it would be great to bait out one of the defenders here, don’t count on it. (A little note on that – if one of the defenders chase you here, it’s already a “win” for your team)
Side House is a strong position to take after going right, however you reach here. You can go straight up to Point A – or go to the upper rooms to harass. There’s cover here, and you can reset to the Courtyard for health and baits.
the far right areas are great for flankers but the main downside to this zone is the difficulty for a single-man strike force to get here – but remember the above notes in the odd event you DO find yourself here.
Hanging around in this place represents a huge unknown for the defenders. Running away to here sure beats dying in and around the right side of the garden.
Hanamura Map Strategy Guide: (P1): Point A | (P2): Point B
Hanamura Point A: General | Attacking Strategy | Defending Strategy
Defending Hanamura A
Never give up the gate for free: it’s very easy to harass the gate with any character, from almost any defensive position. At the very least, it gives you good insights on what the attackers are trying to do.
Always watch the flank window: Most would-be flankers will show their ugly faces here – don’t be caught off guard – and ask teammates for help. Having a guy in Cliffside Rooftop severely hurts the chances of any would-be flanker.
Hanamura Map Strategy Guide: (P1): Point A | (P2): Point B
Hanamura Point A: General | Attacking Strategy | Defending Strategy
Hanamura Point B Strategy
Ahh, this point has its own fair share of notoriety. Assaulting Hanamura B can seem very daunting. It heavily favors defense. Unlike more brutal point B’s like Volskaya or Anubis – Hanamura B is a little more interactive and can easily reward finesse from either side.
Walking back to Point B itself after spawning:
Attacker (average) will take: 23 seconds walking time.
Defender (average) will take: 9 seconds walking time.
Hanamura B Key Locations
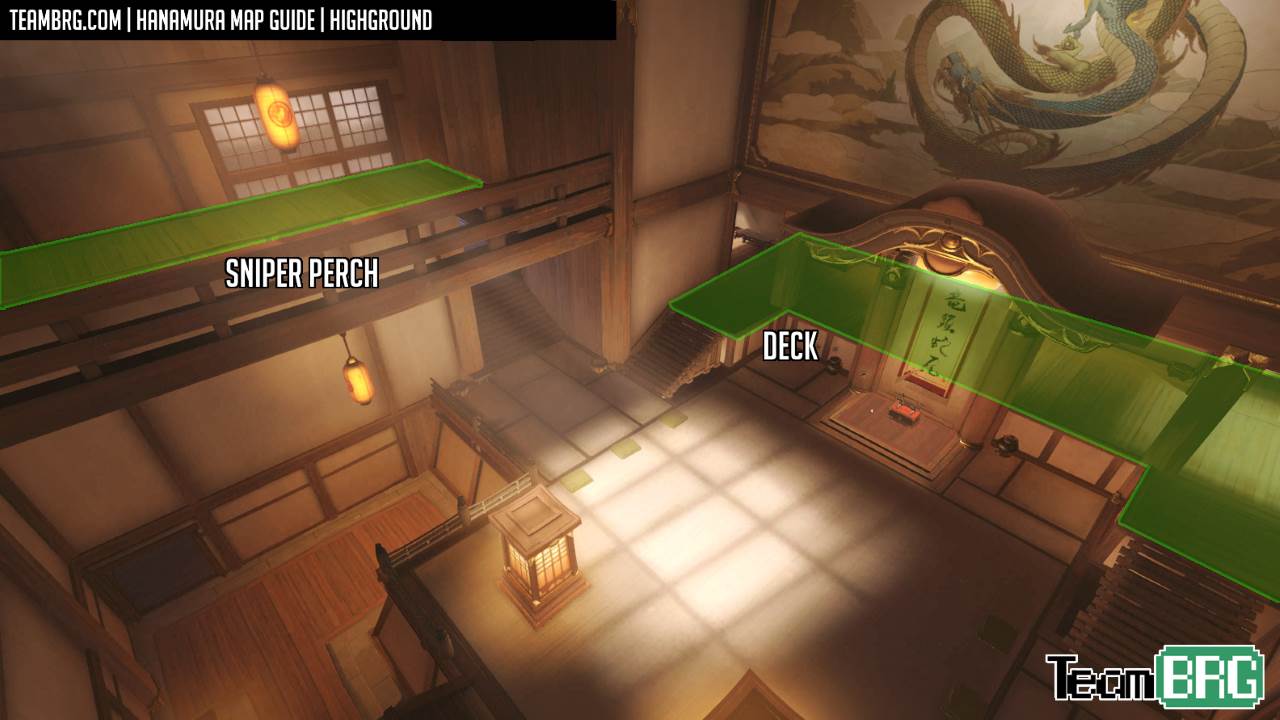

Hanamura B High Ground
There isn’t much high ground ’round these parts…
Upstairs Room – or simply “Upstairs” is the most important high ground in Hanamura B. We’ll be talking about this place quite a bit in the segments below.
Entrance Ledge (Left, Right) – Largely used as a transitional area. Lots of scrappy fights happen here. A defender here while you’re pressing for the point is devastating as it’s a straight up high ground backstab.
Windows (Left, Right) – I guess this has to be mentioned too… it’s an extension of the ‘entrance ledge’ but only serves as high ground in terms of scouting / harassing courtyard.
Sniper Perch – is pretty rarely used. It’s very unaccessible, there’s no meaningful cover and is basically worse than the Upstairs Room which is just opposite to it. Just keep in mind that it exists, in the rare moment you may need it.
Deck – this is still technically high ground, and I’m sure we’ve all been here peeking and taking potshots at the attackers on-point. This is the literal last line of defense and I’m certain that we’ve all been here at one point to know that this is indeed the final advantage you should abuse.
Attacking Hanamura B
Remember that there are only 3 true means of entry: Upstairs Room, Frontal and Veranda. While attackers can leverage various ways to transition from one of these places, those three mentioned entrances are the main vectors when speaking of attack paths.
Upstairs Room is a very key location for both sides, and as such will be discussed in quite a few segments here in the Hanamura B page. For now, all I have to say is walk up here and LOOK at what you can see. As an attacker your presence here severely limits the movements and advantages the defense can have.
Frontal (Main Gate) – Unless you’re going STRAIGHT DOWN THE MIDDLE this place should be avoided. Why? If you wanna go “right immediately” this ends up in either Upstairs Room or Downstairs Room… so why not start the assault from a much less telegraphed path? The side entrance takes you to either the up or downstairs room anyway!!!
Overall this is just poor unless you’re going for a speedy blitz.
Veranda is a strange place to wholly focus your offense to. It’s very comparable to the front gate assault with a very clear pro and con.
- Veranda PRO: Once here you’re VERY close to the point.
- Veranda CON: Actually getting here. It’s very impractical to walk here without taking the jump from across the spawn.
Realistic use? Getting back ASAP for mobile characters. If things have devolved into an all out meat grinder fest I often find myself going thru the veranda route which is a blistering fast method to return to the point – switching character if I have to.
If you find yourself here – have an escape plan ready. If you’re just poking and harassing here you have to be very aware when to call it off and run. The defense runs very little risk sending in a 2v1 here to kill you quickly.
Upstairs Room for Attackers
Defending Hanamura B
There’s a lot of entrances here – you want to be able to react to an attack from ANY of them. Or at least most of them… Choose your defensive position wisely.
Upstairs room should always be yours: or at least represented by your team. Losing this immediately opens up a backstabbing flank, and a full-view highground! This is arguably the most important position for Hanamura B defense. You can easily walk back to spawn for a heal if desperate!
It’s very easy to transition from here into an all out brawl down below, which is a very likely scenario for Hanamura B. Squishier characters can just walk down the stairs and fight from the deck, which is still highground!
Like us on Facebook for more guides.
Help the site out! Check out Patreon for more details!
 S28 | 2.7.5")
 S28 | 2.7.5")
 S28 | 2.7.5")
 S28 | 2.7.5")
 S28 | 2.7.5")


 S28 | 2.7.5")
 S28 | 2.7.5")
 S28 | 2.7.5")
 | 2.7.5")


Man this is dope as fvck! hope you do more map guides like this one.