Hey guys! Welcome to our Necromancer’s Bones of Rathma Set Dungeon Guide. Here we will talk about what build to use, skills, items, notes, map and more!
Last updated: S28 Mar 03 ’23: This one got… weird. Reworks and the passing of time hasn’t been kind to the “balancing” of this set dungeon and it can actually be “impossible” to clear in the intended manner without EXTREME CDR. I added 2 paths for you to clear this dungeon easily. Fixed formatting, clarified location, just some minor updates.
Bones of Rathma Set Dungeon Guide: Build | Location & Map | Tips
Bones of Rathma Set Dungeon Build
| Bones of Rathma Set Dungeon Build | ||||
| Items | Skill & Rune | |||
| Head | Rathma’s Skull Helm | Command Skeletons | Frenzy | |
| Shoulder | Rathma’s Spikes | OPEN | OPEN | |
| Chest | Rathma’s Ribcage Plate | Revive | Personal Army | |
| Wrist | Open | Blood Rush | Potency | |
| Hands | Rathma’s Macabre Vambraces | Army of the Dead | Any | |
| Belt | Cpt Crimson Set | Command Golem | Flesh Golem | |
| Legs | Rathma’s Skeletal Legplates (Cpt Crimson) | Passives | ||
| Boots | Rathma’s Ossified Sabatons | Dark Reaping | Fueled by Death | |
| Neck | Open | ANY | ANY | |
| Ring | Circle of Nailuj’s Evol | Kanai’s Cube | ||
| Ring | Open | In-geom (Messerschmidts) | ||
| Main | Messerschmidts (In-geom) | Leoric’s Crown (- Use Diamond!) | ||
| Off | Open | Any / RoRG | ||
| Legendary Gems | ||||
| Need more CDR? Gogok Of Swiftness | ||||
| Irrelevant. Toughness? Molten Wildebeests Gizzard | ||||
| Irrelevant. DPS? (Powerful / Trapped etc) | ||||
Options & Notes:
- The “Open” slots are irrelevant and can even be yellows. There’s no “must” in that slot.
- Being TOO STRONG might be a problem, since your guys need to hit enemies quite a few times to get the cooldown objective… not a huge problem.
- Weird balancing issues plus the set rework cause this dungeon to play out a little weirdly. More on this in the notes below. The OPEN skill slot and many open build slots come into play here.
- This dungeon is all about CDR. Try to get as much of it as possible.
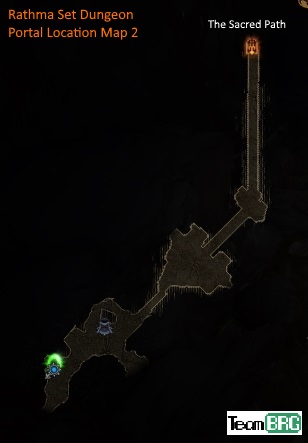
Bones of Rathma Set Dungeon Location & Map
Where’s the Bones of Rathma Set Dungeon? It’s located in Act II Sacred Path.
- Teleport to ACT 2 – Temple of the Firstborn Level 1. Upper-right-ish waypoint.
- Enter The Sacred Path (the door right “behind” you).
- Keep walking down this path. There’s actually no other way to go, lol.
- Portal should be on the left side, before the exit.
The Bones of Rathma Set Dungeon Map / Layout?

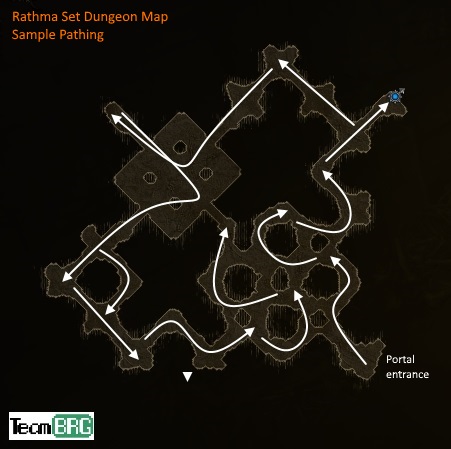
Map & Pathing
Familiarize yourself with the map first. A sample path is shown above.
- The map is small with no dead ends so don’t worry. It’s a big loop with shortcuts.
- Go right and clear those tunnels until you reach the central square.
- Fully clear this square then exit left.
- Clear these left tunnels and youll be back where you started.
- Finally, clear this place as its a little messy over here.
- Search for stragglers if any, the map is really small.
How to Beat & Master Bones of Rathma Set Dungeon
Rathma’s Set Dungeon is so easy to master. Just don’t forget to trigger the skills needed to complete the objectives (duh). And just be aware of those ramming bulls. Try not to get hit!
Objectives, Tips, Notes
PROTIP: Weird dungeon balance and set rework made this… weird.
To complete this set dungeon in the way this was “intended”, you’re gonna need a lot of help to get as much Cooldown Reduction as you can. Messerschmidt’s Reaver, In-geom, and Captain Crimson come to mind. CDR in some of your gear, and a good diamond + maybe a Leorics Crown on your head… Gogok. This is easy enough IF you have the items for it…
The way to “cheese” this with another skill is: to do it “naturally” and getting the both objectives done with, then simply using another skill (backed up by a lot of powerful legendary bonuses) to quickly clear the rest of the dungeon. You would need a couple meaningful legendaries to boost 1 skill to do this. Something like Bone Spear + Maltorius + Cycle, or Blood Nova + Blacktide + Funerary or something.
Objective: Accumulate a total of 500 sec cooldown reduction on Army of the Dead.
The 2 piece bonus is what triggers this objective. As long as your minions attack, you get 1 second of cooldown refunded. So there’s really no practical way to cheese this, as well as no real reason to cheese this either – as you should get to do this semi-naturally.
The only issue you may have is your minions one-shotting too many enemies. So be wary of being too powerful – it’s very easy to scale down so don’t worry.
Objective: Revive 100 Corpses.
This needs no explanation. Spam your Revive to raise minions. You need to do this more than you would “naturally”, so try to get this objective done asap so you can return to your normal reviving pattern.
Random fact: this used to be “Revive 100 Skeletal Mages”, pre Rathma rework.
Rathma Set Dungeon – Summary and Closing
Rathma’s Set Dungeon – Mastery: Is a bit weird because the set dungeon didn’t exactly stand the test of time with the various reworks and balancing since it released. While not difficult by any means, it just requires either a lot of CDR, or a straight up “different skill cheese build”. But, honestly, whichever path you choose shouldn’t prove to be hassle. Good luck!
Bones of Rathma Set Dungeon Guide: Build | Location & Map | Tips
Check our our D3 Guide Directory for any Necro and other D3 classes guides.


 | 2.7.5")

managed to get the mastery with your adivce thanks for the tips
just learned that there is a second spot where the dungeon portal spawns.
I was doing bounties and it showed up in Ancient Cave (Dalgur Oasis, A2).
Obviously, this is not as reliable as the normal place, but i thought nice to know.
Really? Interesting… But I think it’s better if we just follow the clues from the page 86 tome leading to the Rathma set dungeon.
Great guide, especially the map layout and recommended route 🙂
I just let my commadn skeletons (without activating them) smack minions from the start of the dungeon, until I had most of the 500 sec CD, then used Land of the Dead with Devouring aura to spam around 60 mages, I did this twice to get the 100 mages then just ran through the last 1/4 of the map killing of remaining enemies. Mastered on second try 🙂