Hey guys! Welcome to our Inna’s Mantra Set Dungeon Guide. Here we will talk about what build to use, skills, items, notes, map and more!
Inna’s Set Dungeon Guide: Build | Location & Map | Tips
Inna’s Set Dungeon Build
| Inna’s Mantra Set Dungeon Build | ||||
| Items | Skill & Rune | |||
| Head | Inna’s Radiance | Way of Hundred Fists | Assimilation | |
| Shoulder | Lefebvre’s | Cyclone Strike | Implosion or Wall of Wind | |
| Chest | Inna’s Vast Expanse | Epiphany | Desert Shroud | |
| Wrist | Gungdo Gear | Dashing Strike | Way of Falling | |
| Hands | Inna’s Hold | Mystic Ally | Earth Ally | |
| Belt | Inna’s Favor | Exploding Palm | Any | |
| Legs | Inna’s Temperance | Passives | ||
| Boots | Crudest Boots | Fleet Footed | Beacon of Ytar | |
| Neck | Hellfire (Any) | Unity | Seize the Initiative | |
| Ring | Obsidian | Kanai’s Cube | ||
| Ring | Jordan (Any) | In-geom | ||
| Main | Inna’s Reach | Leoric’s Crown (more CDR!) | ||
| Off | – | Ring of Royal Grandeur (if no Inna’s Reach) (Any) | ||
| Legendary Gems | ||||
| Gogok of Swiftness | ||||
| Trapped (Irrelevant) | ||||
| Powerful (Irrelevant) | ||||
Options:
- Too Strong? Remove one of these to prevent accidental kills: green gems in your armor, Inna’s Reach or Crudest Boots.
- Ice Climbers!? Isn’t “necessary” but if you’re lazy or bad…
- DO NOT USE Bindings of the Lesser Gods – it will surely cause accidental kills!
- Leoric’s Crown with the highest Diamond you can combine for higher cooldown reduc!
I had success using the WAVE OF LIGHT COMBO, it’s an option! WoL Combo: Incense Torch, Pinto’s Pride, Kyoshiro’s Blade (In-geom). It’s an ok choice for those unfamiliar with Inna EP playstyle.
Support TeamBRG in Patreon!
Inna’s Set Dungeon Location & Map
Where is the Inna’s Set Dungeon? It’s located in the ACT II – Flooded Causeway
- Teleport to the Act II Town – Hidden Camp.
- Walk up and zone to the Caldeum Bazaar.
- Walk straight then left and down and you’ll find the entry to the Flooded Causeway.
- Just head straight a bit then go right.
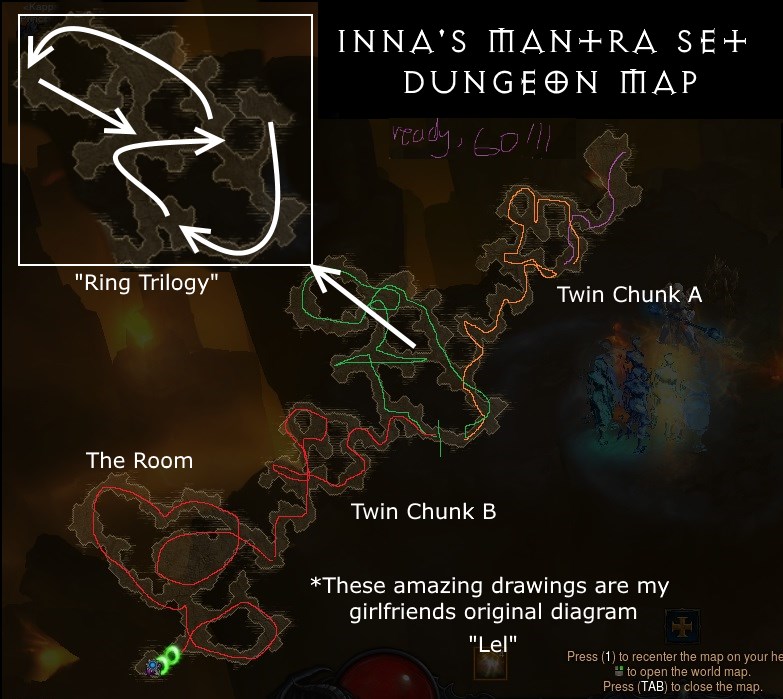
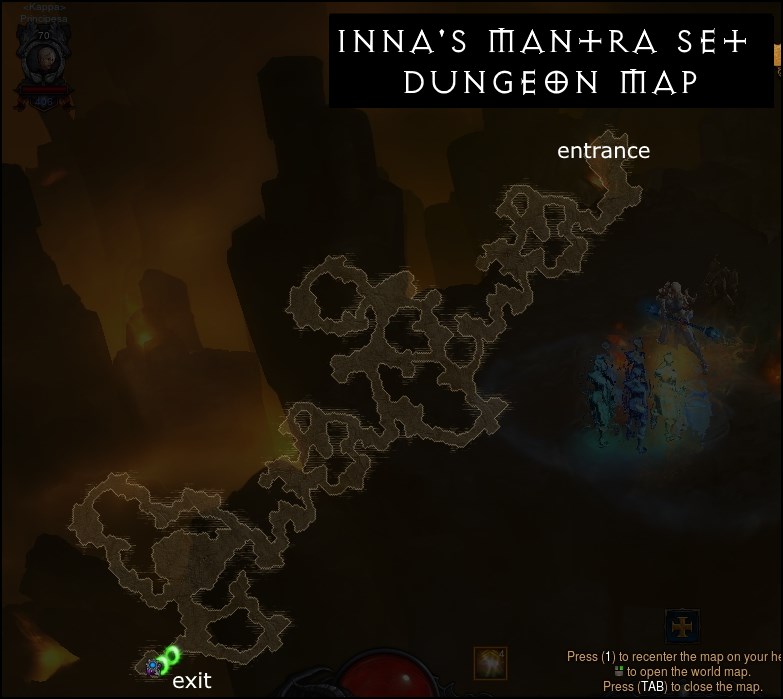
Inna’s Mantra Set Dungeon Map / Layout?
How to Beat & Master Inna’s Set Dungeon
10 yard is smaller than you think, which this dungeon will cement in your mind…
Map & Pathing
Familiarize yourself with the map first. A sample path is shown above.
- Opener” Twin Chunk A” has 2 “rings”
- “The Ring Trilogy” has 3 “rings” (undoubtedly),check the image above for how to tackle this part. Dashing Strike to cover ravines and cut corners is important.
- “Twin Chunk B“, as its name implies, has the same layout as the opener.
- Finally, clear the big room and make the two final loops in “The Room“
Not much to say here, but i’ll stress the importance of abusing Dashing Strike.
Tips & Explanations
Objective: Unleash your Mystic Allies on 10 enemies within yards (5 times)
BEING TOO STRONG is a problem in this dungeon. Having your allies kill the little guys is a sure way to failure. There’s lots of ways to mitigate this as discussed in the options above. Removing Inna’s Reach (recommended) or remove Crudest Boots (avoid this if you can…), these are you main power sources.
Cyclone – Dash/Walk – (Repeat to gather) – Mystic Ally
That’s the basics of herding and killing. 10 guys isn’t a lot – but the range you need them in… it’s really damn close. Do it a few times and you’ll get the “look” of when it’s right.
Objective: Do not get frozen for the duration of the dungeon
Ice objective? Ice Climbers (and optionally, Talisman of Aranoch) completely nullify this, but it shouldn’t even be that much of a concern. You can use Serenity if you’re tight on build space.
Obsidian Ring of the Zodiac is a valuable item to have. Reduces the cooldown of both your Mystic Ally and Dashing Strike, it’s a small boost but welcome.
Yellows with Cooldown Reduction: Since the accessories don’t really matter here, you can craft rings/amulet with CDR, as you might not have them on hand.
Gogok of Swiftness: I sound like a broken record old by now but yeah, CDR helps.
Wave of Light package note: What’s really nice about this off-shoot setup is you won’t be seeing accidental kills, and makes clearing the dungeon when you’ve completed the objectives easy! If you’re having a hard time wiping the map – try it.
Inna’s Set Dungeon Guide: Build | Location & Map | Tips
You might find these Monk Guides useful:
- Monk Speedfarming Builds & Primer
- Monk Best Speedfarming Build
- Harmony (Passive)
- Inna’s Mantra | Inna’s Set Dungeon
- Raiment of a Thousand Storms | 1000 Storms Set Dungeon
- The Monkey King’s Garb | Sunwuko Set Dungeon
- Uliana’s Strategem | Uliana’s Set Dungeon
Check out our D3 Guide Directory for other resources.
We hope our guide got you even 10 yards closer to clearing Inna’s Mantra Set Dungeon.


 | 2.7.5")

I have found that the fires solutions almost always make these set dungeons easier… I used it anywhere you mentioned it… and the one where you mention it but say that you didn’t want to base the solution on that (because it was kind of off the set – maybe it was uliana [dont remmeber]) it was absolutely crucial… I would start listing those… They are just so much easier for the mass clears at the end.
It (Fires) practically turned this into a super easy vs a semi-hard.
Ever since set dungeons were nerfed the “fires” solution does seem to fit the bill more often than not. I’ll have another look at all the monk set dungeons and see what’s best. Thank you!
Objectives still missing for this set dungeon.
objectives added
nice guide but this set dungeon is the worst shit ever. alex sulman should die
Could you show what the Set Dungeon objectives are 😉
I can slightly make up from the notes, what the objectives are, but stating them clearly will be of big help. Thanks
oh never noticed the objectives weren’t included for this. will rectify that! thanks!