Hey guys! Welcome to our The Wrath of the Wastes Set Dungeon Guide. Here we will talk about what build to use, skills, items, notes, map and more!
Wrath of the Wastes Set Dungeon Guide: Build | Location & Map | Tips
Wrath of the Wastes Set Dungeon Build
| Wrath of the Wastes Set Dungeon Build | ||||
| Equipment | Skill | Rune | ||
| Head | Helm of the Wastes | Rend | Ravage | |
| Shoulder | Pauldrons of the Wastes | Whirlwind | Any (Hurricane) | |
| Chest | Cuirass of the Wastes | Ground Stomp | Wrenching Smash | |
| Hands | Gauntlet of the Wastes | Leap | Call of Arreat | |
| Legs | Tasset of the Wastes | Sprint | Gangway | |
| Feet | Sabaton of the Wastes | War Cry | Veteran’s Warning | |
| Belt | Krelm’s Buff Belt | |||
| Bracer | Open | Passives | ||
| Amulet | Ess of Johan (Open) | Unforgiving | ||
| Ring | Open | Ruthless | ||
| Ring | Zodiac | Pound of Flesh | ||
| Weapon | Bul’Kathos’s Solemn Vow | Open | ||
| Off-hand | Bul’Kathos’s Warrior Blood | |||
| Legendary Gems | Kanai’s Cube | |||
| Gogok of Swiftness | The Furnace (Open) | |||
| Wreath of Lightning (Open) | Lut Socks | |||
| Taeguk (Open) | Skull Grasp | |||
Options & Notes:
- The “any” slots are irrelevant and can even be yellows. There’s no “must” in that slot.
- Ditch your follower, more often than not it will interfere with the “gathering”.
- Enemies are SERIOUSLY SOFT, you may accidentally kill them while clumping them.
- Reduce your power if you have to.
- I choose furnace because the elites are pretty fat compared to the regular enemies.
Wrath of the Wastes Set Dungeon Location & Map
Where’s the Wrath of the Wastes Set Dungeon?
- Teleport to waypoint Pandemonium Fortress I
- Walk “backwards” towards the previous map.
- After a few thin corridors you’ll see it – you can’t miss it!
The Wrath of the Wastes Set Dungeon Map / Layout?
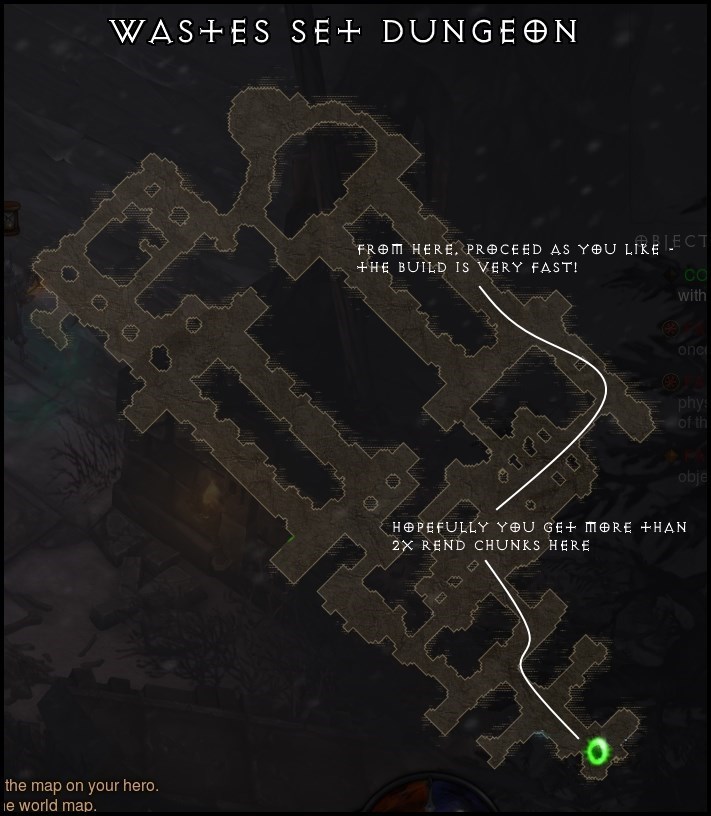

How to Beat & Master Wrath of the Wastes Set Dungeon
Map & Pathing
Familiarize yourself with the map first. A sample path is shown above.
- Path towards the big room – COMPLETELY clear this.
- Completely clear the entire right side “II”
- from above, clear the left side “II”.
- Wipe out stragglers.
Pathing information isn’t that important for Wastes set dungeon. You move EXTREMELY fast. You are only bottle-necked by the Rend objective – once that’s done you will blaze through!
Tips & Explanations
Objective: Do not get hit by Physical Damage: HAHA! You read it right. You can reword this to “do not get hit by anything”, including the guillotine scythe things!
So, the best way to achieve this is via heavy CC. Which is why I have Ground Stomp-Wrenching Smash and Leap-Call of Arreat + Lut Socks. Both of these skills interrupt their hits, while also gathering guys (relevant to the next objective).
Sprint-Gangway is great! It stuns enemies around you passively, for just enough time for your purposes…
There’s no magic bullet to solve this. Awareness, patience and perseverance! Having high latency sucks for this objective – trust me I know…
Use 3x Leap to easily get past the blades!!!! Hands down, this is probably the worst set dungeon objective in the entire game.
Objective: Rend 10 Enemies 5 times: This can be so-so depending on how your map spawned. Sometimes the creeps are just so spread out!
Like I mentioned earlier, Wrenching Smash and Call of Arreat do the heavy lifting here. Threatening Shout-Demoralize helps you taunt a few guys just for that little bit of extra grouping.
We use the Ravage rune simply to increase the width of our Rend to tag more guys.
Once you finish this objective – you can completely wreck the dungeon FAST.
Wrath of the Wastes Set Dungeon Mastery: Isn’t bad at all. The OBJECTIVES themselves are annoying, but once you snag those two, this build is UNBELIEVABLY MOBILE and you will have 0 problems sweeping up the stragglers. Mastery isn’t the hard part at ALL.
Use 3x Leap to easily get past the blades!!!!
Wrath of the Wastes Set Dungeon Guide: Build | Location & Map | Tips
Check our our D3 Guide Directory for anything else you might need! The Wrath of the Wastes Set Dungeon can be very frustrating but hopefully these suggestions will help you out. Leap really helped me here.
Don’t forget to like us on Facebook for more D3 and other gaming updates!


 | 2.7.5")

Lies! Literally walked backwards from Pandimonium Forest WP no portal anywhere that map you show is not the map I see. I cleared ENTIRE map
Hi Darren. I uploaded a video on how to get to the Wastes Set dungeon portal (haven’t edited to video yet just to show you where the portal should be). Make sure you have the complete 6 set or RoRG
I don’t usually post comments, but I love your guides. Just wanted to add 2 suggestions:
1. Put Madawc’s Sorrow in the cube instead of Furnace.
2. Since small mobs are so squishy, I put diamonds in both weapons.
300k sheet damage seemed to be almost too much.
I didn’t have any Fury issues with the weapons you suggested. But if someone is having Fury issues, the passive “Weapons Master” with Mighty weapons equipped can be very helpful as well.
Thank you again for all your guides. Really appreciate it.
* Update:
– Madawc’s Sorrow in cube {tried In-geom per Quin69, but 15 seconds of use wasn’t helpful to me}
– Diamond’s in both weapons for 40% Elite dmg
– Replaced Threatening Shout with Warcry: Veteran’s Warning for +30% Dodge.
– used RoRG and Illusionary Boots
(took me less than 10 tries when i made these changes)
Tactics:
– watched Quin69’s YouTube video for this set dungeon.
– used Sprint: Gangway as I approached a group, especially when visibility wasn’t good.
– used Leap: Call of Arreat x2 or x3, then well placed Ground Stomp, Rend x1, WW until dead.
– vs. Elites: Leap x1, Rend x1, WW as I moved away to avoid being hit randomly; Dust Devils from WW would kill it off worse case scenario.
– also used Sprint when Leap/Ground Stomp were on cooldown.
– I only used WW as I went through the 4 trapped tunnels, pausing before each blade to time my movement through it; this allowed me to safely kill everything without mobs getting swings; I used Leap through this area once the mobs were dead {using leap then WW to kill mobs within the tunnels got me hit once; not sure how exactly; don’t think it was a blade}.
– worked best when I was able to get 3 Rend Objectives in the first Large main room; just reset if you don’t get at least 2 Rend Objectives here, IMO.
– able to get 1 Rend Objective in the Rectangle shaped rooms at the top/bottom of each long blade-trap corridors (depending upon spawn).
– able to get 1 Rend Objective in Arena/circle room at top of map (depending upon spawn).
– able to get 1 Rend Objective in another Rectangle shaped room that is at the left-bottom side of the map that runs parallel to the long trapped tunnels (depending upon spawn).
Possible Group Tactic:
– lower your damage as much as possible.
– Leap, Leap, [Leap], Rend, Sprint, runaway, hopefully rend doesn’t kill the mobs… wait for Rend to run its course, jump back in and repeat vs. the same mobs. I tested this a few times, and was able to get credit for Rending a mob a second time, after a short internal timer, maybe ~5-10 seconds.
– this worked when I had a lot of mobs in the large main room; had to Leap and Sprint out asap so mobs wouldn’t leave the large room.
– once you get your Rend Objective done, have a buddy kill everything.
– you could try to solo it via this method, but I don’t think you’d have time.
The significance of the room is that the last enemy can be there. Lots of people fail this dungeon because they don’t know about it and there’s one enemy left. Probably less an issue now that there’s more time.
Interesting…. Never knew this… thanks for the info!
I’ve mastered 26/28 dungeons solo, even Uliana’s and Roland’s, but I’m at 200+ tries for this one and can’t even get the basic objective done. Out of frustration and still wanting the mastery wings, I’d even pay someone to do it for me, at this point…
There is a small room on the top right off the map. You walk through the wall to get to it. I have a screen shot to show where if i had a place to send it.
Where’s the room and what’s the significance of this room? Maybe you can send it through our Facebook page. Thanks