Hey guys! Welcome to our Necromancer’s Pestilence Master’s Shroud Set Dungeon Guide. Here we will talk about what build to use, skills, items, notes, map and more! This one is incredibly easy, but requires you purposefully nerf yourself in a specific way. Onward!
Last updated: S28 Mar 03 ’23: Since ancient times the power of Corpse Lance actually can become a problem in this set dungeon. Added some advice to mitigate that, as well as clarified other notes here and there.
Pestilence Master’s Shroud Set Dungeon Guide: Build | Location & Map | Tips
Pestilence Master’s Shroud Set Dungeon Build
| Pestilence Master’s Shroud Set Dungeon | ||||
| Items | Skill & Rune | |||
| Head | Pestilence Mask | Bone Spear | Teeth | |
| Shoulder | Pestilence Defense | Devour | Devouring Aura | |
| Chest | Pestilence Robe | Blood Rush | Potency | |
| Wrist | Open (Guardian) | Bone Armor | Thy Flesh Sustained | |
| Hands | Pestilence Gloves | Command Golem | Flesh Golem | |
| Belt | Open (Guardian / Dayntee) | (Open) Decrepify | Wither | |
| Legs | Pestilence Incantations | Passives | ||
| Boots | Pestilence Battle Boots | Serration | Overwhelming Essence | |
| Neck | Open | Dark Reaping | Stand Alone | |
| Ring | Open Unity | Kanai’s Cube | ||
| Ring | Open | Scythe of the Cycle (Maltorious’ Spike) | ||
| Main | Maltorius’ Petrified Spike (Cycle) | St. Archews / Golemskin Breeches | ||
| Off | Open | DPS? Johnstone. Toughness? RoRG / any | ||
| Legendary Gems | ||||
| Need shields? Molten Wildebeest’s Gizzard | ||||
| Need defense? Moratorium | ||||
| DPS? Bane of the Powerful | ||||
Options & Notes:
- The dungeon is incredibly easy and you only really NEED Pestilence 6. Use literally every other slot to cover for your “weaknesses” either needing more DPS or toughness.
- You DO, HOWEVER – NEED TO NERF YOUR CORPSE LANCE TO THE GROUND. Do not use “general power-ups” like Shadowhook that might bring your corpse lance power too high. Why? You’re gonna end up killing trash with it.
- You only need enough power to one-shot whites, and kill elites in one or two. Heck, you can probably get away being a lot weaker.
- You need some manner of toughness for the objective. But we added some cheesy tech that will be discussed in the segment below.
Pestilence Set Dungeon Location & Map
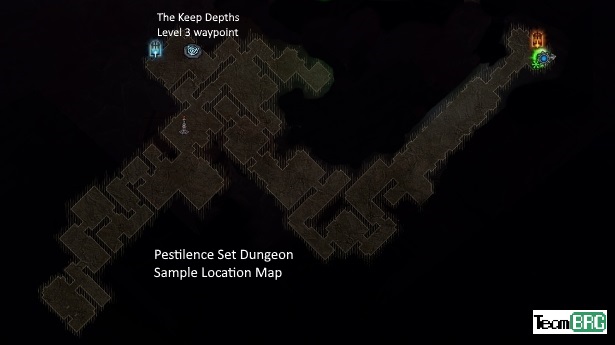
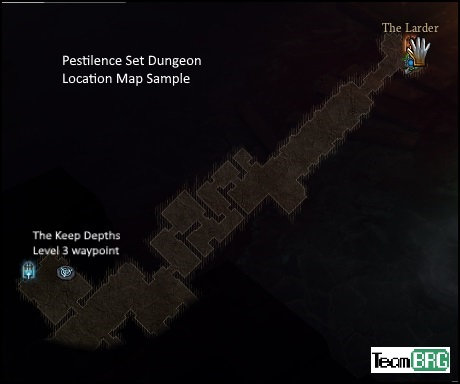
Where’s the Pestilence Master’s Set Dungeon? It’s located in Act III The Keep Depths Level 3.
- Teleport to ACT 3 – The Keep Depths Level 3 (lower left most waypoint)
- Make your way towards east / upper right to the Larder entrance (Ghom room)
- Portal will be on the right just beside the Larder entrance!
The Pestilence Master’s Shroud Set Dungeon Map / Layout?
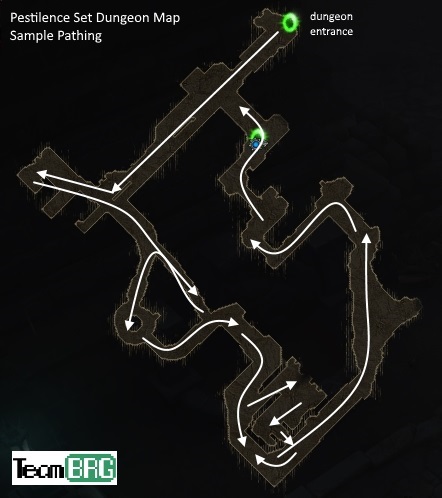
Map & Pathing
Familiarize yourself with the map first. A sample path is shown above.
- It’s a very simple and straightforward map with no BS.
- Enter and press golem ASAP. This gets your your first empowered spears.
- Walk down the hall then clear the little room on the left.
- Continue counter-clockwise (right).
- There’s no more “branching paths” and youll end up where you started. Hopefully, there are no stragglers. If you end up missing something, the map is super tiny so you’ll have no problem backtracking.
How to Beat & Master Pestilence Master’s Shroud Set Dungeon
Objectives, Tips, Notes
Objective: Hit enemies 150x with Empowered Bone Spears.
The only way you’re gonna fail this? Your Corpse Lance killing enemies. NERF IT TO THE GROUND. Do not use legendaries or even avoid gems that give you “Generic power” like Shadowhook, Bane of the Powerful if you don’t need it. You only need enough power to kill enemies quickly with your empowered bone spear.
If you’ve made sure of that then it’s the only way you’re going to pass the dungeon anyway – by killing monsters. I struggle to think how you will clear the dungeon without smashing this objective passively.
Again, just take a little care to nerf your own Corpse Lance.
Objective: Don’t take 400k damage.
If you play carefully, the toughness objective is irrelevant, but to make things a little more “sure”, you can cheese things with SHIELDING via St. Archews Gage (glove), or Molten Wildebeest’s Gizzard’s (LGem)
Proper Rolls: Some armor rolls go a LONG WAY in increasing your toughness – Stand Alone (Passive) works hard here.
That being said don’t be dumb. Don’t simply stand there and get smashed. A little effort goes a long way in succeeding this one. Technically you can get away with taking zero damage with just a tiny bit of care.
NOTE THAT THERE ARE SOME “BUGGY” NECRO SKILLS that increase your MAX HP, when it goes away it may count as damage for the purposes of this objective. None of which are listed in the build, but if you chose other skills this may be a problem you’ll face.
Pestilence Set Dungeon – Summary and Closing
As long as you took care in NERFING YOUR OWN CORPSE LANCE, this should be a breeze. Aside from that the build is SUPER FLEXIBLE, just avoid general power-ups that buff corpse lance indirectly.
Pestilence Masters’s Shroud Set Dungeon – Mastery: The small layout of the Necro dungeons along with the buffed duration on all set dungeons makes this a walk in the park. The damage objective may catch you off guard here and there but there really is no magic solution for that.
Pestilence Master’s Shroud Set Dungeon Guide: Build | Location & Map | Tips
Check our our D3 Guide Directory for anything else you might need!


 | 2.7.5")
