Hey guys! This guide is all about how to beat and master Marauder Embodiment Set Dungeon! Here we will talk about what build to use, skills, items, notes, map and more! This one ain’t so bad… (*cough* worms *cough*). Note that since their release, set dungeon were NERFED and are much easier to complete.
Last updated: S28 Feb 03 ’23: Objective changed to sentry kills (this one automatically completes itself, basically) and refined the format and notes a bit re: location, worms.
Marauder Set Dungeon Guide: Build | Location & Map | Tips
Marauder Set Dungeon Build
| Demon Hunter: Embodiment of the Marauder Set Dungeon Build | ||||
| Items | Skill & Rune | |||
| Head | Marauder’s Visage | Evasive Fire | Focus | |
| Shoulder | Marauder’s Spine | Cluster Arrow | Maelstrom (Any) | |
| Chest | Marauder’s Carapace | Companion | ALL ACTIVE | |
| Wrist | Any | Vault | Tumble | |
| Hands | Marauder’s Gloves | Sentry | Polar Station | |
| Belt | Any | Vengeance | Seethe | |
| Legs | Marauder’s Encasement | Passives | ||
| Boots | Marauder’s Treads | Thrill of the Hunt | Blood Vengeance | |
| Neck | Any | Custom Engineering | Tactical Advantage | |
| Ring | Any | Kanai’s Cube | ||
| Ring | Any | Dawn | ||
| Main | Manticore | Cloak of the Garwulf | ||
| Off | Bombardier’s | Zodiac | ||
| Legendary Gems | ||||
| Zei’s Stone of Vengeance | ||||
| Bane of the Trapped | ||||
| Bane of the Powerful (Irrelevant) | ||||
Due to the objectives of the map.. MANY ITEMS ARE LITERALLY IRRELEVANT!
Like our guides? Help us out through Patreon!
Options & Notes:
- Cloak of the Garwulf (+Templar) gives you lots of tanks so enemies won’t reach melee.
- The build is lose and there’s a million setups you can choose that will EASILY clear this.
- There’s no “cheese item” or combo… just play DH like you would always.
Marauder Set Dungeon Location & Map
Where is Marauder Set Dungeon? It’s located in ACT III – Bridge of Korsikk.
- Continue along forward.
- roughly in the middle of the map there’s a fiery “crater”.
- On the south / middle / left-ish side of this crater there is a “pier” of sorts. You’ll find the entrance on the edge of this little pier!
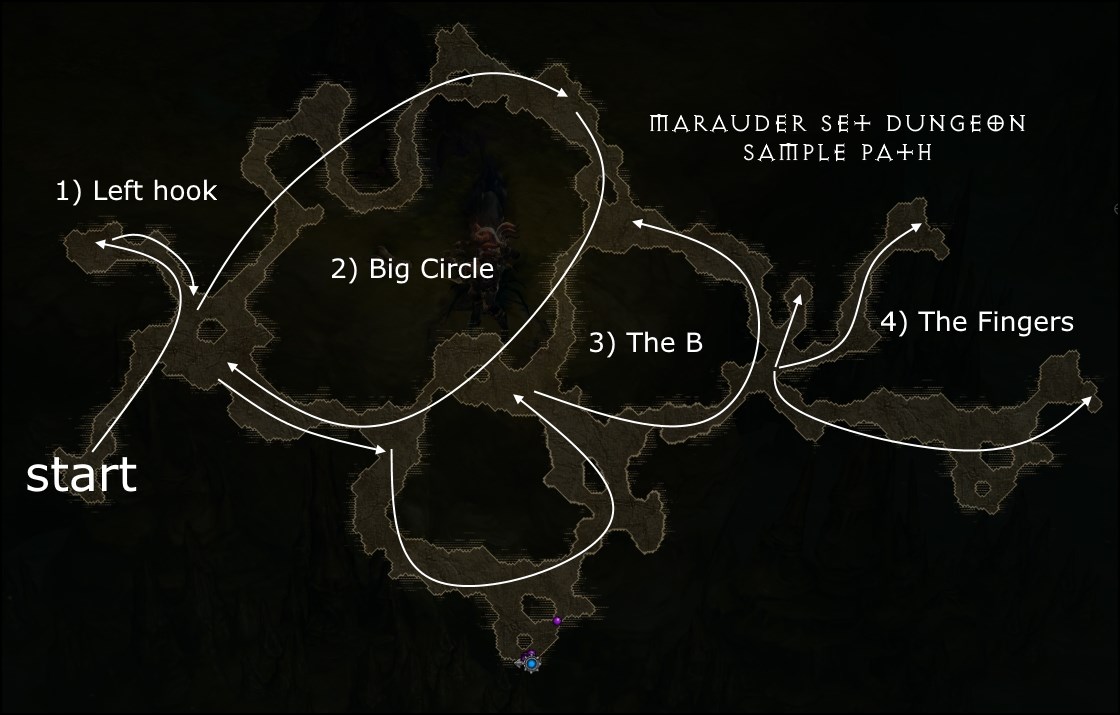
Marauder Set Dungeon Map / Layout?

How to Beat & Master Marauder Set Dungeon
Marauder is pretty easy… except for one semi-RNG aspect: Worms.
Map & Pathing
First of all, familiarize yourself with the map. Look above, it shows a sample path.
- Enter the dungeon and start out with the Left Hook.
- Complete the Big Circle, careful not to get surprised while walking downwards…
- Clear the “B“.
- Lastly, clear The Fingers, and you’re done!
Objectives, Tips, Notes
PROTIP: Worms shouldn’t hit you
Yes worms. If you’ve ever watched the movie “Tremors”, you know what I’m talking about. Here’s a few wormy facts that might help you…
- A visual and sound effect happens before the worm appears!
- YOU CAN NOW SEE A SKULL ON THE MAP for where the worms are hiding. Bait them out and smash them as they spawn!
- KEEP MOVING and do not BACKTRACK has maximum anti-worm effects.
This used to be much more annoying, but the skull indicator now helps a lot. Obviously if you get wormed you will automatically fail the “no melee” objective.
Objective: No enemy reaches melee
If you let any of these guys reach you in melee range… I’ve got some bad news for you… We have many anti-melee options here –
- Polar Station slows in an area so block chokepoints.
- Thrill of the Hunt this passive slows enemies hit, if they dont just outright die.
- Wolves, Templar = Tanks.
PROTIP: Worms shouldn’t hit you
Yes worms. If you’ve ever watched the movie “Tremors”, you know what I’m talking about. Here’s a few wormy facts that might help you…
- A visual and sound effect happens before the worm appears!
- YOU CAN NOW SEE A SKULL ON THE MAP for where the worms are hiding. Bait them out and smash them as they spawn!
- KEEP MOVING and do not BACKTRACK has maximum anti-worm effects.
This used to be much more annoying, but the skull indicator now helps a lot. Obviously if you get wormed you will automatically fail the “no melee” objective.
Marauder Set Dungeon – Summary and Closing
Overall, the dungeon is very easy. The map isn’t huge, the enemies are soft and there’s no problems like in other dungeons of “being too strong”. GL, but I doubt you need it!
As a quick rundown “No melee hits” just needs a little bit of care – only walking downward is a bit troublesome. “Kill enemies while 3 sentries are up” basically takes care of itself. and remember the protips to NOT GET WORMED!
Marauder Set Dungeon Guide: Build | Location & Map | Tips
Other Demon Hunter Guides:
- Demon Hunter Leveling Guide
- Demon Hunter Fresh 70
- The Shadow’s Mantle | Shadow’s Mantle Set Dungeon
- Embodiment of the Marauder | Marauder Set Dungeon
- Natalya’s Vengeance | Natalya’s Set Dungeon
- Unhallowed Essence | UE Set Dungeon
- Demon Hunter Speedfarming General
- Demon Hunter Best Speedfarm Build
- Demon Hunter Support Builds
Check our our D3 Guide Directory for anything else you might need!
We hope our Marauder Set Dungeon guide helped you out!


 | 2.7.5")

got it first try!