Hey guys! Welcome to our Witch Doctor’s Raiment of the Jade Harvester Set Dungeon Guide. Here we will talk about what build to use, skills, items, notes, map and more!
Jade Harvester Set Dungeon Guide: Build | Location & Map | Tips
Jade Harvester Set Dungeon Build
| Raiment of the Jade Harvester Set Dungeon Build | ||||
| Items | Skill & Rune | |||
| Head | Jade Harvester’s Wisdom | Haunt | Resentful | |
| Shoulder | Jade Harvester’s Joy | Locust Swarm | Any (Searing) | |
| Chest | Jade Harvester’s Peace | Soul Harvest | Soul to Waste | |
| Wrist | Any (Lakumba’s) | Spirit Walk | Severance | |
| Hands | Jade Harvester’s Mercy | Horrify | Face of Death | |
| Belt | Krelm’s (H.Girdle) | Piranhas | Piranhado | |
| Legs | Jade Harvester’s Courage | Passives | ||
| Boots | Jade Harvester’s Swiftness | Creeping Death | Swampland A. | |
| Neck | Xephirian (T.Pledge) | Pierce the Veil | Grave Injustice | |
| Ring | Any (C. Rose) | Kanai’s Cube | ||
| Ring | Any (Emptiness) | In-geom | ||
| Main | Any (S. Harvester) | Illusory Boots | ||
| Off | Any (Shukrani’s) | Xephirian Amulet | ||
| Legendary Gems | ||||
| Powerful | ||||
| Trapped | ||||
| Irrelevant (Gogok of Swiftness) | ||||
Options & Notes:
- The “any” slots are irrelevant and can even be yellows. There’s no “must” in that slot.
- “Too Strong” and “Too Weak” are a problem in this dungeon…
- Many suggestions above improve power. Decreasing power should be a no-brainer.
- Shukrani’s Triumph should be in there! Ditch In-geom in the cube if you have to.
Head on to Patreon and see how you can help our site!
Jade Harvester Set Dungeon Location & Map
Where’s the Jade Harvester Set Dungeon? It’s in ACT IV – Vestibule of Light!
- Teleport to way point ACT IV – Gardens of Hope tier 1.
- Walk downwards!!! Zone out of the map and you should be in the Vestibule of Light.
- Hug the upper wall and keep walking right. You’ll see the entrance soon!
The Jade Harvester Set Dungeon Map / Layout
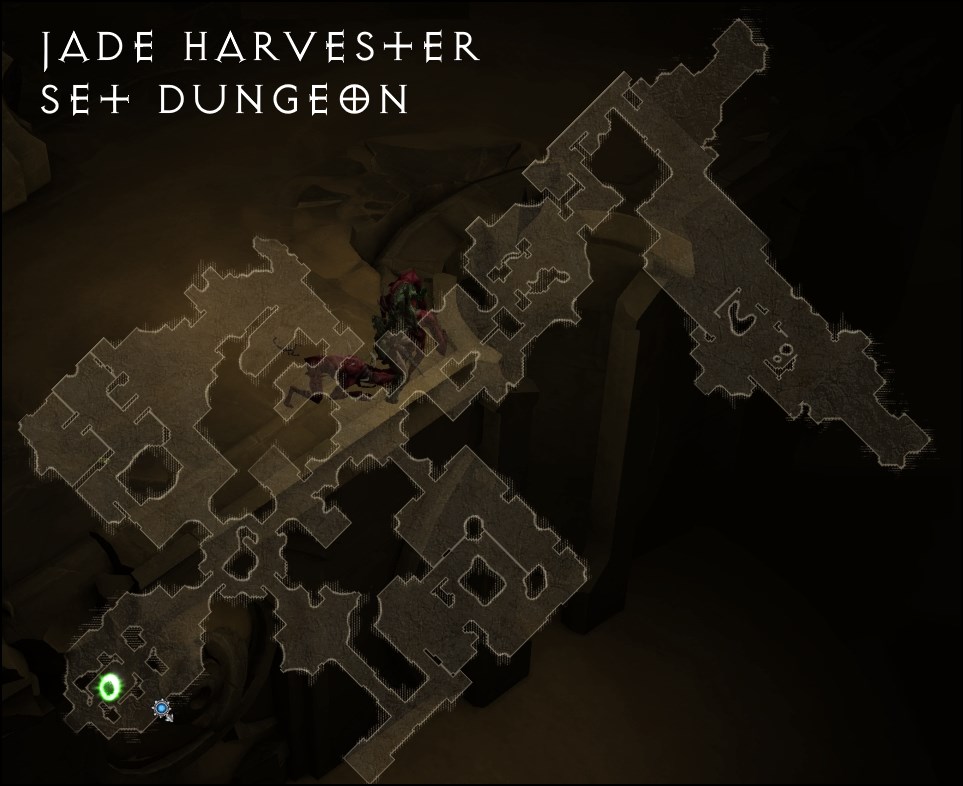
How to Beat & Master Jade Harvester Set Dungeon
One of the more frustrating WD dungeons – MOVESPEED is of the essence here.
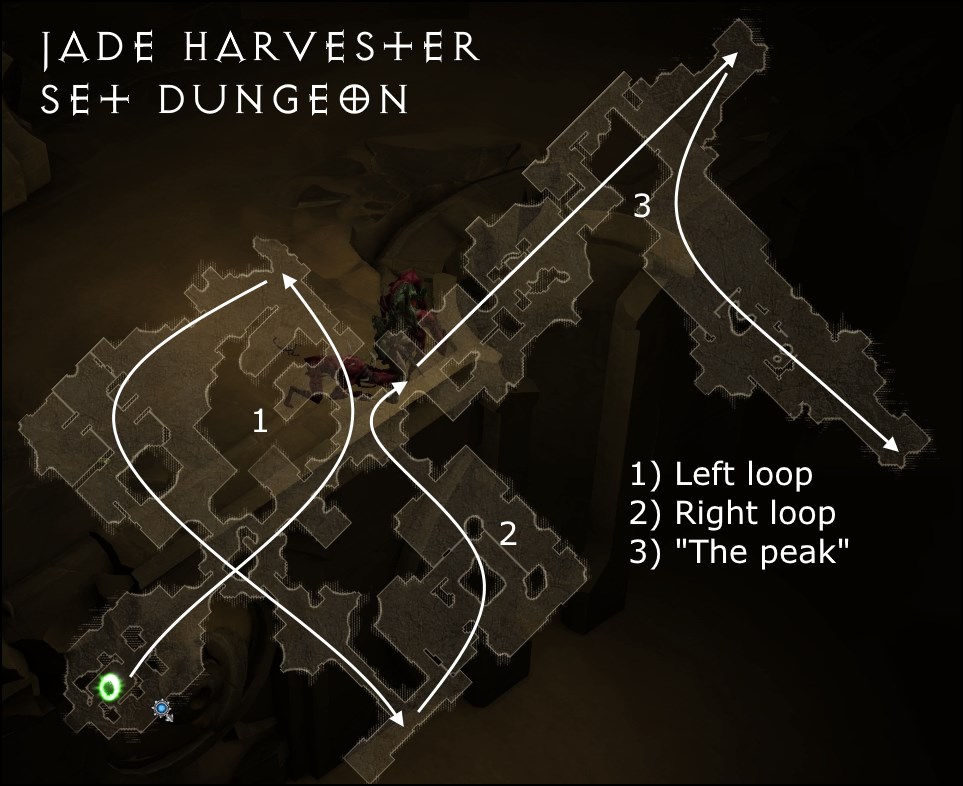
Map & Pathing
Familiarize yourself with the map first. A sample path is shown above.
- Go left on the “third intersection” and completely clear the LARGE left loop.
- Keep going along this path and you’ll find yourself in the right loop.
- Once you return to the “third intersection” you’ll have one last path: Up.
- That upper chunk is pretty massive.
- Map can be a b!tch – lots of nooks and crannies… lots of invis dudes.
Tips & Explanations
Objective: Harvest enemies simultaneously
THIS OBJECTIVE DOESN’T REQUIRE CONSUMING DoT’s! You can Soul Harvest enemies without Haunt or Locust, and it counts! This is in fact what you SHOULD be doing because the DoT’s might kill ’em!
There’s not much to say here but to “try without trying”. Worms come in packs of 20ish often, and there’s a lot more of them than you think! The dungeon layout is huge!!
The best rotation to satisfy both objectives:
Walk up > Position (Illusory helps here) > Harvest > Haunt spam > Locust > Harvest
So that rotation above makes sure you tag ’em with a “Safe” Harvest before they die. Again don’t force it too much if you fail, there’s A LOT OF OPPORTUNITIES.
ILLUSORY BOOTS helps a ton. Just another reminder… Ditch your follower, too!
Objective: Kills while Haunt+Locust are up
Don’t even think about this objective. You should get it “naturally” while trying to kill dudes. Look at the rotation above.
Not much to say… there’s a few things to help you out. Locust Swarm-Pestilence rune (via Vile Hive or rune choice). So is Haunt-Resentful Spirits + Haunting Girdle. But again, I do not foresee a situation wherein you will actively TRY to go out of your way to do this.
I don’t advise using Wormwood. You really need In-geom and/or Shukrani. Also, the unnecessary deaths caused by random locust swarms might not be desirable. I guess it can work, but I didn’t really need it.
Wormy Damage!!! Is pretty painful isn’t it? While there are many ways to increase your toughness, I think the recommendation of Xephirian Amulet is the most brainless fix. Unless I’m imagining things they help vs. these electrical wormies.
Mastery? Problems killing all? Being too strong that DoT’s kill your worms en-masse before you can harvest… Being too weak that elites may take too long!?
So how do you balance this? First of all let me let you in on a secret of Jade: HAUNT SPAM IS YOUR BEST TOOL FOR SINGLE TARGET. Don’t wait around for Harvest when killing fats! Haunting is more than enough. Try not to spread Locust to a new worm-pile. Having leftover Haunts is pretty unavoidable though!
Invis dudes? Haha what a joke right? There’s not much advice I can give you here.
Jade Harvester Set Dungeon Guide: Build | Location & Map | Tips
Other TeamBRG WD Guides:
- Witch Doctor Leveling
- Witch Doctor Fresh Level 70
- Witch Doctor Speedfarming General
- Witch Doctor BEST Speedfarm Build
- Helltooth Harness | Helltooth Set Dungeon
- Raiment of the Jade Harvester | Jade Harvester Set Dungeon
- Spirit of Arachyr | Arachyr Set Dungeon
- Zunimassa’s Haunt | Zunimassa Set Dungeon
Check our our D3 Guide Directory for anything else you might need! The Jade Harvester Set Dungeon can be annoying! “Soul to Waste” is really an appropriate rune name…


 | 2.7.5")

I found Horrify useless so instead, since I was using a hellfire amulet with the Midnight Feast passive, I changed Swampland Attunement to Zombie Handler and used Burning Zombie Dogs to help clear enemies. Of course I didn’t summon them till I had already completed both secondary objectives.