
Hello and welcome to our guide regarding Public Events in Destiny 2. Locations, Heroic triggers, walkthroughs and more!
Destiny 2 – Public Events: Navigation:
Basics | List & Summary | Locations | Public Event Walkthroughs
Public Events – Basic Information
Tip: Fireteam Medallions bonuses work on Public Events – so if you’re planning to do a bit of ’em, don’t forget to consume one of these!
Public Events List &Summary
Click on the public event name to scroll to full details
| Public Event | Heroic Trigger |
| Glimmer Extraction | Destroy 3 Mini Drill |
| Cabal Excavation | Destroy Thresher Ship |
| Ether Resupply | Destroy Servitor Trio |
| Injection Rig | Destroy Vents |
| Weapon Exchange | Place 6 Arc Charges |
| Witches Ritual | Destroy Crystals |
| Taken Blight | Destroy Massive Orb |
| Spire Integration | Capture 3 Spires |
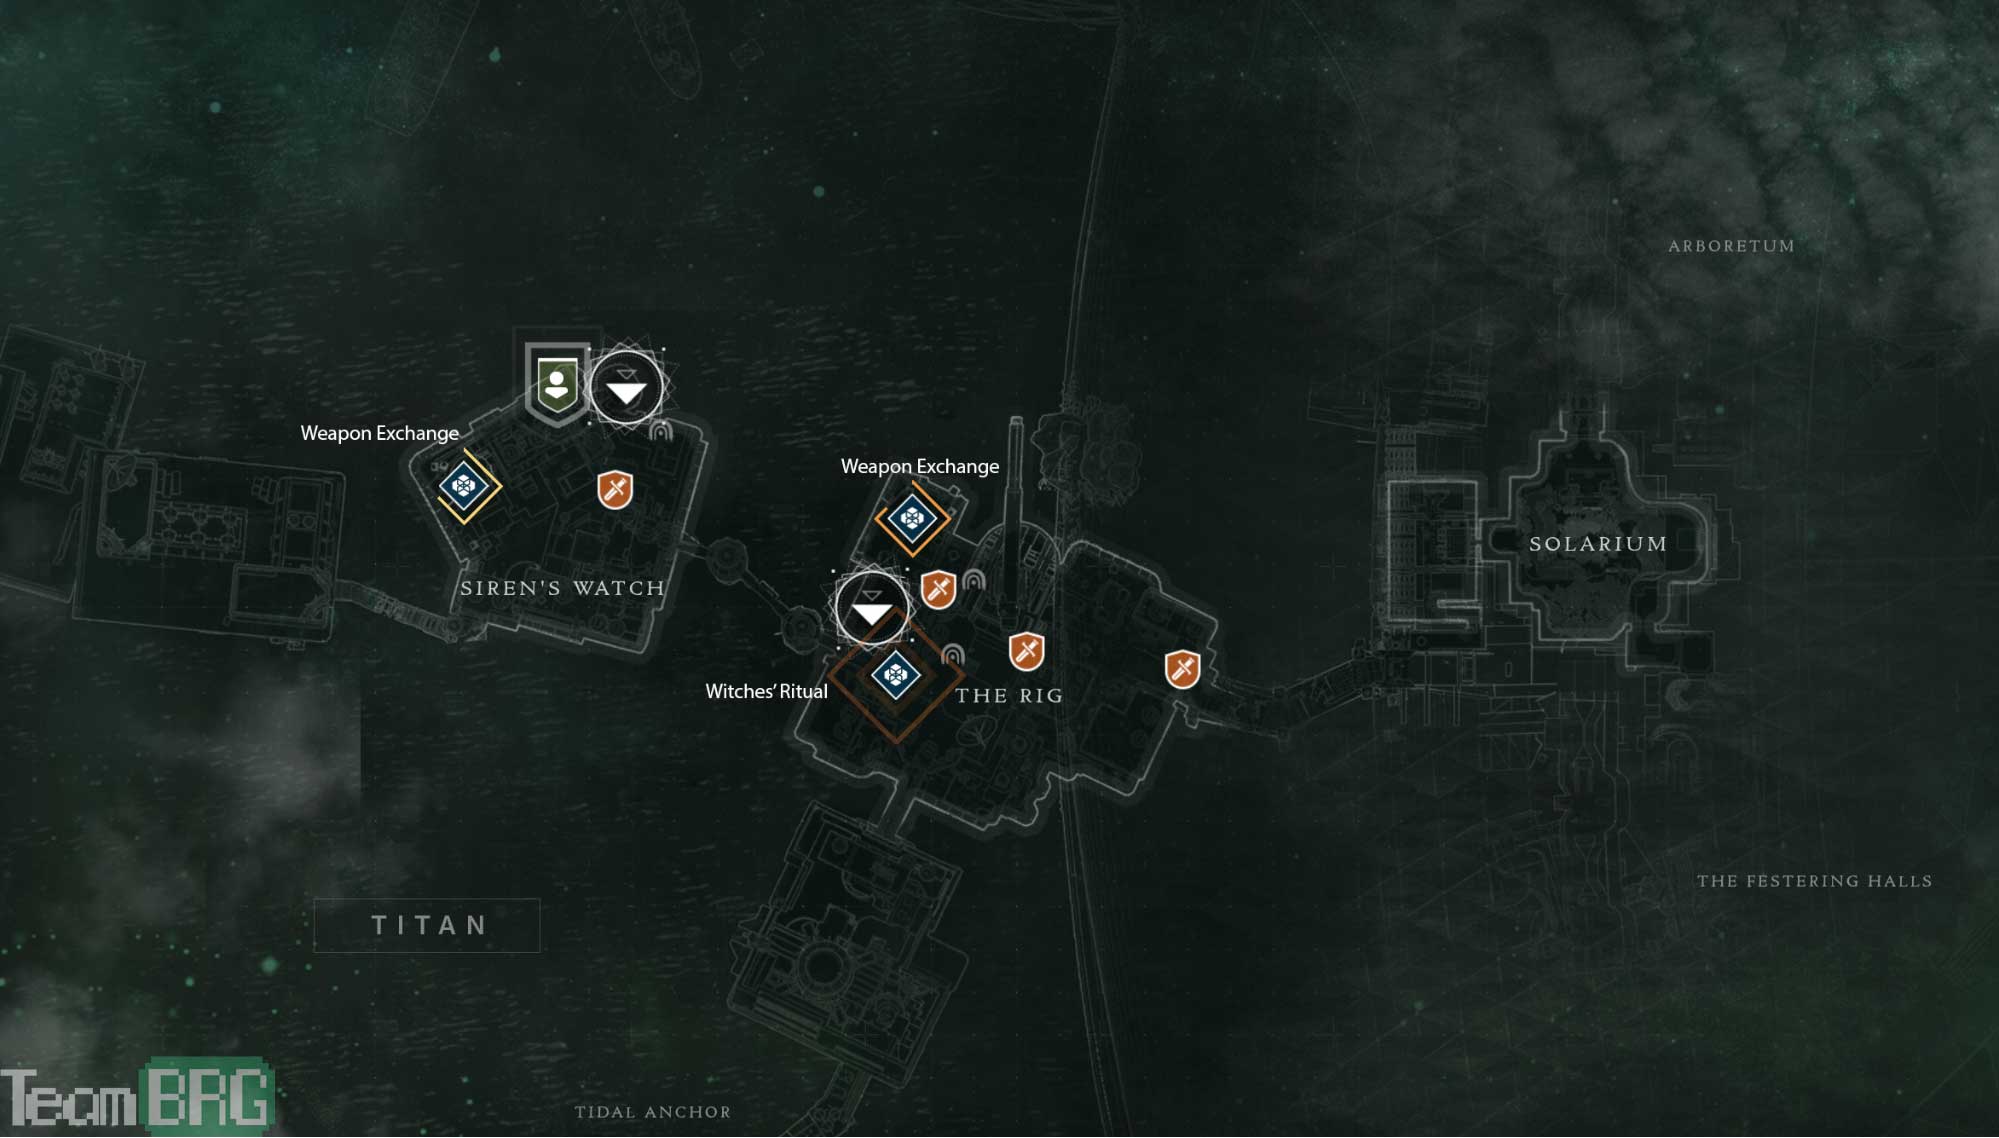
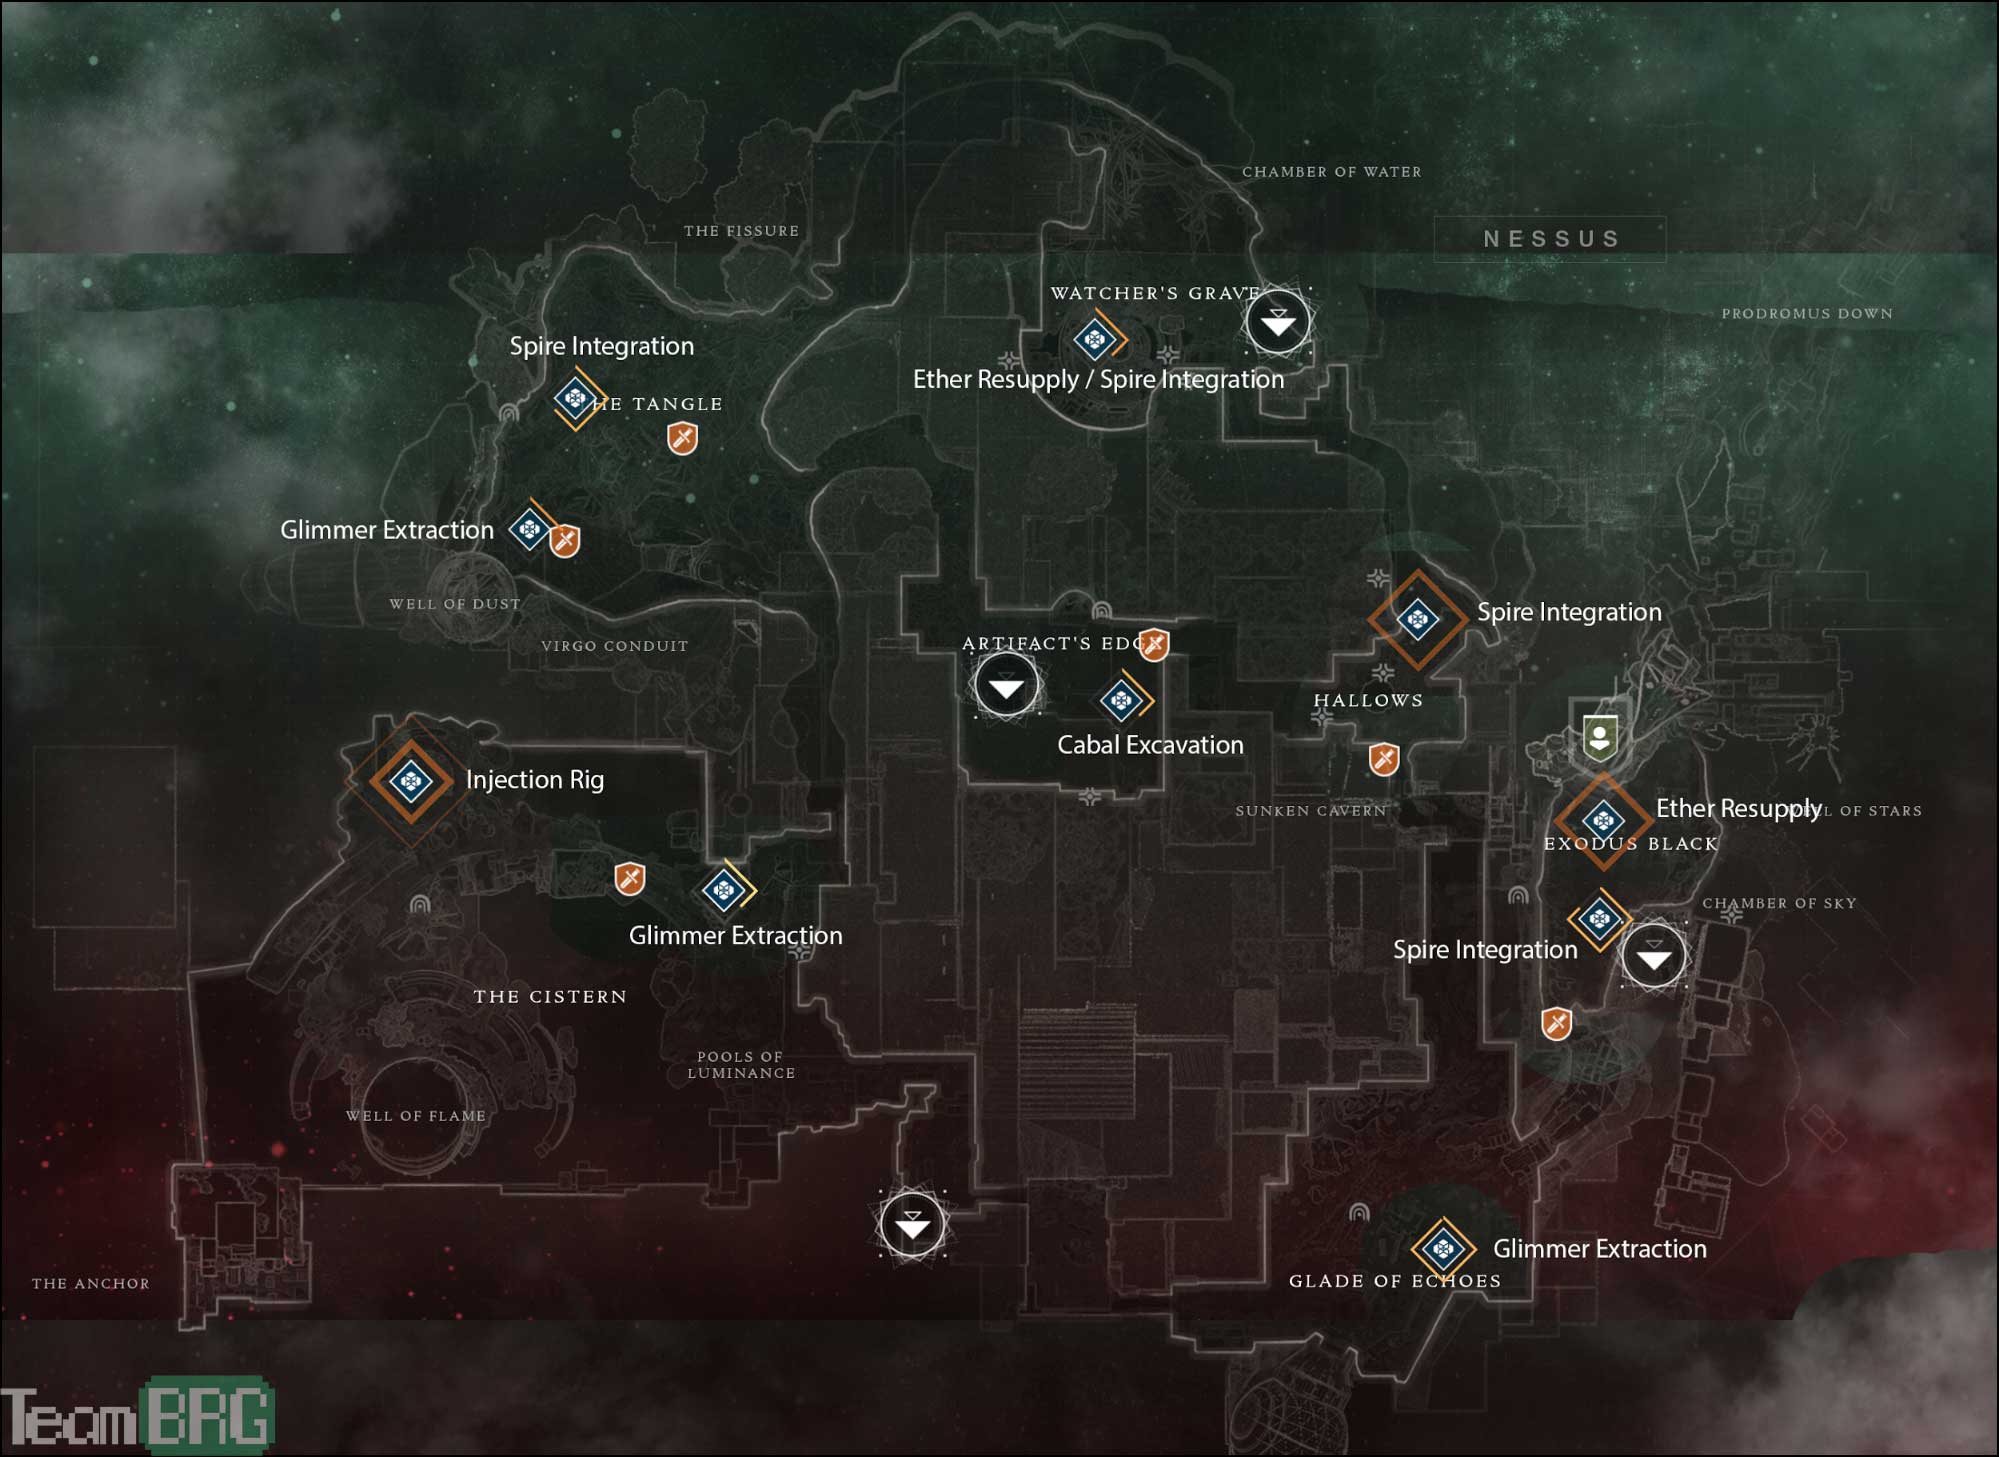
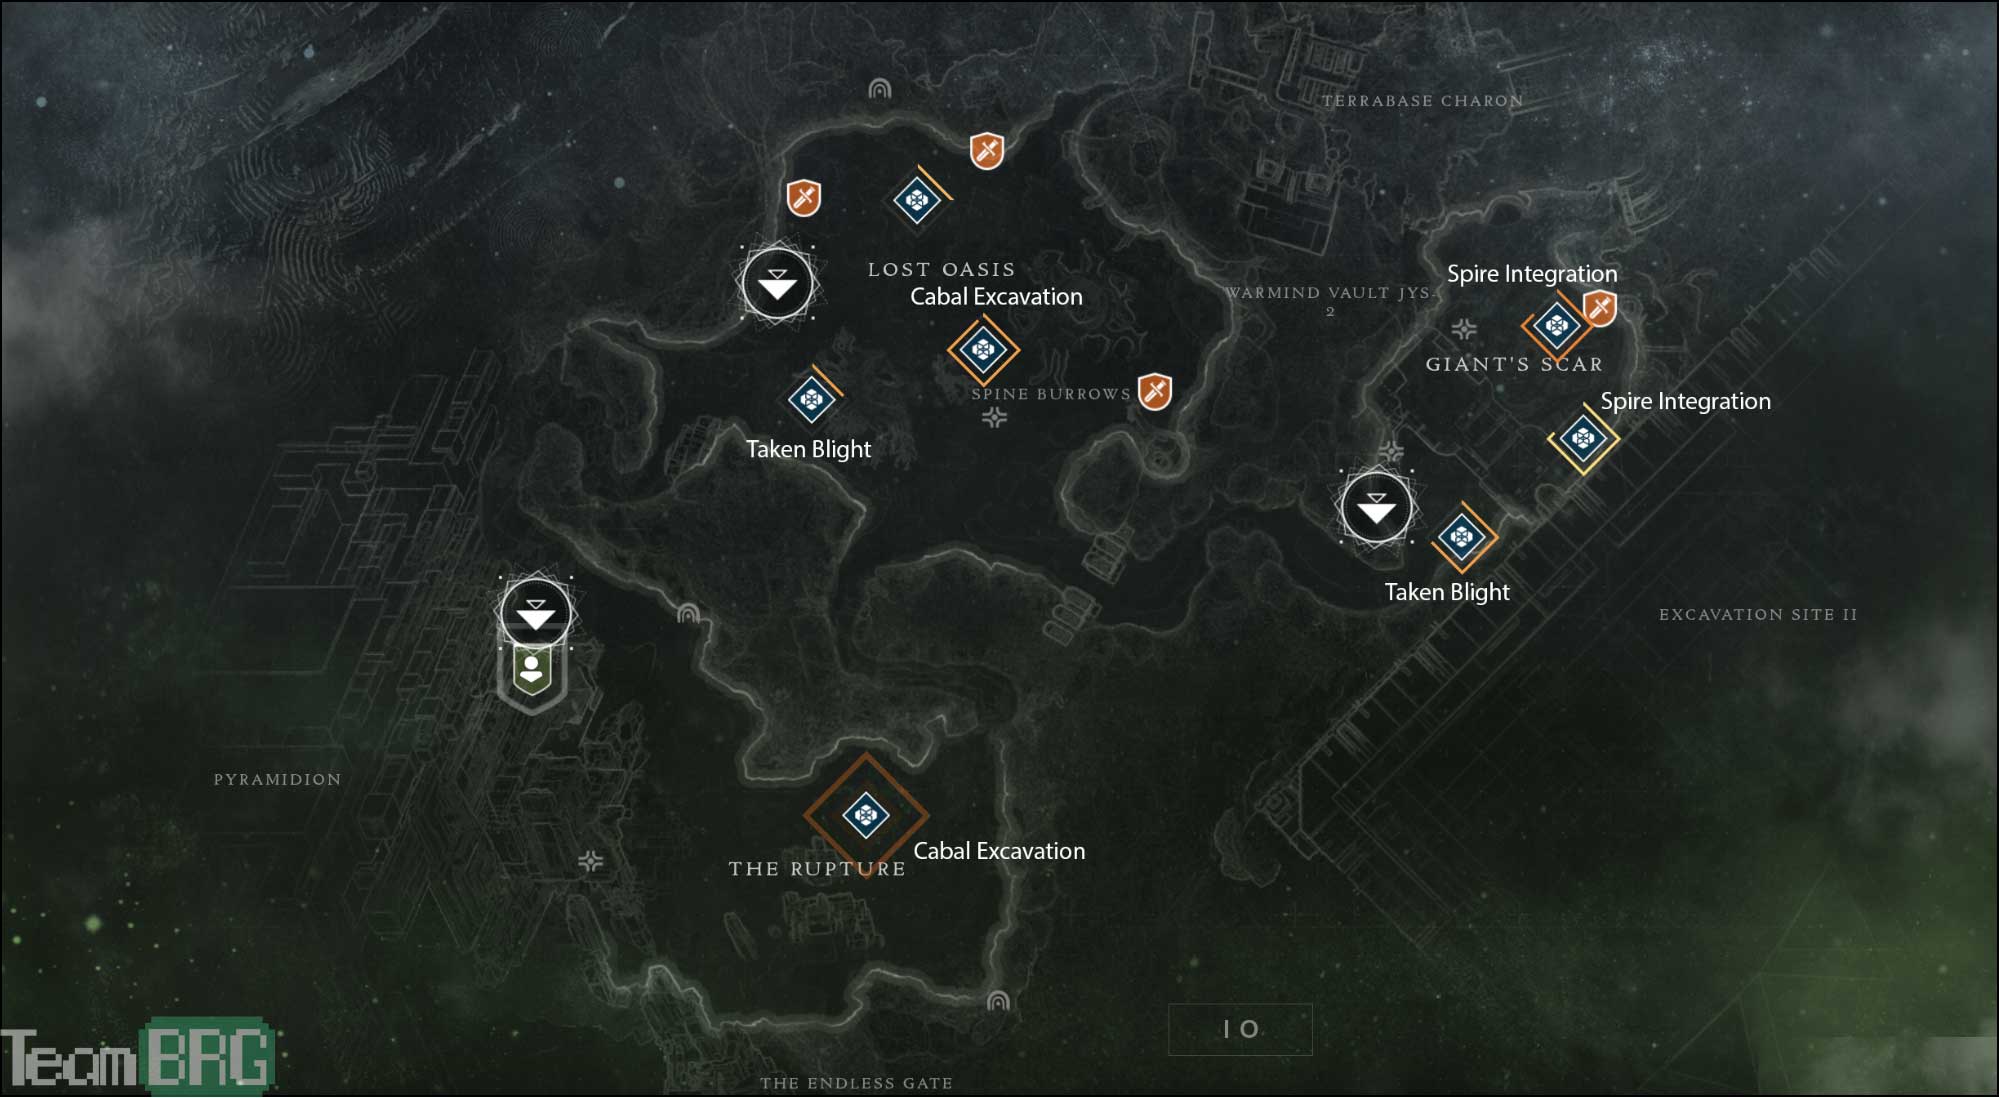
Public Event Locations
Public Events can be found in many of the zones in Destiny 2. While most locations spawn the same exact event every time, some trigger one of two events seemingly at random as shown in the following maps.
Click between the tabs to see the Public Event locations on each map.
EDZ public event locations

Titan public event locations
Nessus public event locations
Io public event locations
Public Event Walkthroughs and Full Information
Public Events for the most part can be completed just by following the objectives that show up below your minimap. Triggering heroic versions are a little more complicated as the conditions for each event aren’t always so obvious. In my experience, getting a Public Event to turn heroic can be made much more challenging due to other guardians being idiots (more on this later).
While I’m sure that these events, heroic or otherwise, can be done alone by any class, certain classes and specs will have an easier time of it.
Weapon loadouts also help out immensely. For instance, having Merciless and Wardcliff Coil makes triggering certain heroic events trivial.
Below is a guide for each event plus a clip of heroic runs.
Glimmer Extraction
Heroic Trigger: (Destroy 3 Mini Drill) In each mining location, after the three Fallen Extractors are dropped off, a turret-looking drill will materialize. Destroy these as the event progresses. After the third mini-drill is destroyed – the event turns heroic.
Walkthrough:
A Fallen ship will drop three Fallen Extractors near the glimmer drill. After defeating these three Extractors, a Fallen Captain will spawn. Deal with it then follow the Fallen ship to the next mining location. This process repeats twice for a total of 12 Fallen Extractors.
At the start of the heroic phase, the floating drill will collapse to the ground, creating a pile of glimmer. Guardians too excited for their own good will sometimes provide a meaty cushion for the collapsing drill.
Next, stand in the pile and complete the transmat while defending against waves of Fallen including a Wretched Captain boss to complete the heroic event.
Video:
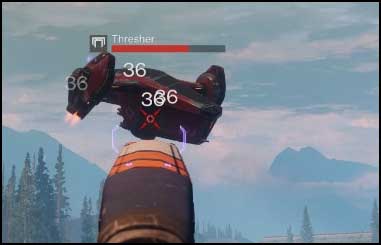
Cabal Excavation
Heroic Trigger: (Destroy Thresher Ship) Once the transmat reaches 31, the Cabal mothership will spawn a Thresher. Blow it up to make the event heroic.
Walkthrough:
A Cabal drill will drop out of orbit. Stand within its vicinity to complete the transmat and finish the event. Avoid being hit by missiles and defend against waves of Cabal.
At the start of the heroic phase, the transmat circle disappears and more Cabal units will spawn. Among these Cabal is Excavator Valus. Eliminate him to complete the heroic event.
VIDEO:
Ether Resupply
Heroic Trigger: (Destroy Servitor Trio) At about 60% boss health, a trio of the small Servitors will spawn and shield the boss. You can either eliminate them or wait around 15 seconds until they despawn.

Walkthrough:
Defeat the large Fallen Prime Ether Servitor boss before the timer runs out. Waves of Fallen will also spawn to defend the boss.
At about 90% boss health, a small Transport Servitor will spawn and shield the boss. Destroying it will remove the shield effect.
At the start of the heroic phase, the Servitor boss will gain a massive defensive buff that will significantly reduce the damage it takes. This buff persists until the completion of the event.
I recommend using all burst cooldowns (Supers and Power weapons) on the boss right after the first small Servitor is destroyed and before the Servitor trio appear. Timing this right, you can enter the heroic phase with the boss at 30% health or less.
VIDEO:
Injection Rig
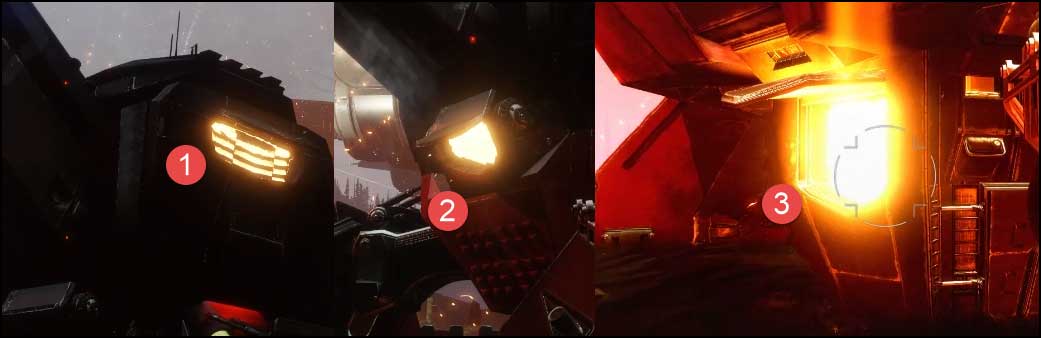
Heroic Trigger: (Destroy Vents) During the three burn phases which happen after each Scion’s death, the drill’s vents become vulnerable to damage. The first layer of vents are at the top most portion of the drill, the second layer at the middle, and the last layer will be in one of three possible locations at the very bottom.
Walkthrough:
This event has a very similar start to Cabal Excavation but only with a much bigger drill. Once it lands, waves of Cabal including an Infiltrator Scion will spawn to defend it.
After the Scion is dealt with, a massive passable force field will appear around the drill and everyone inside will take burn damage for a few seconds. Unless you have healing abilities, move out of the force field.
Once the burn phase ends, another Infiltrator Scion will appear. This cycles twice for a total of three Scions.
Kill the last Scion and Infiltrator Valus will spawn. Eliminate him to complete the event.
A vent is successfully destroyed once it takes enough damage, leaving the vent open and steam comes out of it. From my experience, vents in one layer share the same health pool, so if you’re in a group, there is no need to focus fire.
Each layer of vents have to be dealt with in order of top to bottom though during the initial landing phase of the drill, once Ghost is done with his speech, there’s a small window of opportunity to start dealing damage when the top and middle layer of vents open up for a few seconds.
Rocket launchers are ideal for blowing up the vents. If you have the Wardcliff Coil, this becomes easier as one volley from the exotic rocket launcher is enough to destroy one layer of vents.
Once all three vents are blown up, continue the event as normal. When the third Scion is destroyed, a beefier Infiltrator Valus will spawn along with a couple of interceptors. End him to complete the event.
For some reason, the second layer of vents will continue to take damage even after blowing up. Clueless guardians can often be seen shooting at these vents while they die to burn damage thinking they did good. Don’t be one of those guys.
VIDEO:
Weapon Exchange
Heroic Trigger: (Place 6 Arc Charges) Place an arc charge in each of the six washing machines before the first Arsenal Walker is destroyed. Arc Charges are obtained when an Arsenal Walker leg breaks.
Walkthrough:
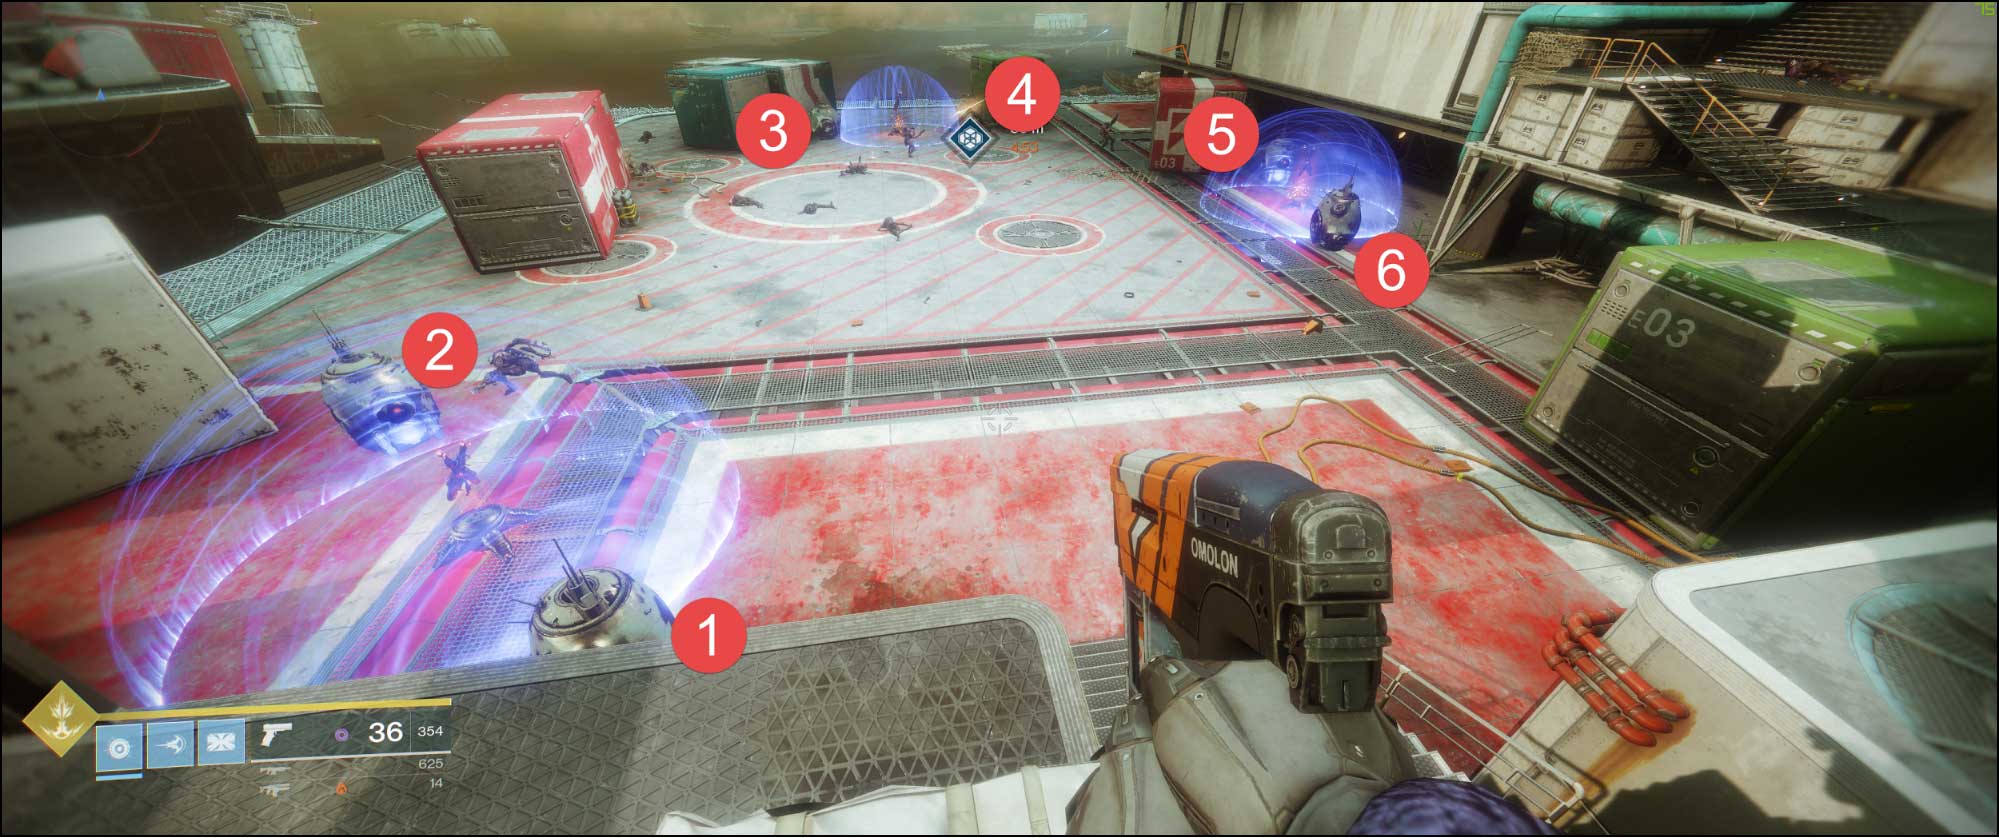
Three force field domes will appear around the event location. Each of these domes are flanked by two washing machine-looking devices. Inside the domes are scorch cannons but they are out of reach at this point.
A Resilient Captain along with other Fallen will be dropped off by a Fallen ketch shorty after. Kill the Resilient Captain to cause the immediate delivery of an Arsenal Walker. It has a few seconds of immunity while powering up. At this point, waves of Fallen will keep spawning until the event ends.
Shooting at any of the Arsenal Walker’s six legs will cause precision damage. Once a leg takes enough damage, its armor will break, causing the Arsenal Walker to fall prone and reveal its engine which is a precision target. This also spawns three arc charges.
Remember those washing machines? Place arc charges into these to power down the force fields, granting access to the scorch cannons.
Blow up the Arsenal Walker with the scorch cannons (Or, with your equipped weapons…) to complete the event.
Triggering heroic can be sped up even further by timing the destruction of two or more legs as each blown leg will spawn three arc charges.
Once all force fields are powered down, a second Arsenal Walker appears. Eliminate both to complete the heroic event.
This is one of the few Public Events where baboon guardians can work against you by destroying the first Arsenal Walker before all six washing machines are fed an arc charge. As real guardians, it is your duty to shoot them in the face with scorch cannons and show them the error of their ways.
VIDEO:
Spire Integration
Heroic Trigger: (Capture 3 Spires) The fuse projects beams of light in three different directions. Each of these beams will lead to smaller Vex spires. Standing on one will start a transmat countdown. Complete these for all three beams while stopping Vex from integrating to begin heroic.
Walkthrough:
A giant fuse-looking device will materialize near the event rally flag’s previous location. Waves of Vex will spawn and begin marching to the fuse.
Once a Vex unit reaches the fuse, it will start integrating. It takes a few seconds for this to complete so it’s fairly easy to prevent it.
Simply defend against the Vex until the event timers runs out. Having 10 Vex successfully integrate will result in failure and that earns you a spot in Vuvuzela’s blacklist.
At the start of heroic, even more Vex will spawn including a hydra boss, Integration Mind. Prioritize the boss as well as the two cyclops that appear. Survive until the timer runs out while preventing Vex from integrating.
While all of the heroic events can be done solo, this Public Event is not worth the time if not done by multiple guardians since you will have to do all three beams yourself.
VIDEO:
Witches’ Ritual
Heroic Trigger: (Destroy Crystals) Once both Ritual WItches are taken out, two shielded blue crystals will appear on the top left and top right corner of the portal. Continue standing on the glowing circles to remove the shield on the crystals then destroy them. An Abyssal Champion will show up. Give him the business to complete the event.

Walkthrough:
Two shielded Ritual Witches along with a bunch of Hive units spawn around the location. Stand on either of the glowing circles for a time to remove the shield of the Ritual Witch in front of it.
After both are killed, more of the Hive will come pouring out of the portal by the wall followed by an Abyssal Sorcerer boss. Eliminate it to complete the event.
This heroic Public Event is one of the fastest to complete with guardians mowing down the Hive and completing the event in less than two minutes. That said, the crystals can at times bug out and be immune to damage even after the shields are removed. I’ve had this happen to me three times since the game’s launch on PC.
VIDEO:
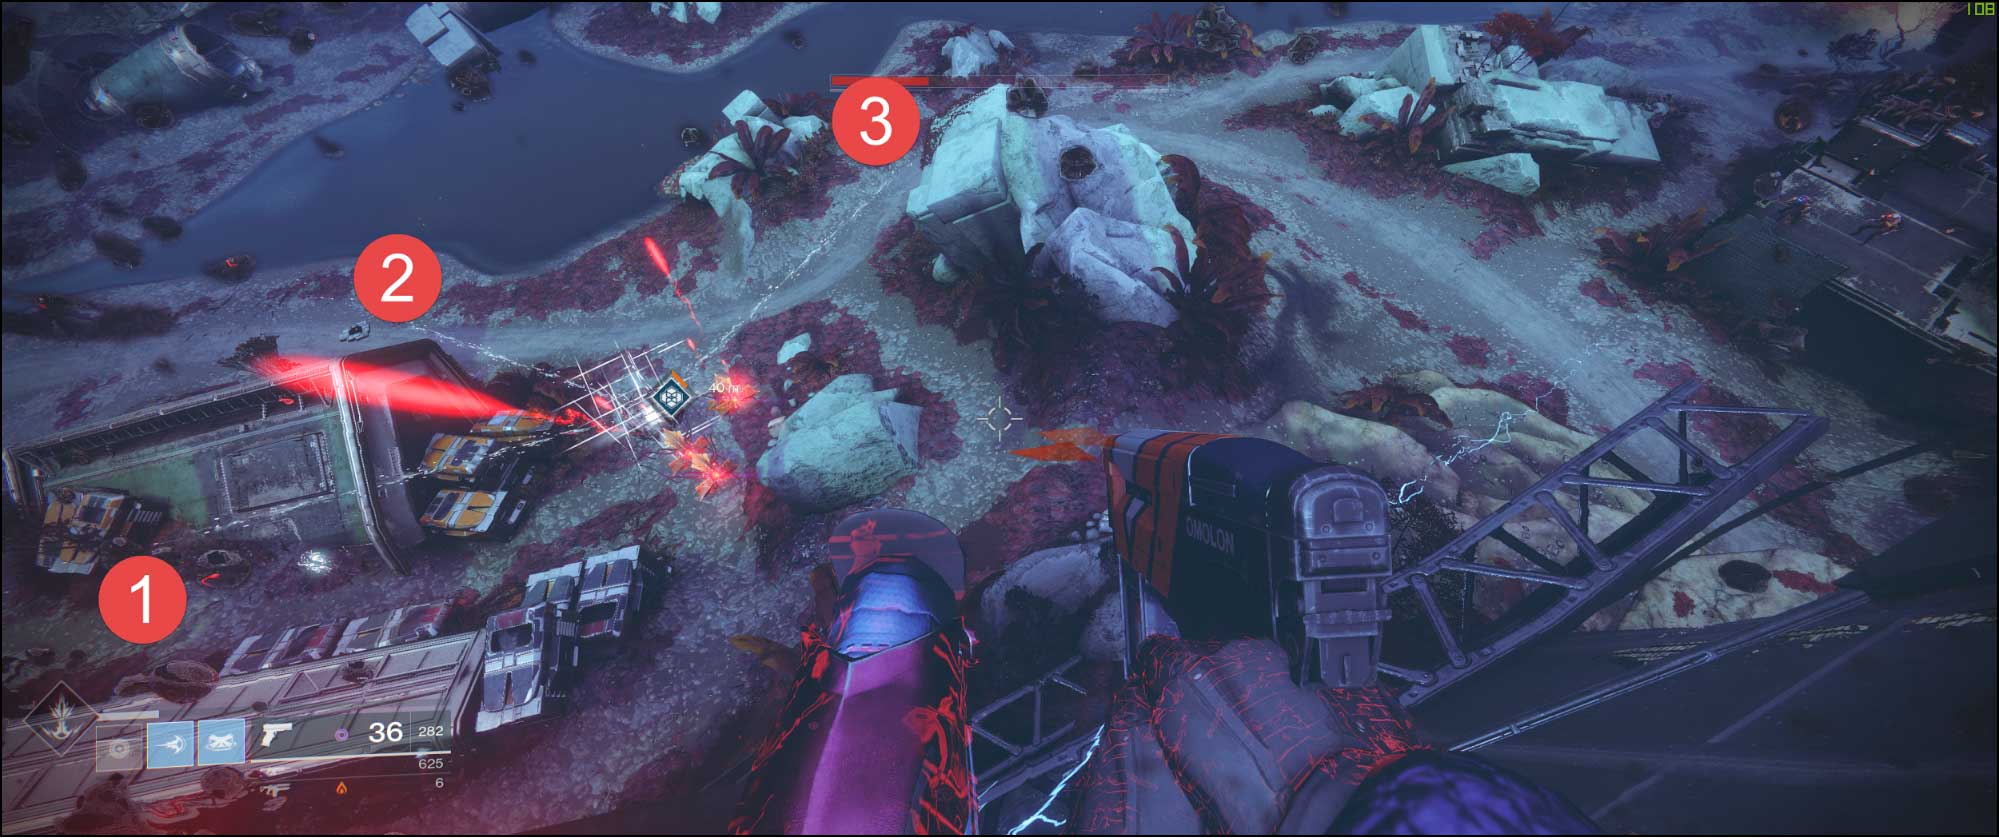
Taken Blight
Heroic Trigger: (Destroy Massive Orb) Entering and leaving the small blight rifts will give you a buff which lasts four seconds. While you have this buff you can damage the massive orb of blight that was initially immune. Continue taking the buff from the small rifts and damaging the orb until it breaks to spawn the Blightmaker. Eliminate him to complete the event.

Walkthrough:
A massive damage-immune orb of blight will materialize in the area. Shortly after, small rifts of blight will appear. These rifts will spawn waves of Taken. Eliminate them to weaken the blight.
Eventually, the orb of blight will dematerialize and reappear in a different location. Follow it and repeat the process until the event’s completion. On each location change, more types of Taken will spawn.
If you’re running solo and are looking to complete this event in heroic, don’t waste your time on this Public Event unless you have the Wardcliff Coil. Four volleys from it is enough to trigger heroic. Without the exotic rocket launcher, it simply takes way too much time.
This is one of those Public Events where your fellow guardians can’t help but make it hard to trigger heroic by killing the waves of Taken instead of dealing with the orb of blight. I have convinced myself that these idiots are not actual players but are instead servants of the corrupted Hive god, Oryx.
VIDEO:
Destiny 2 – Public Events: Navigation:
Basics | List & Summary | Locations | Public Event Walkthroughs
Well, that’s it regarding Public Events in Destiny 2! This guide is still a bit raw so keep and eye out for the very near future updates.


 | 2.7.5")
