I’ll be compiling this info as I go along, but basically if you’ve ever asked “Where are the Tomes / Grimoires?” in Vermintide 2 – Look no further. Formatting this to be “easy to search and less scrolly”. Not everyone (IE no one) likes jumping puzzles, be prepared.
OTHER MAPS WILL BE UPDATED AS I PLAY
SCREENSHOTS IN THE TABS, VIDEOS TO FOLLOW
Tomes & Grimoire Locations – Scroll to Map:
- Against the Grain
- Empire in Flames
- Festering Ground
- The War Camp
More to come!
Against The Grain Tomes & Grimoires Location
Tome 1: Inside a hole in the straw roof, on the house before cart blocking gate.
Grimoire 1: House before first boss barn. Blow up the cellar hole with barrel.
Tome 2: On left of boss barn entrance, sitting on top of the hay shack.
Grimoire 2: On the tower in front of the boss barn.
Tome 3: Near felled tree in the creek. Before you go up the hill.
Here’s some images to jog your memory. 1 for each, by order.


Map Objective: Reach Holzfrucht’s Orchard
The area is after the first wheat field in the beginning of the map, right when you jump over the wall. Get this before you move the cart that’s blocking the path onward.
The first tome is located in a hole on the thatched roof of the building nearest the cart. Simply:
Climb on to the fence.
Jump onto the wooden platform.
Go to the hole on the roof and pick it up.

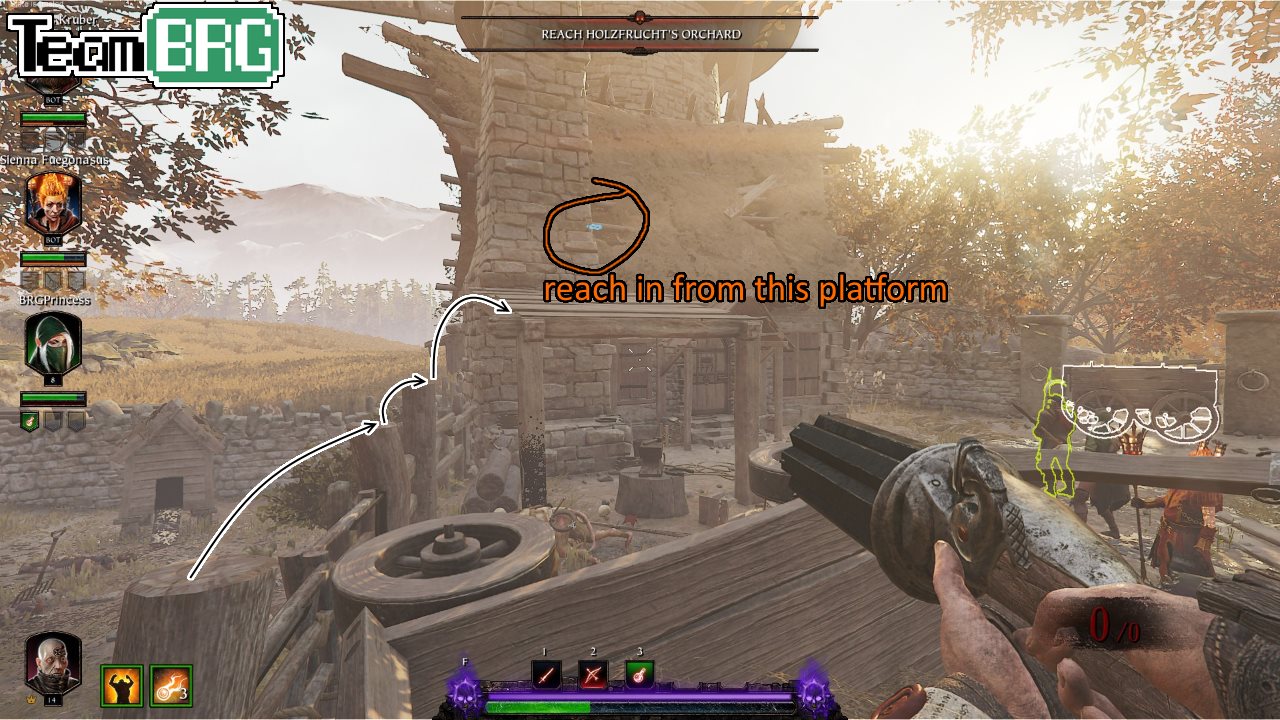
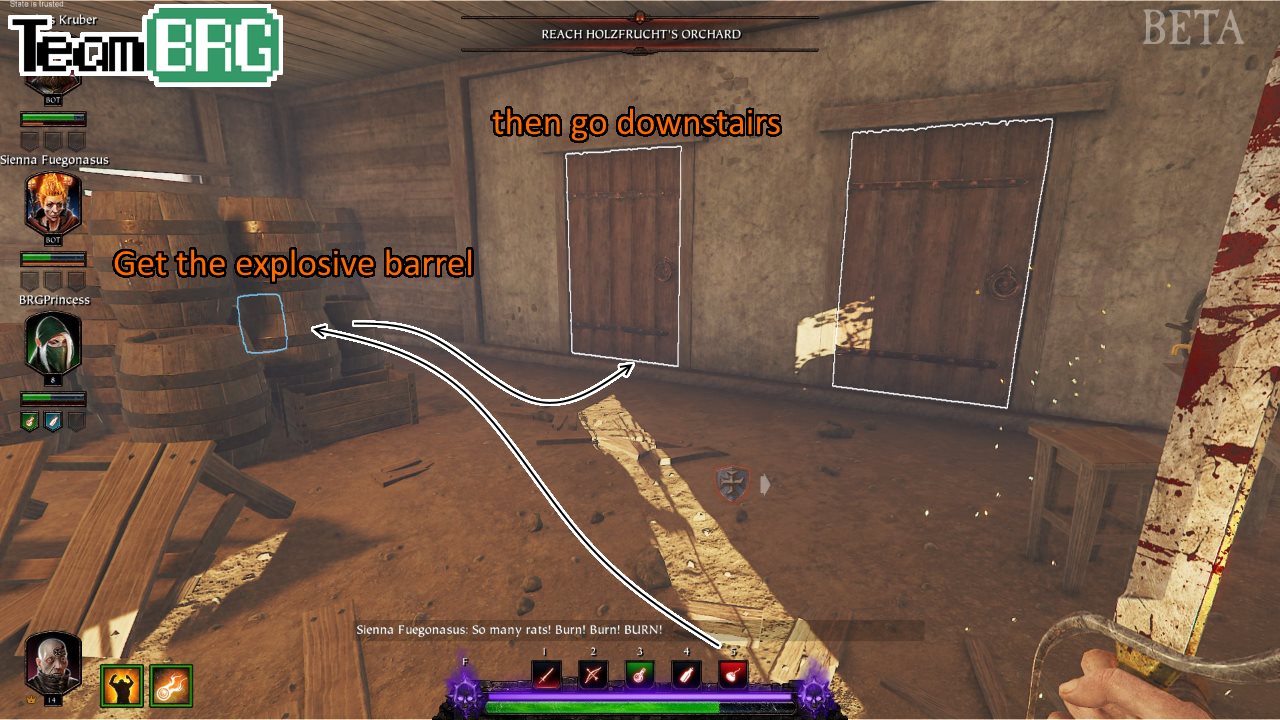
Map Objective: Reach Holzfrucht’s Orchard
After jumping the second stone wall (the area before the boss barn), the place that has two shacks and a house on the right? The first grimoire is “behind” that house.
Get the explosive barrel that’s inside the house.
Take the middle door downstairs.
Blow up the “cracked crawlspace” in the cellar.
Proceed upward and the grimoire is on a crate to your left.

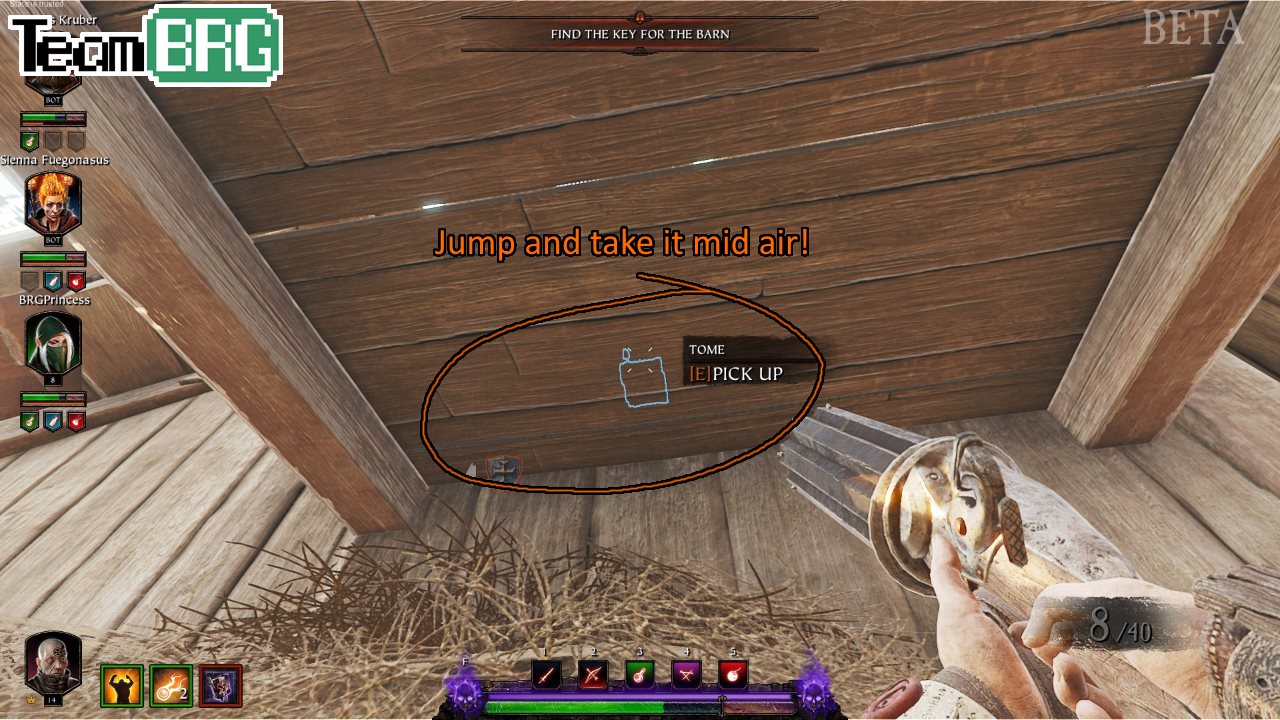
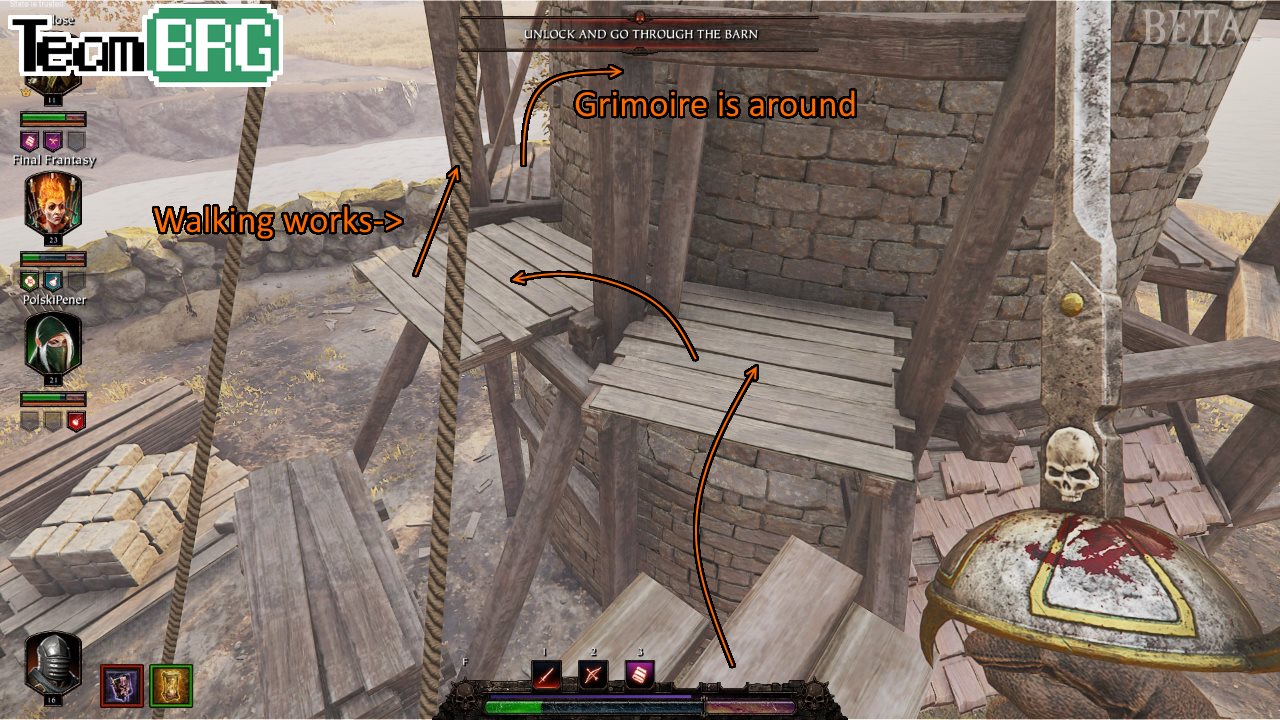
Map Objective: Find the Key for the Barn / Unlock and Go Through the Barn
While you can get this before you unlock the barn – I highly suggest you unlock and take care of the boss first.
The second tome is simply sitting on top of the wooden “shack” on the left of the barn entrance, the one with hay bales under it. All you have to do is mark it first by pressing T (spam it around the roof), then jump up from below and pick it up mid-air.
Map Objective: Find the Key for the Barn / Unlock and Go Through the Barn
Is in the same area as Tome 2 – and the same advice applies here as well. Unlock the barn and beat the boss prior to taking the Grimoire.
The second grimoire is on the tower across the boss barn, at one of the wooden platforms spiraling it. To reach here you have to:
Climb up the ladder across the tower
Jump to the suspended platform holding bricks
Jump across to the tower.
Wrap around the left of the tower.
The grimoire is resting on one of these “scaffolding”.

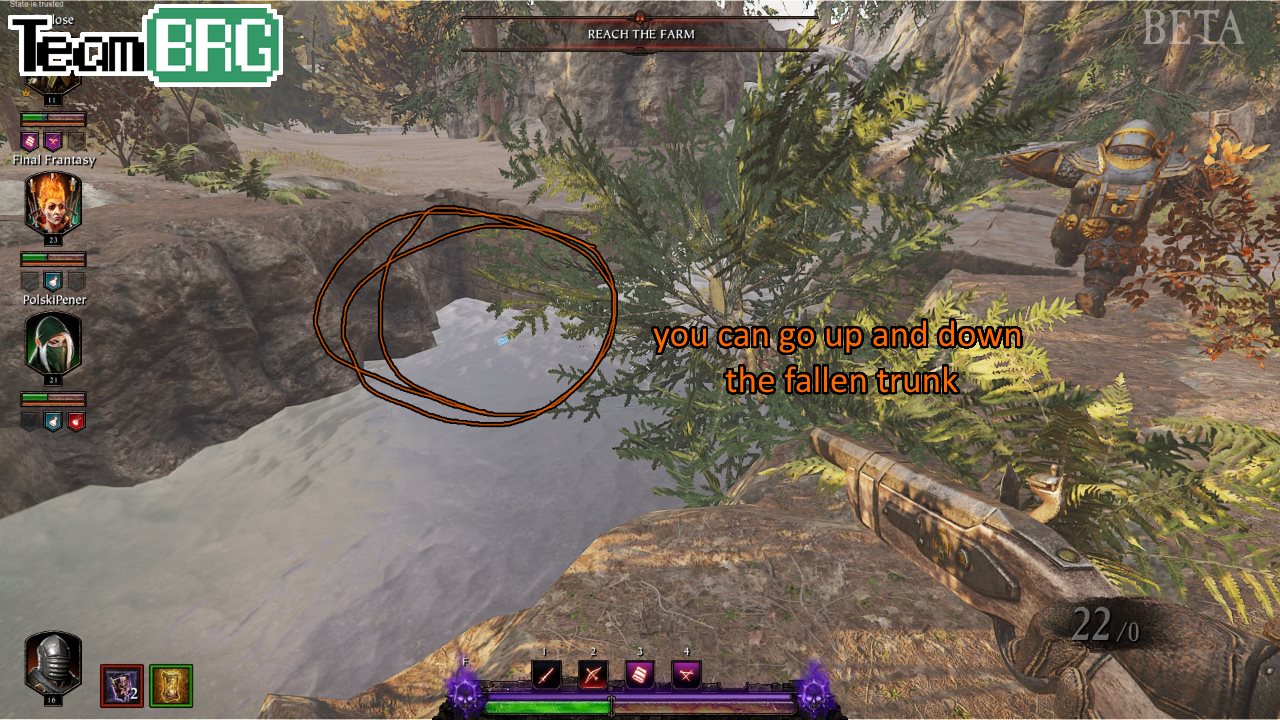
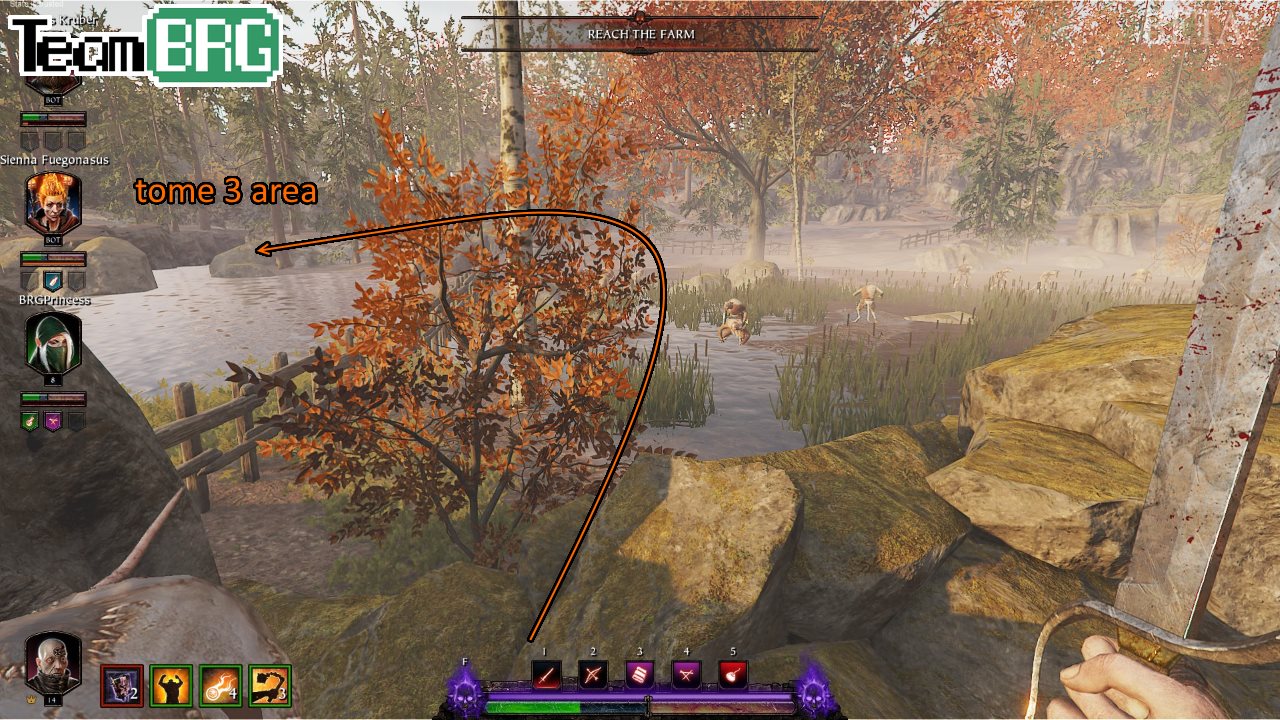
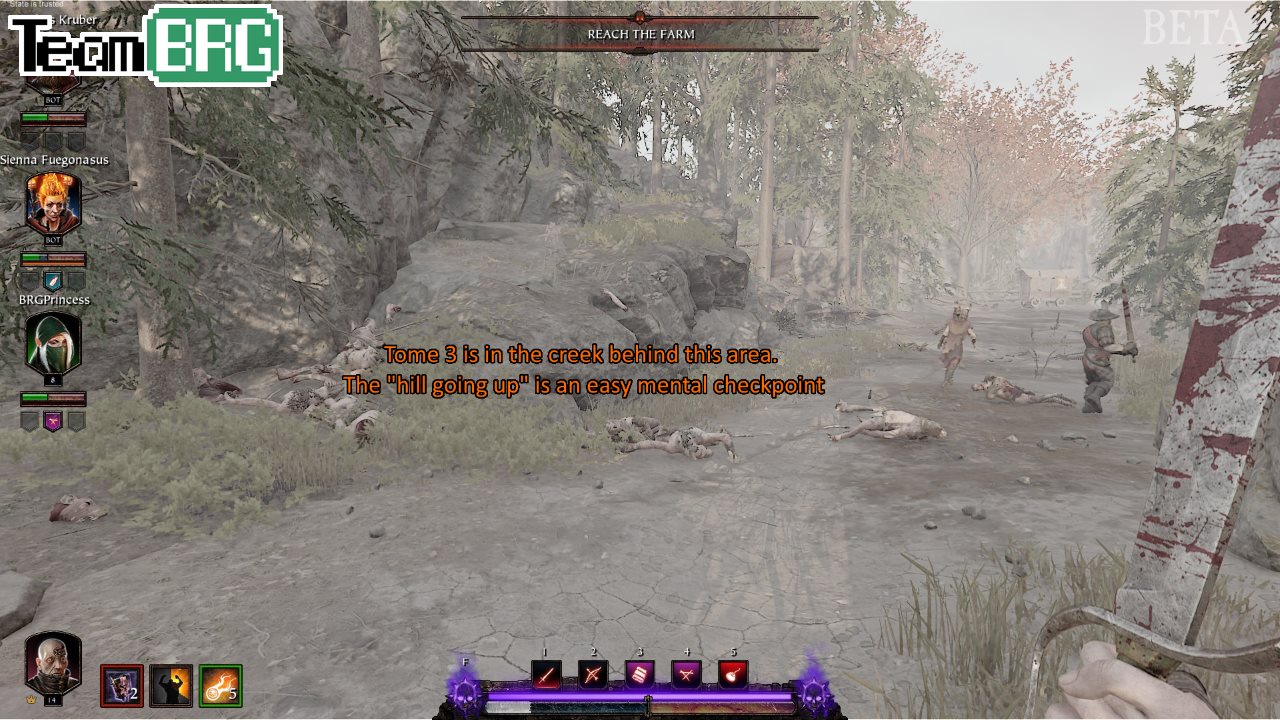
Map Objective: Reach the Farm
In the marsh (after jumping yet another stone wall…) right before you “go up the hill”. There is a felled tree on a creek to your left. On the left of where the tree hits the water, the third tome is inside a half-submerged crate.
Empire In Flames Tomes & Grimoires Location
Tome 1: Drop after first burning house. Second house on the right. Jump on platform.
Grimoire 1: House after tunnel, blow up barrel from window and go around outside.
Tome 2: At the end of submerged tunnel after wine cellar. In a hole on the right.
Grimoire 2: House on the left, right before market square. Top most brick on the south.
Tome 3: Final house before end – mid air “curve” jump to left 2nd floor room.
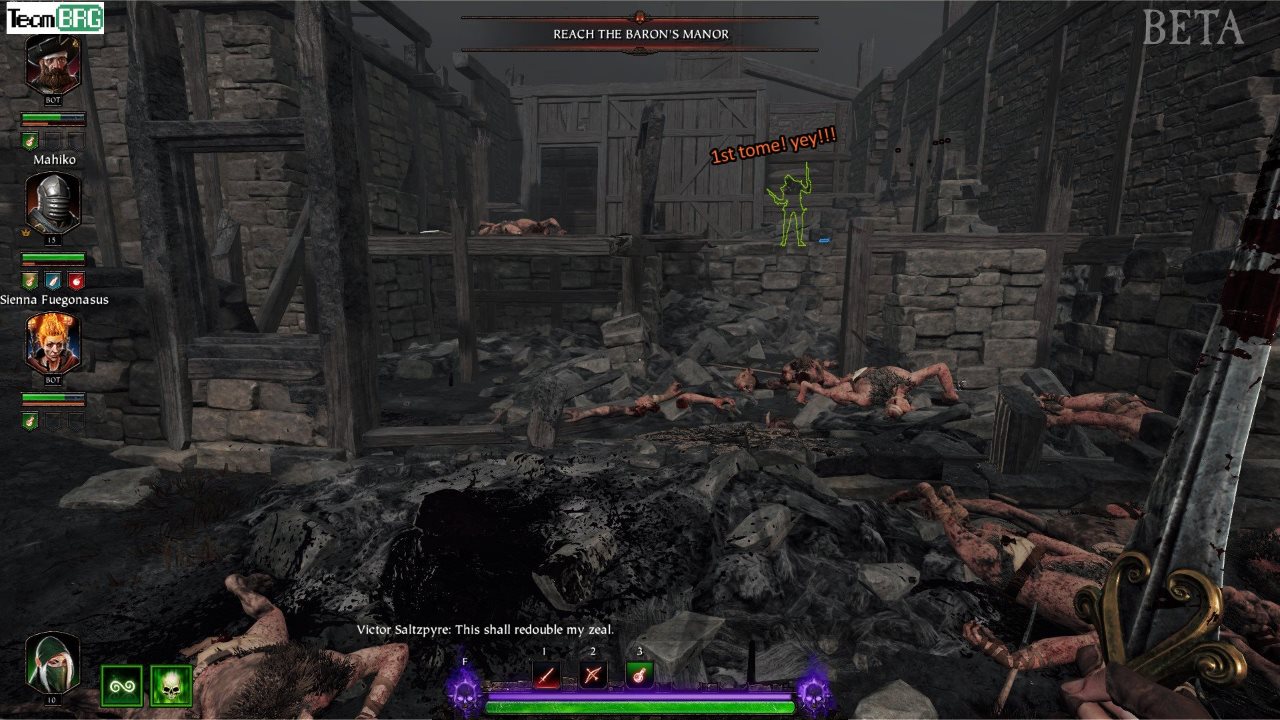
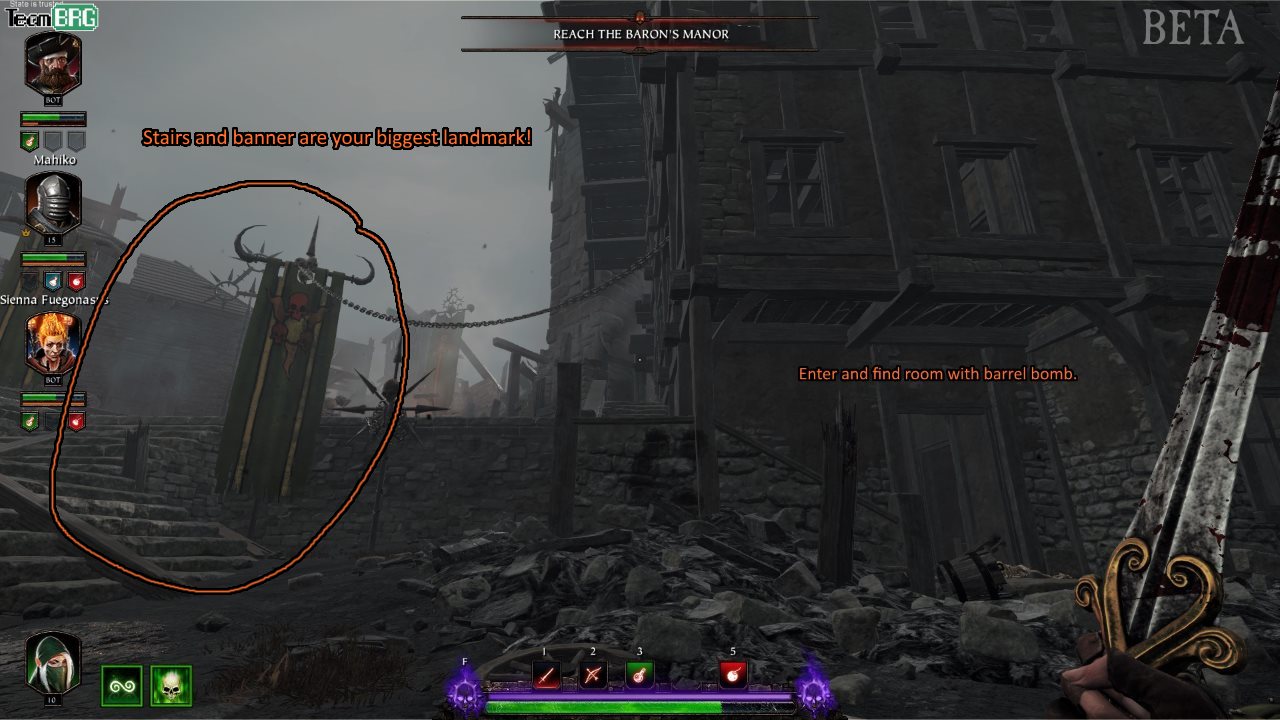
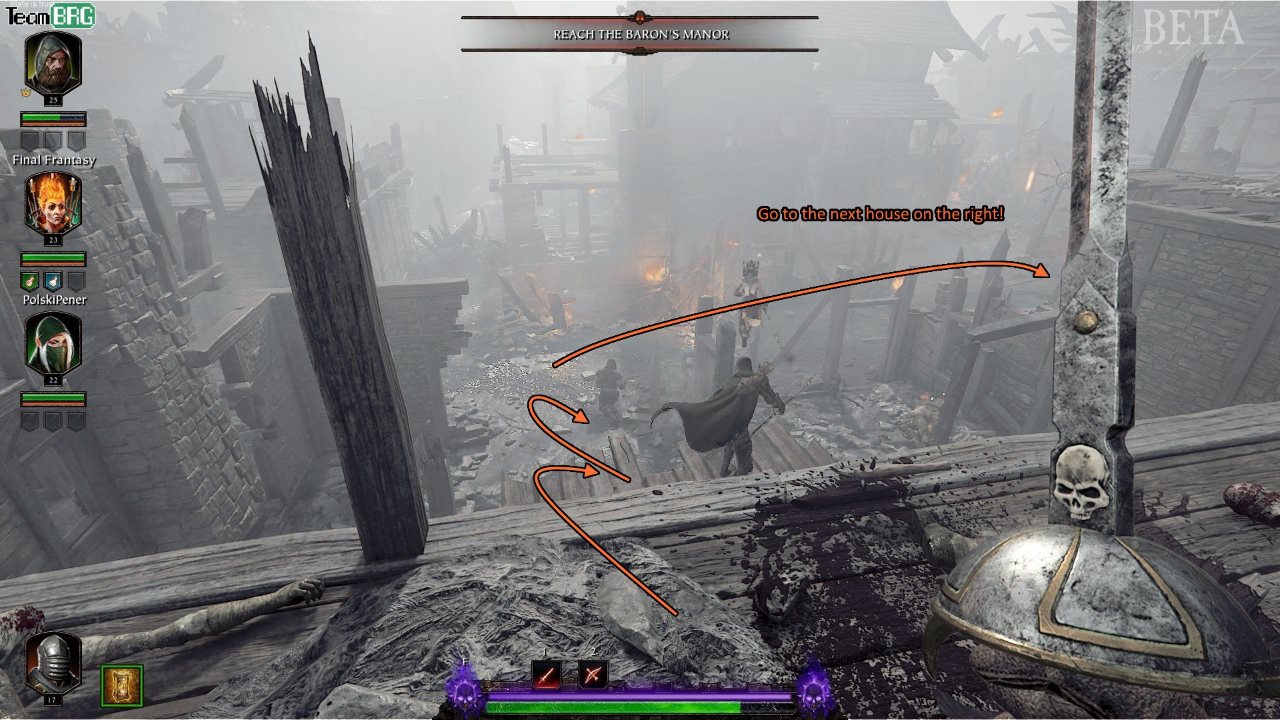
Map Objective: Reach the Baron’s Manor.
After the first burning house, where you have to fall – go to the second house on the right (or what remains of it… lot?) .
Here, you’ll find the shell of what seems to be a balcony, and a brick platform. Jump on this platform and into the window to get the tome.

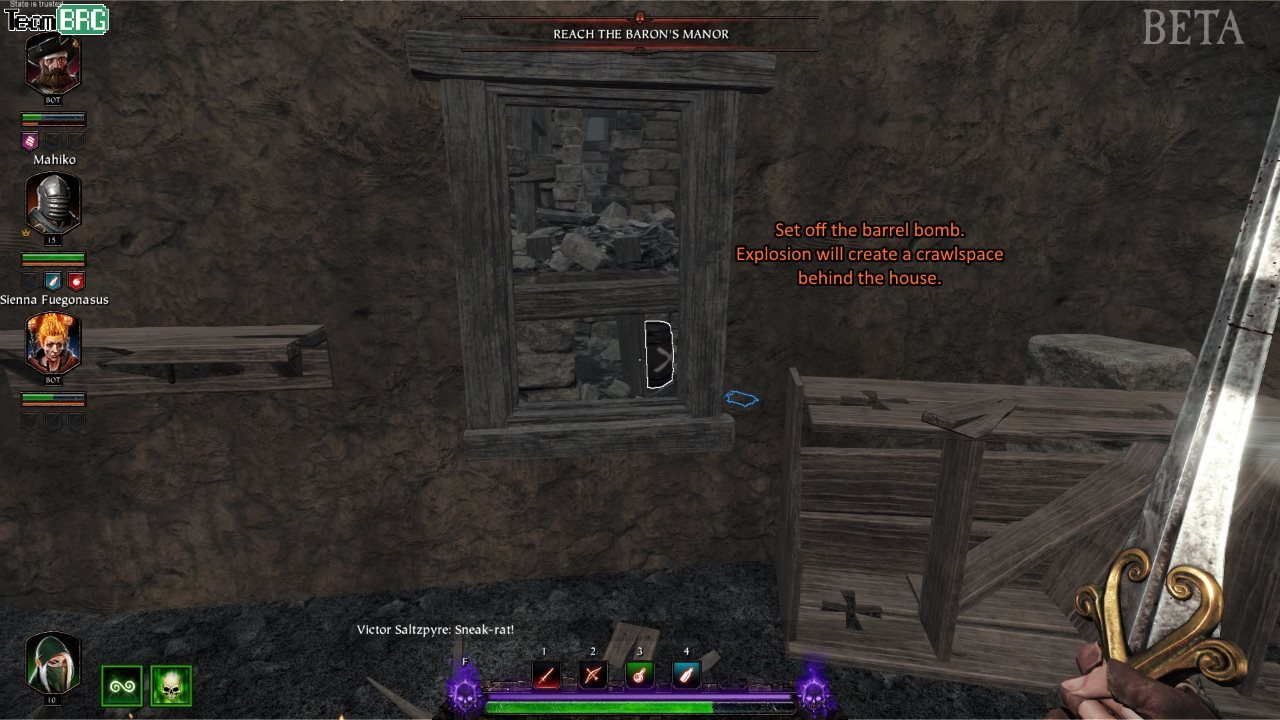
Map Objective: Reach the Baron’s Manor.
After the Watch Barracks Tunnel (if you passed here, there is another way though), you will see brick stairs with green flags – the house on the right is where all Grimoire 1 shenanigans happen.
Enter the house and shoot the explosive barrel you see from the “east” window. This will unblock the path, which you can access from the other end of the house (outside).
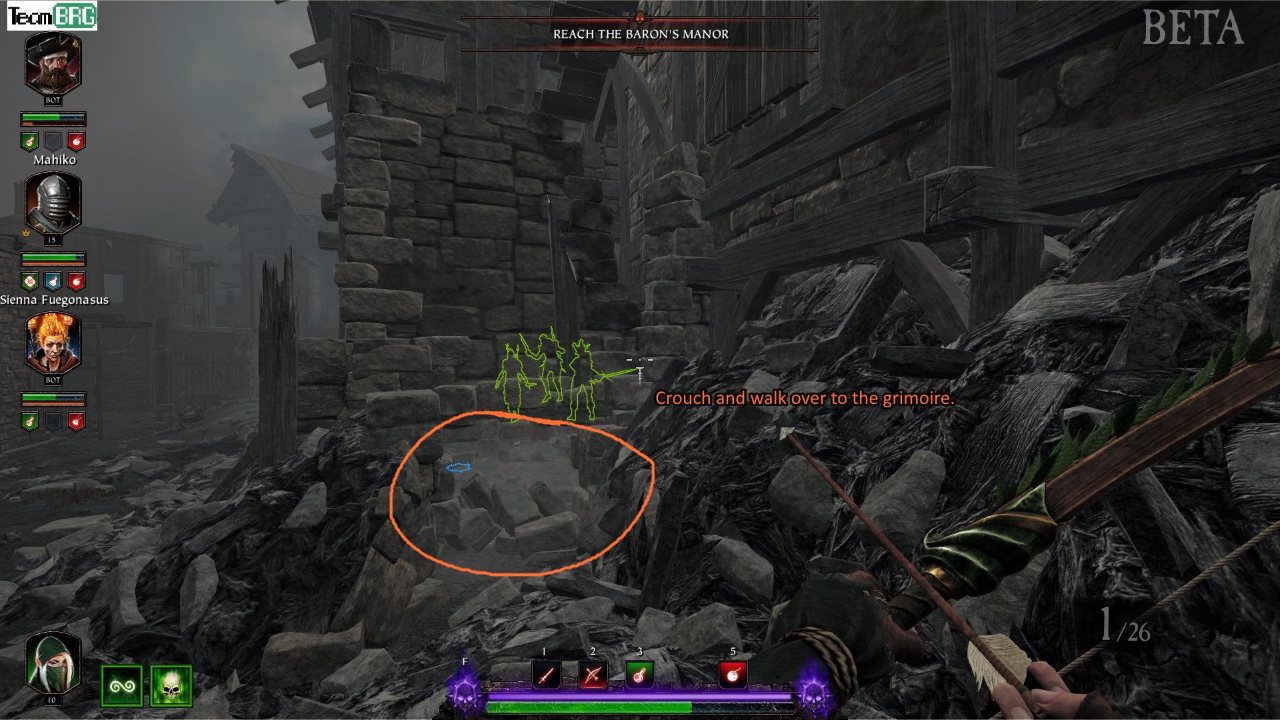

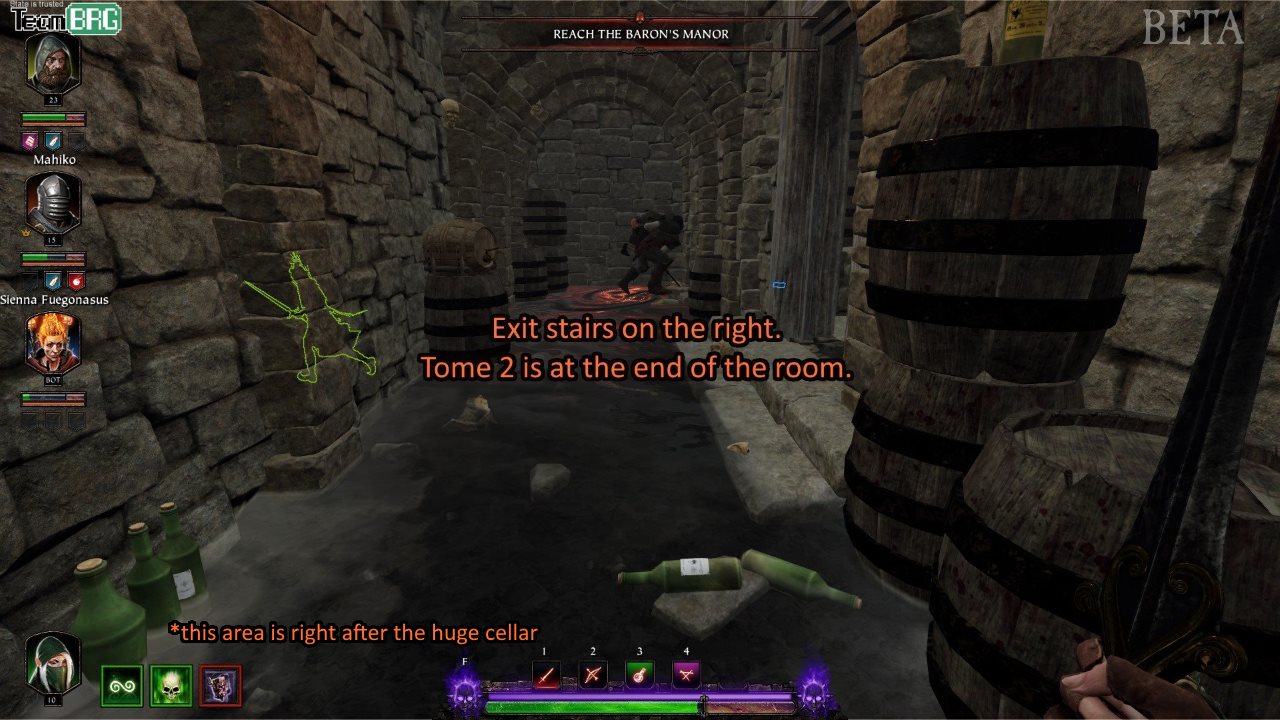
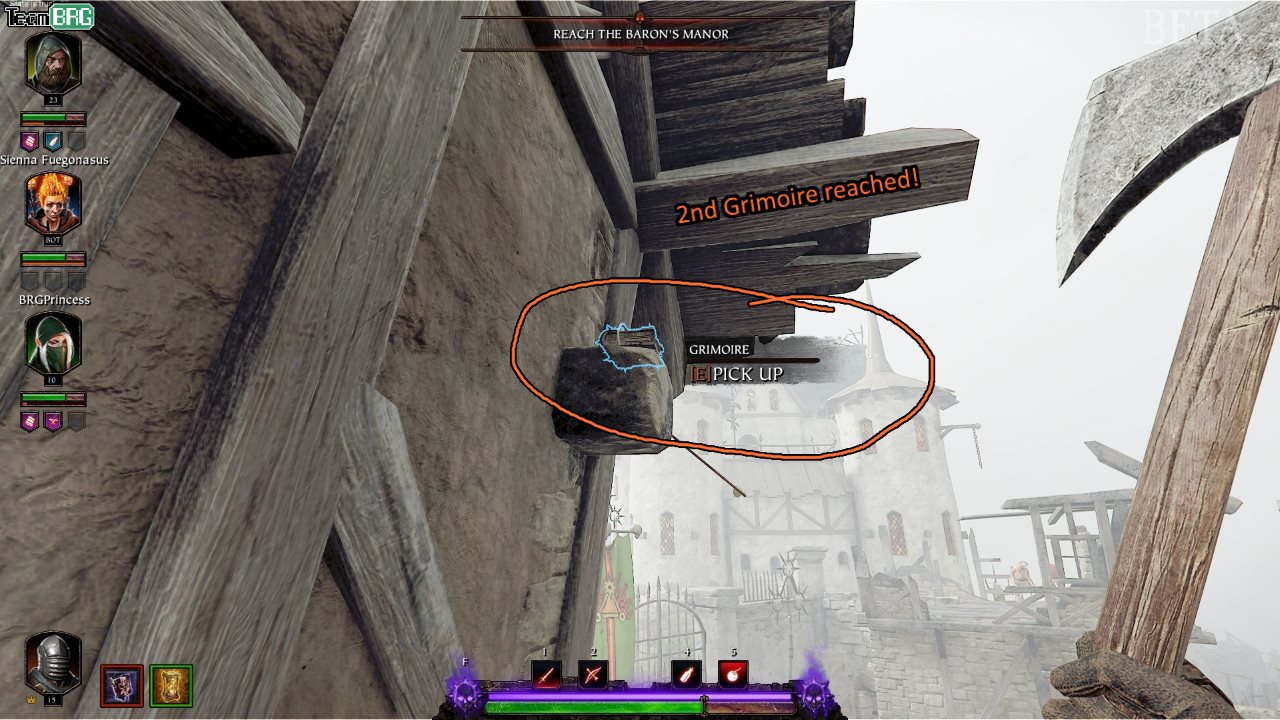
Map Objective: Reach the Baron’s Manor.
This one is in the very end of the flooded tunnel, after the wine cellar. If you see the stairs going up, simply go a bit forward and reach into the hole to your right.

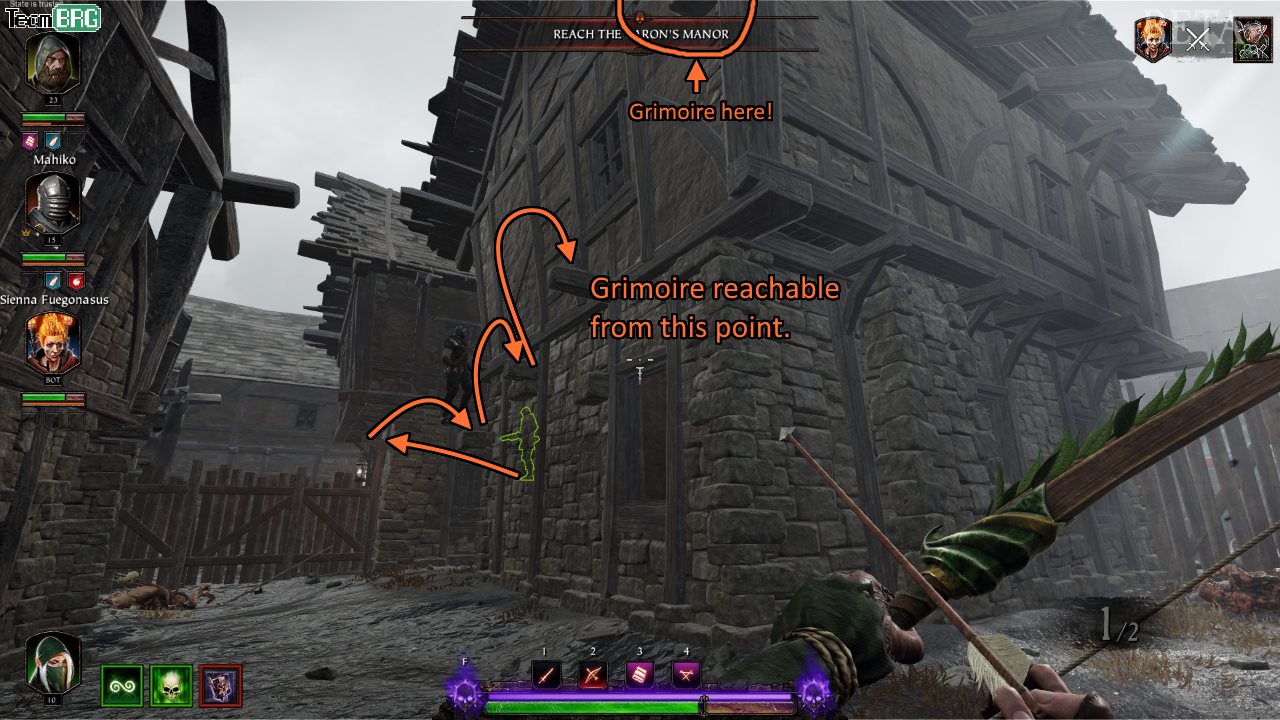
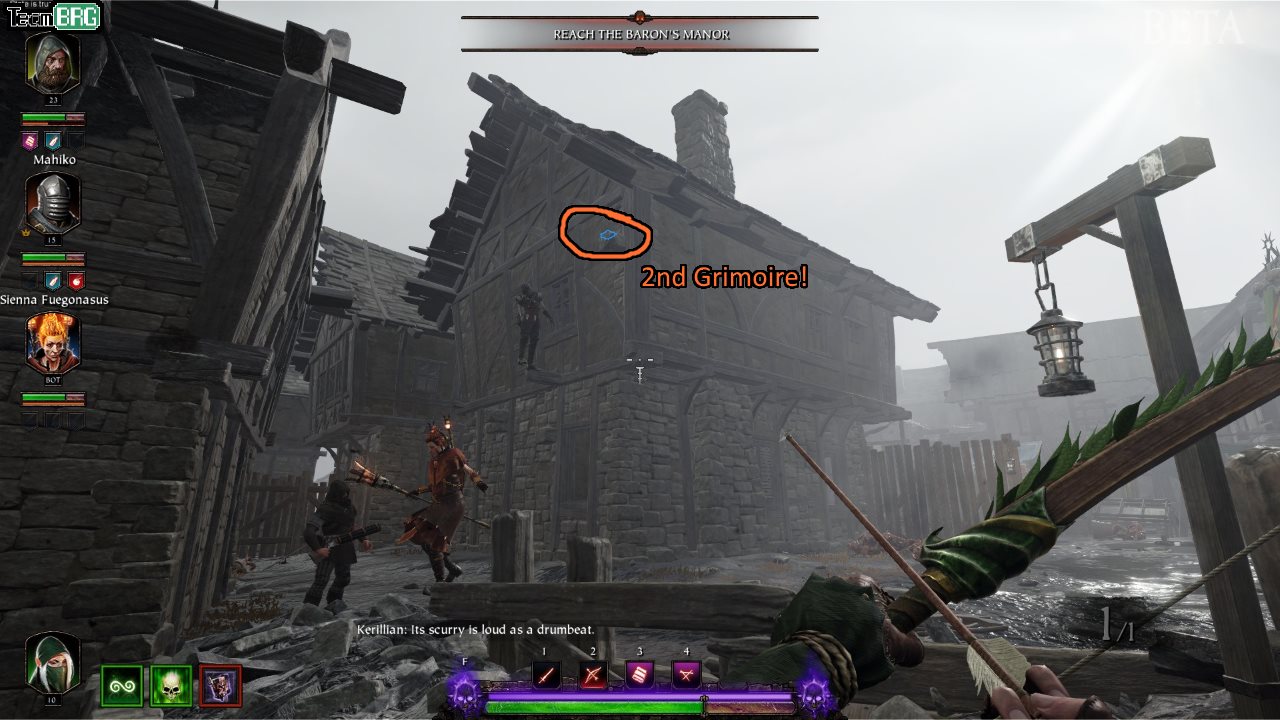
Map Objective: Reach the Baron’s Manor
In the house on the left before the market square. In the “southern alley” of this house you will see brick protrusions – the Grimoire is atop one of the highest ones on the right. Getting there is painful.
Start from the “West” alley, and jump on the boxes -> Signpost -> Brick 1 -> Brick 2 -> Look up and pick up the Grimoire from here.

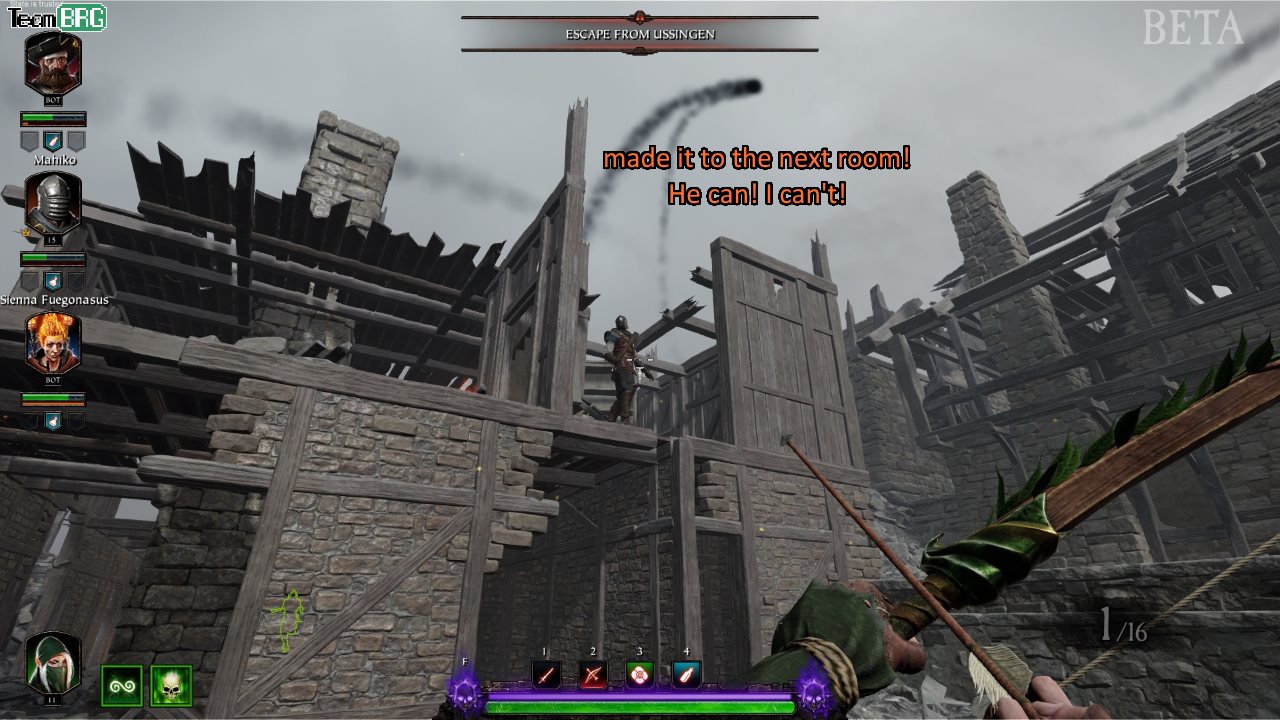
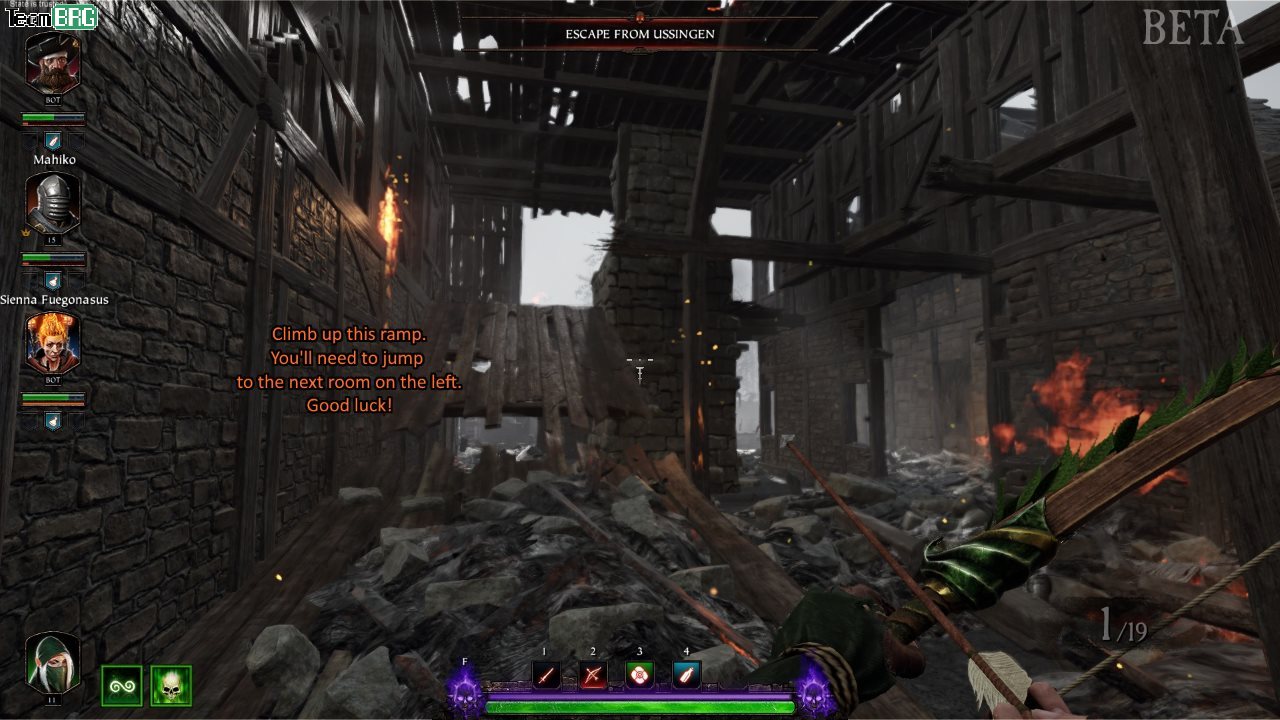
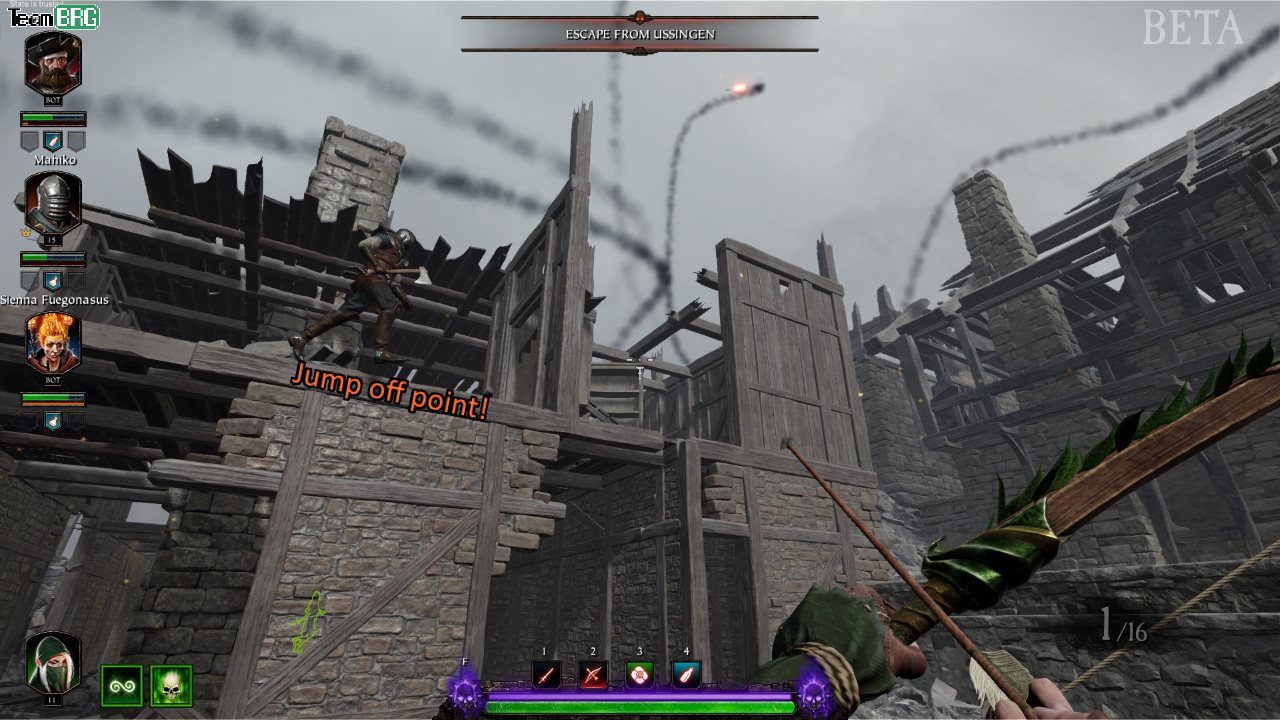
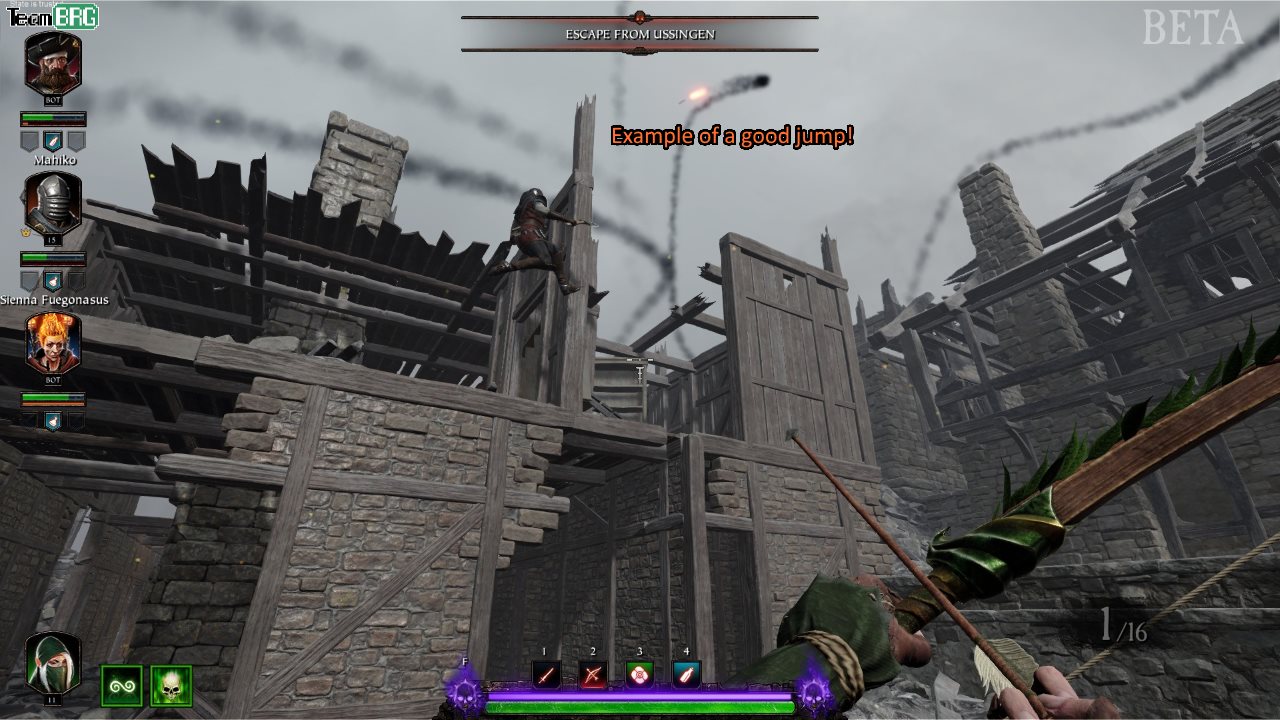
Map Objective: Escape from Ussingen
This is in the FINAL HOUSE BEFORE THE END OF THE MAP. Like, REALLY NEAR THE END. Start from the stairs up front. Before you fall down, you have to make a stupid “mid air curveball” to reach the room on the left (2nd floor). It’s one of the more annoying jumps.
Once here go downstairs and the tome is within the chest. Thankfully, you can unlock an iron door so everyone has access to it – so 4 people can attempt the jump.
Festering Ground Tomes & Grimoires Location
Grimoire 1A: Key near the corpse in the caverns. Save for later.
Tome 1: Bridge with ladder, climb up then long jump. Cheesed from below.
Grimoire 1B: Riverbank chest. After you “drop down a lot”, before the bridge.
Tome 2: “Place with a lots of wooden bridges and structures”, drop down one level.
Grimoire 2: Swamp with tents, fall to ledge at the end of wooden ramp.
Tome 3: First ruins in between the grimoire 2 swamp and the next swamp. It’s on the “second floor” of the ruins accessed by the stairs in front.

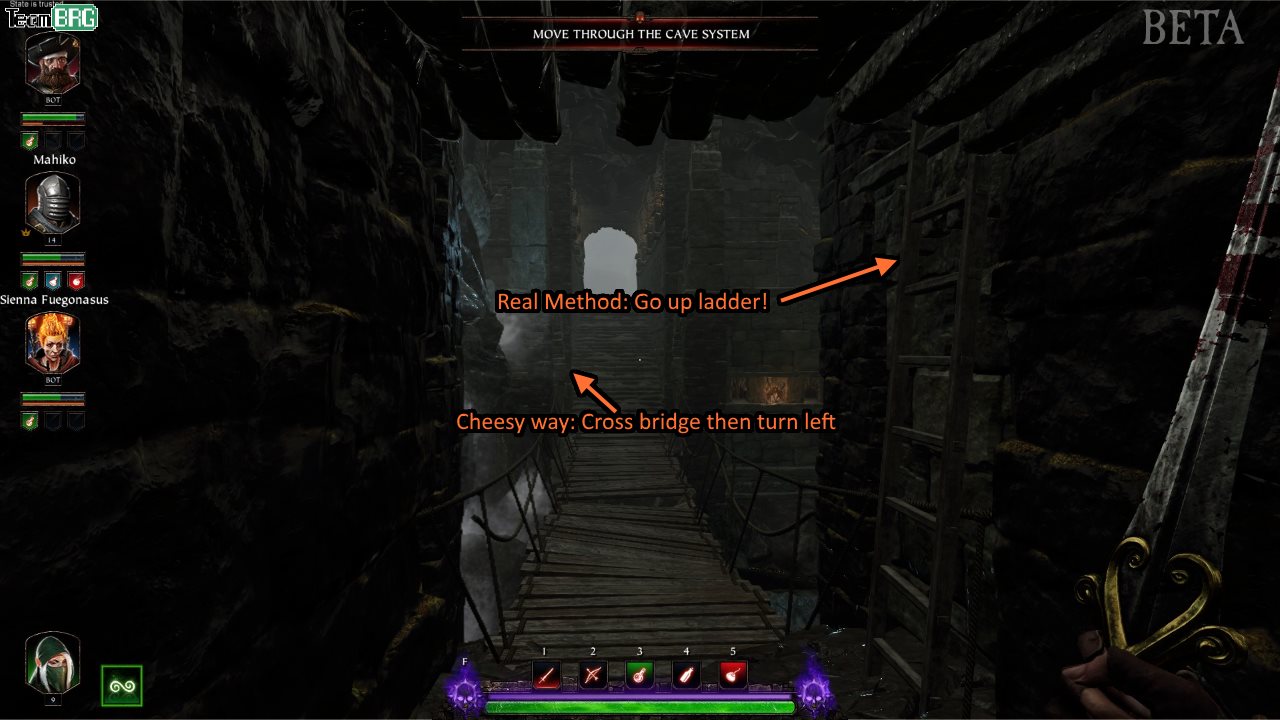
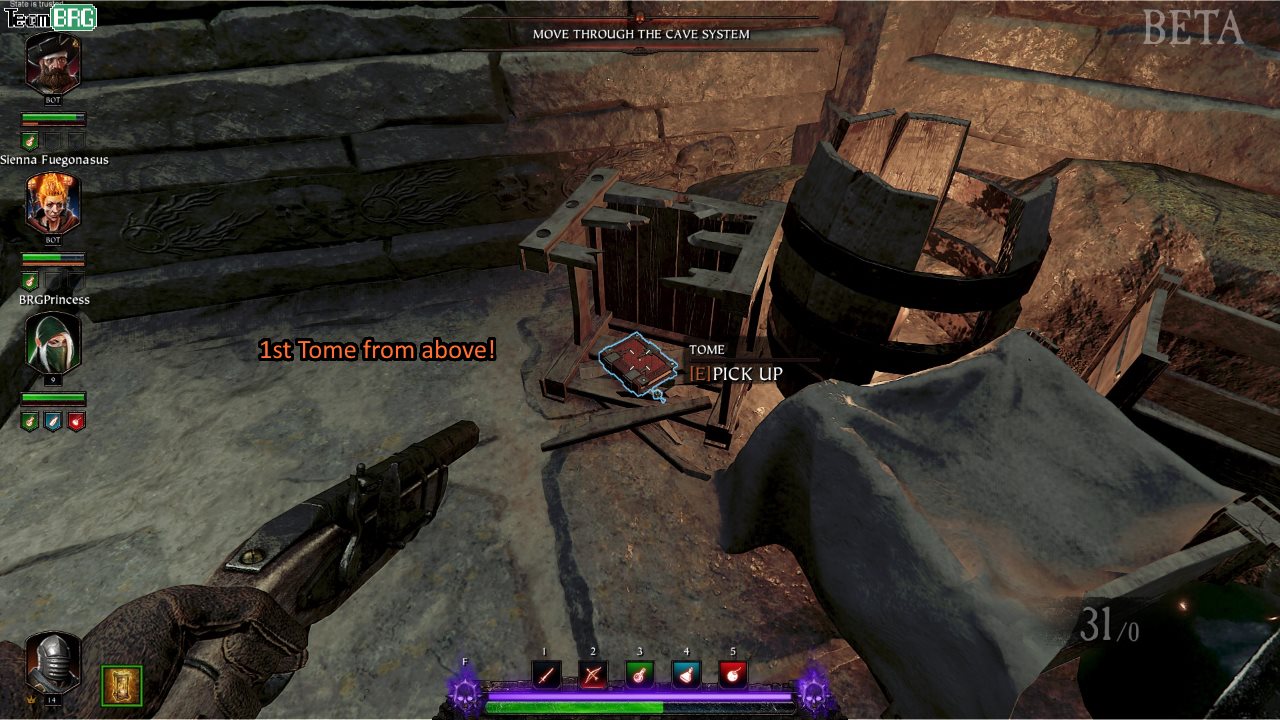
Map Objective: Move through the cave system
This is a 2-part Grimoire. The first part involves getting a key in the Cave System. You’ll know you’re in the right place if you’re in a cavern, and there’s lots of pillars and wooden “bridges”.
The key is on the base of the “middle” wooden pillar, near a corpse. Careful, it’s really tiny! You’ll be using this a bit later on, so after you get this you’re done for now.
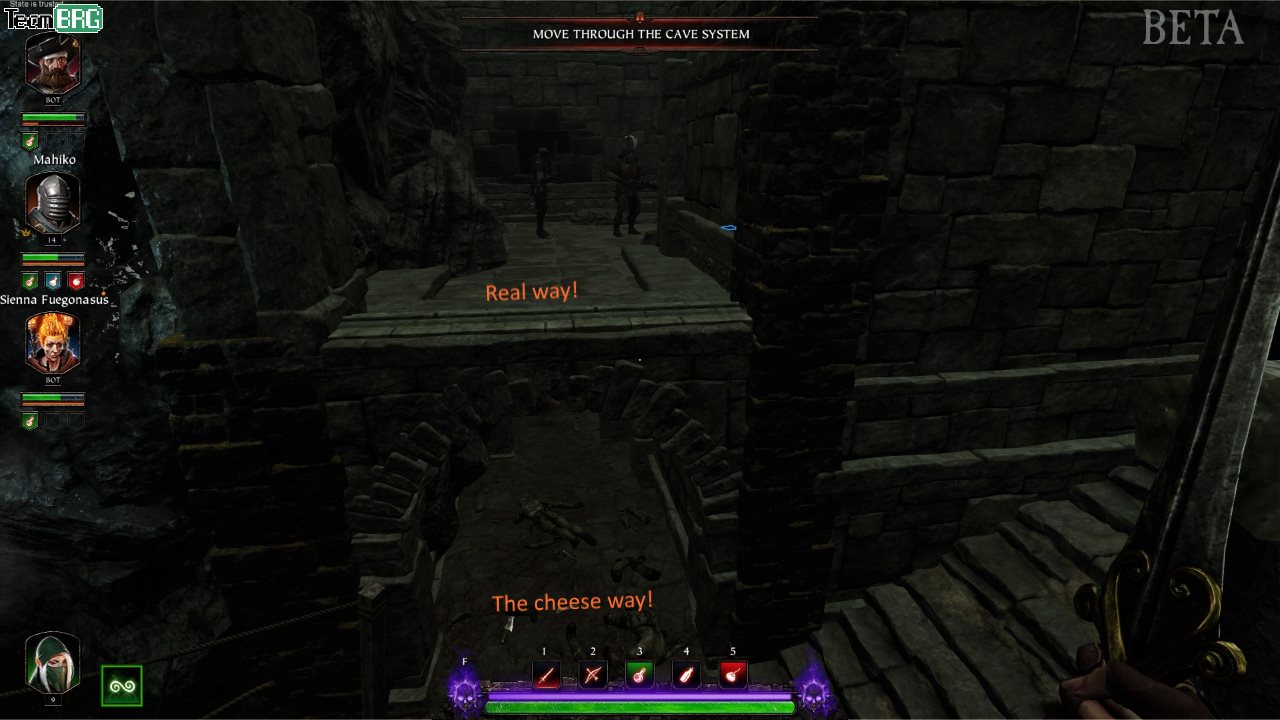
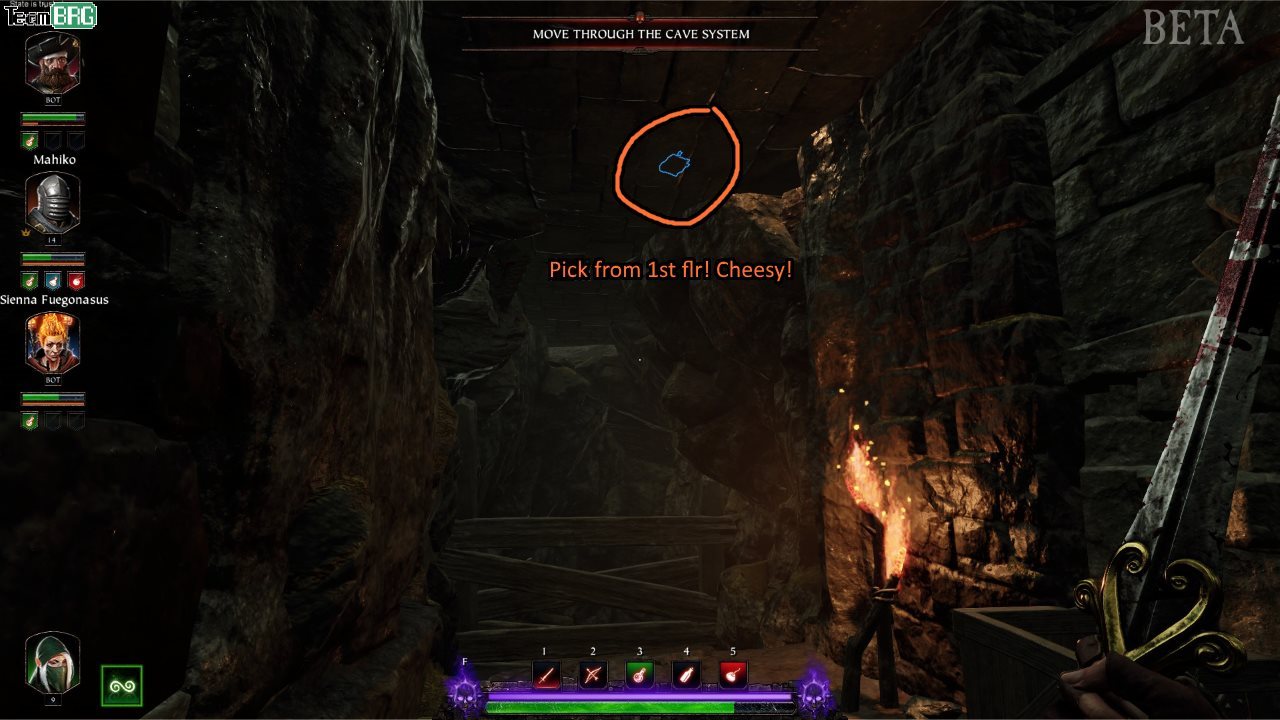
Map Objective: Move through the cave system
Let me start off by saying you can cheese this one from the bottom. If you spam “T” to mark it from under, you can jump up and snag it mid-air.
Once you reach a bridge with running water on both sides (within a “ruins” setting), there is a ladder to your right, before you cross it. Climb ladder and the path to the tome is on the left.
Jumping across is a little annoying – do it at the very last microsecond. If you manage to get across, the Tome is inside a crate. Again, you can cheese this by going “under” the tome when you cross to bridge and take a left.
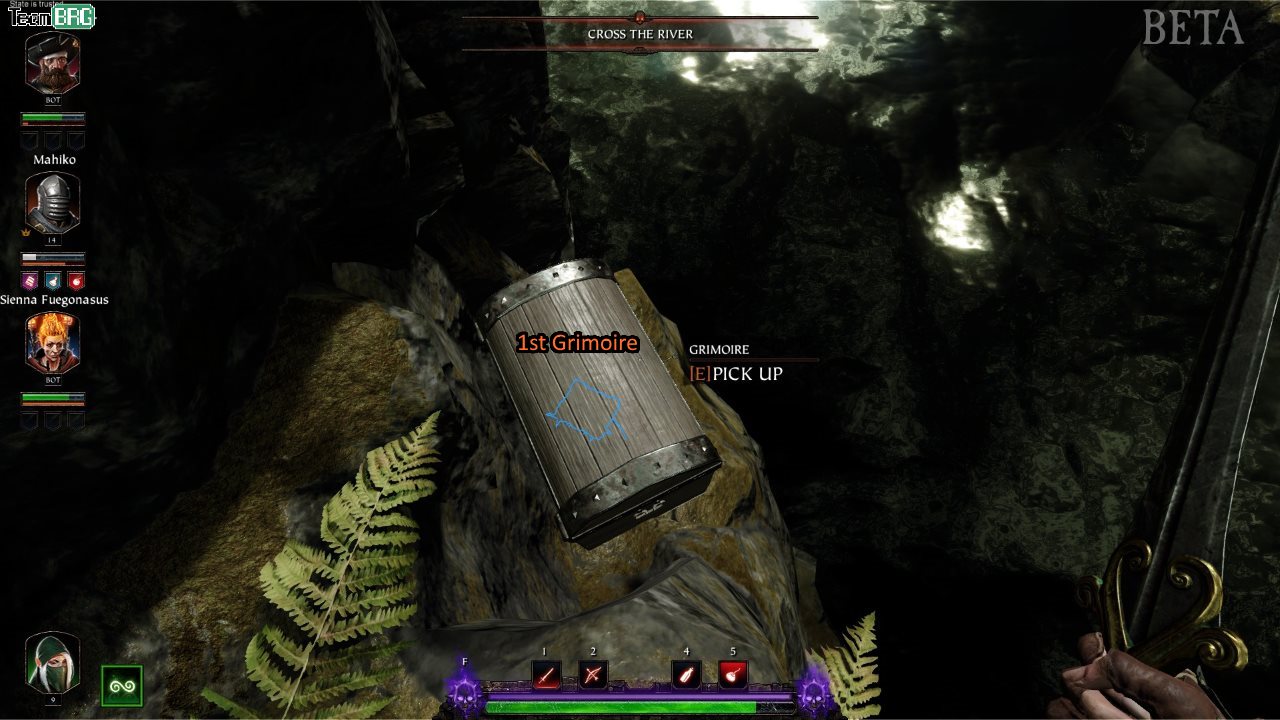
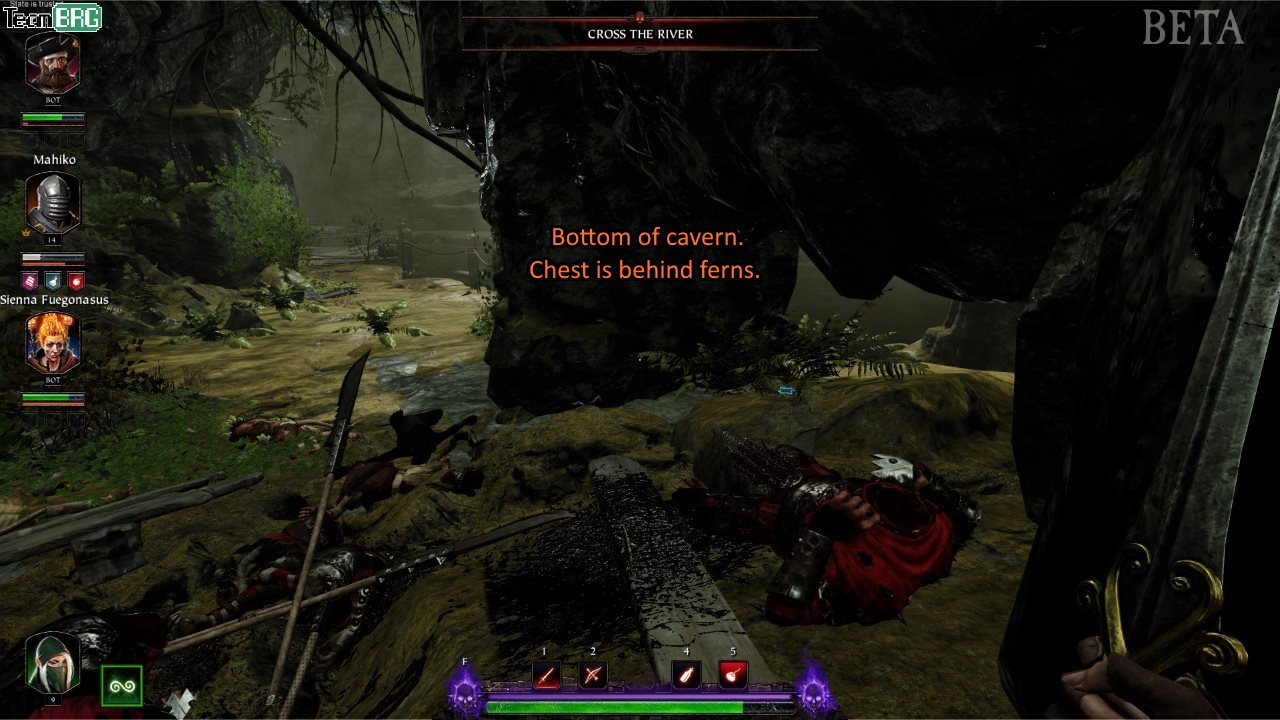
Map Objective: Cross the River
At the very end of “Move through the cave system” you’ll start going down a series of rocks (this is in the sunny outside world, so you don’t get confused). I guess you can call it a mini waterfall.
At the very bottom of this “hole”, there’s a river on your right (you can see the bridge in the distance). Look down onto the riverbank – there’s chained locked chest. Inside it is the first Grimoire!

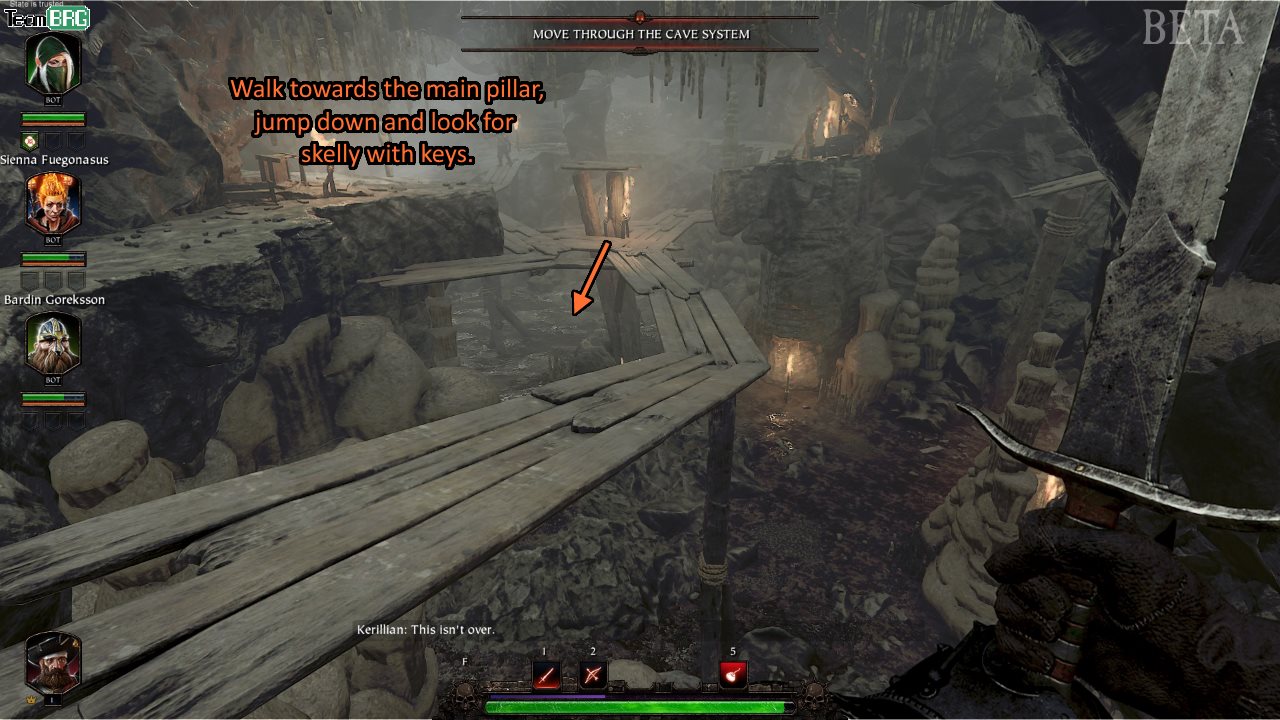
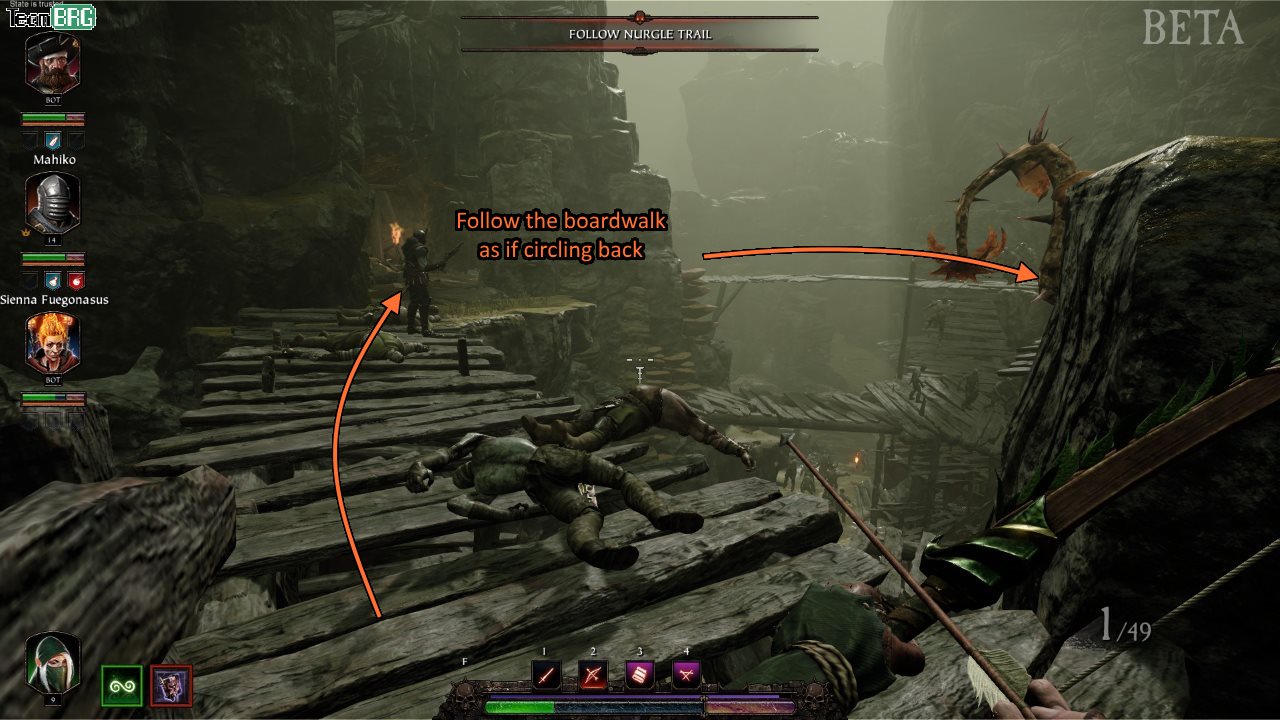
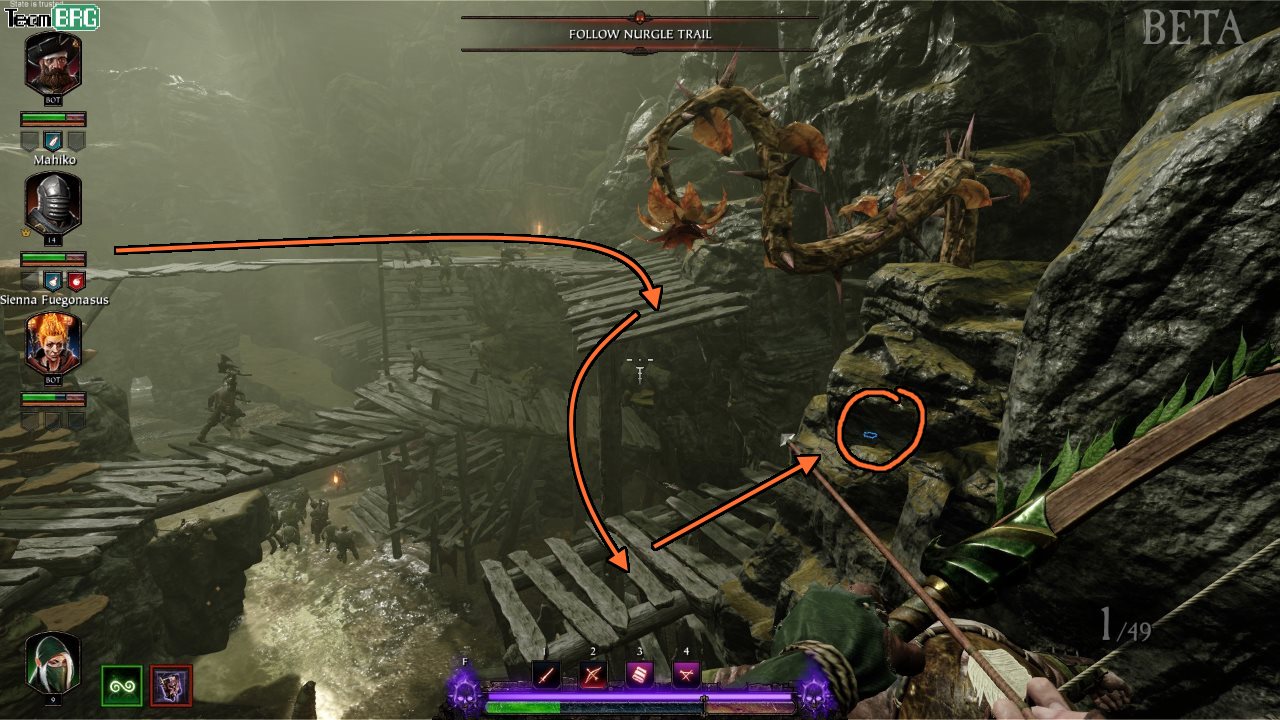
Map Objective: Follow Nurgle Trail
The area of this one’s better explained via screenshots. You know the area with a lot of bridges that lead to a bunch of wooden “towers” you have to jump down? There’s a small platform you can jump on in the “middle tier” (connected to the cliff) and that’s where the tome is.
I really have a hard time explaining this one with words – I’m open to suggestions.
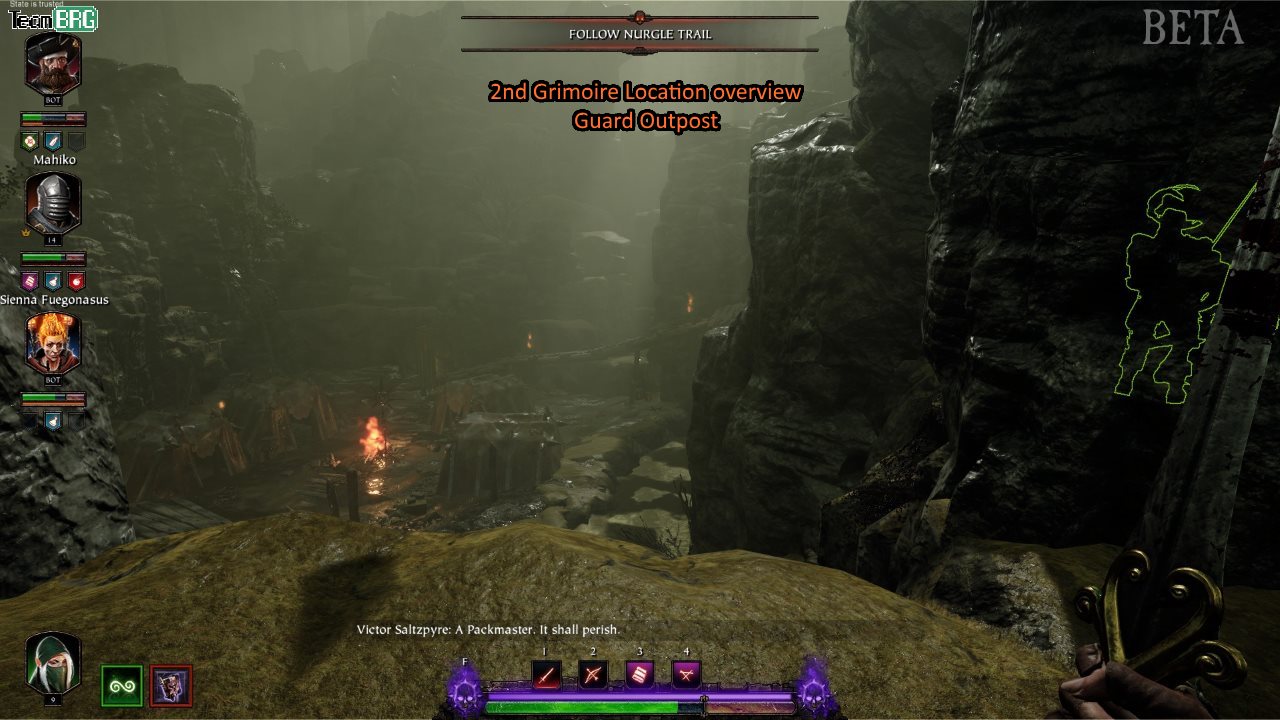
Map Objective: Follow Nurgle Trail
Is in the swamp with camps. This one’s a little annoying. In the wooden ramp going upward, where the ramp meets the cliff, YOU CAN DROP DOWN to a small ledge. Good Luck… try walking off then pressing left – it’s my only advice.
Once inside this mini-cave, the grimoire is inside a chest. Exit the cave through a ladder on the other side – don’t bother with the boulder blocking the mini-cave entrance.

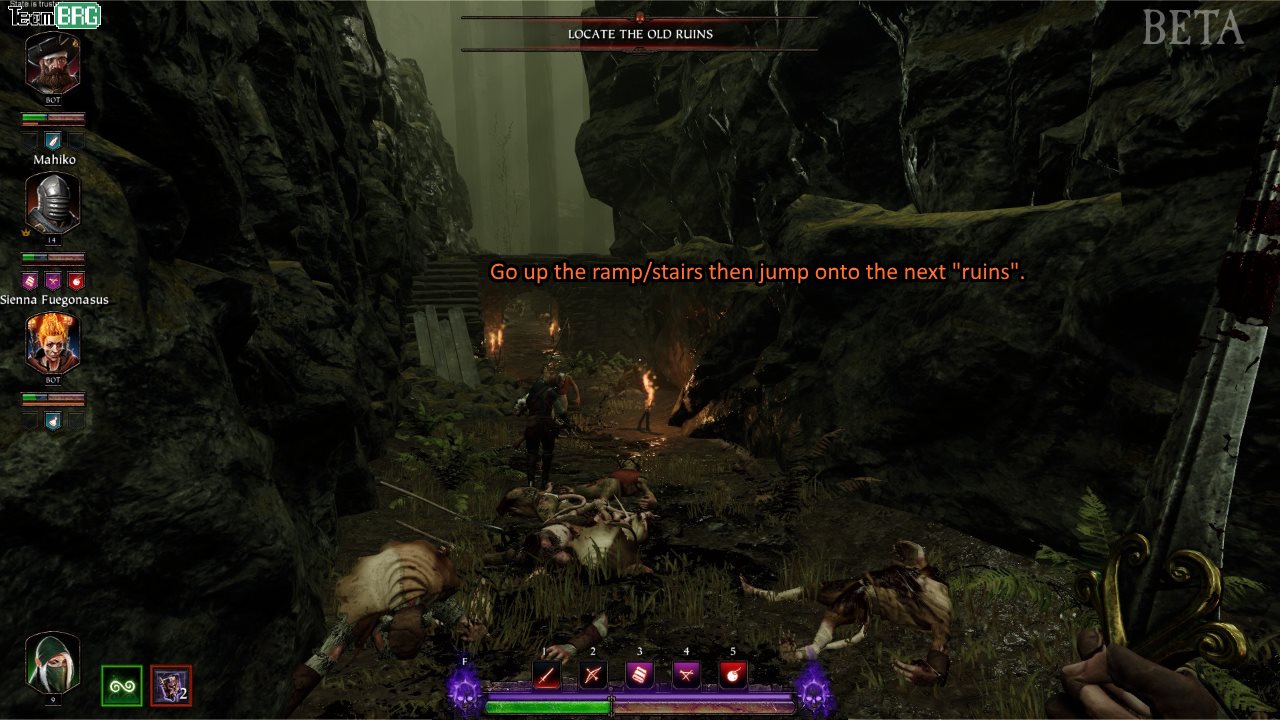
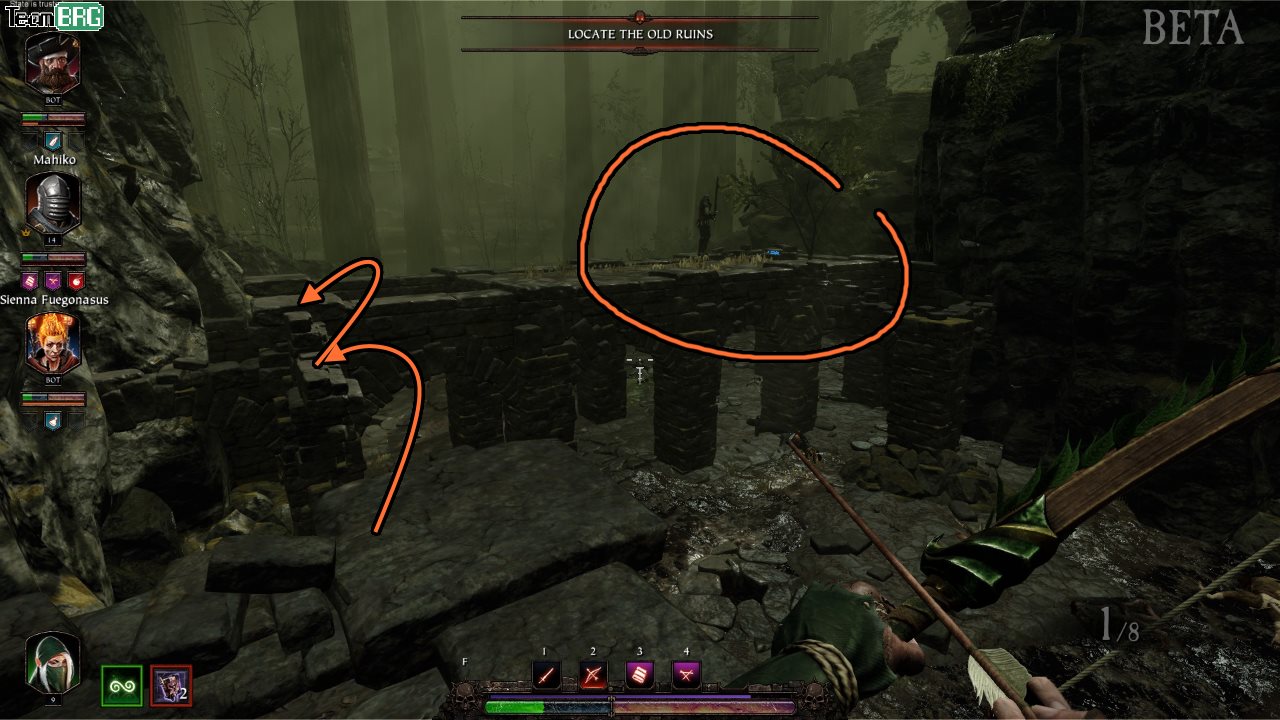
Map Objective: Locate the Old Ruins
After the “swamp with the camp ” area (Guard Outpost: Grimoire 2 zone), you’ll find a small ruins before the next swamp. It’s on the “2nd floor” of the far side. You simply have to jump across from the first ruined half of the building. Process is:
Go up the stairs in the beginning.
Stand on the protrusion.
Jump to pillar.
Jump to next protrusion BUT DO NOT WALK.
Make a small jump to get to the platform.
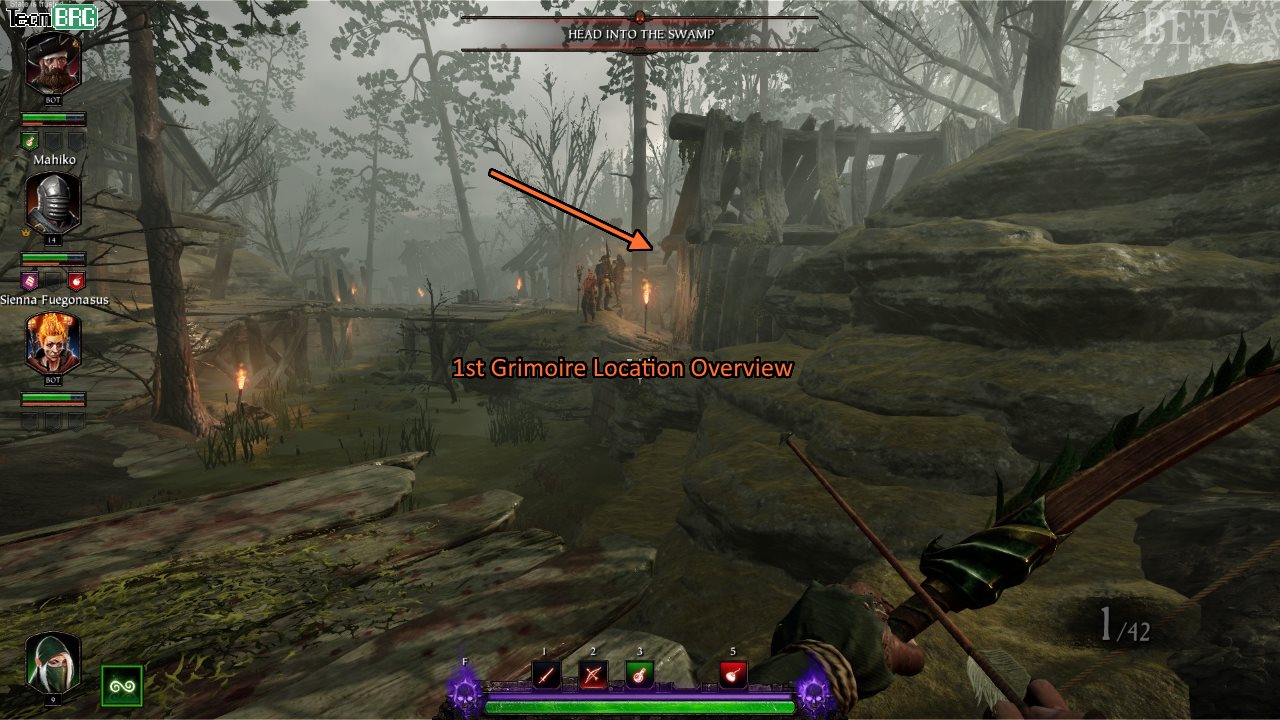
The War Camp Tomes & Grimoires Location
Map Objective: Head Into the Swamp
Is very near the start of the map. Keep going and until you reach the first clearing with “puddles”. On the left of this area is a shack (Old Andrea’s Den). It’s sitting plainly on top of a shelf on the far side of the structure.


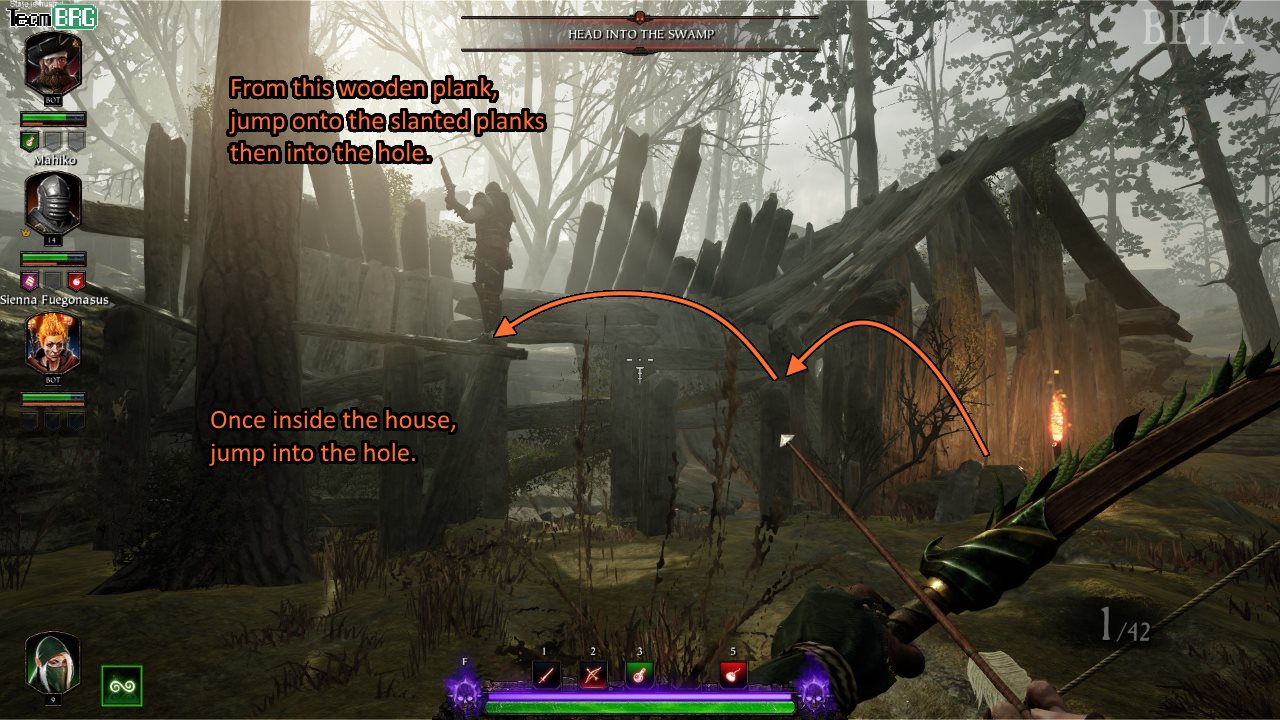
Map Objective: Head Into the Swamp
Once you reach the first “ruined village” in the swamp, the second house on the right. You have to get INSIDE the house. Process is:
Stand on the rock
Jump to first pillar
Jump to “last wood” (you can skip jumping on the second pillar)
Jump inside the house.
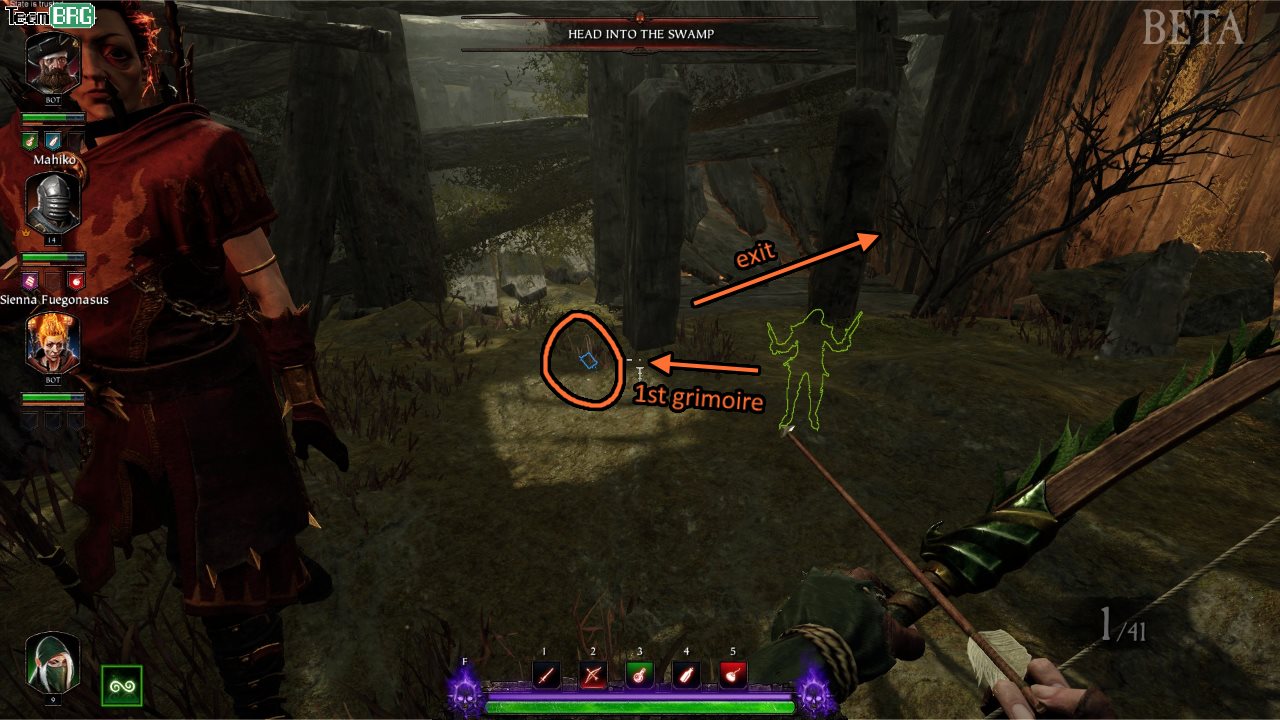
Once inside the house, you’ll find a hole you can drop down from. Follow it to the grimoire and the eventual exit. The very first jump can be a little tricky, but remember YOU CAN SKIP THE SECOND PILLAR.
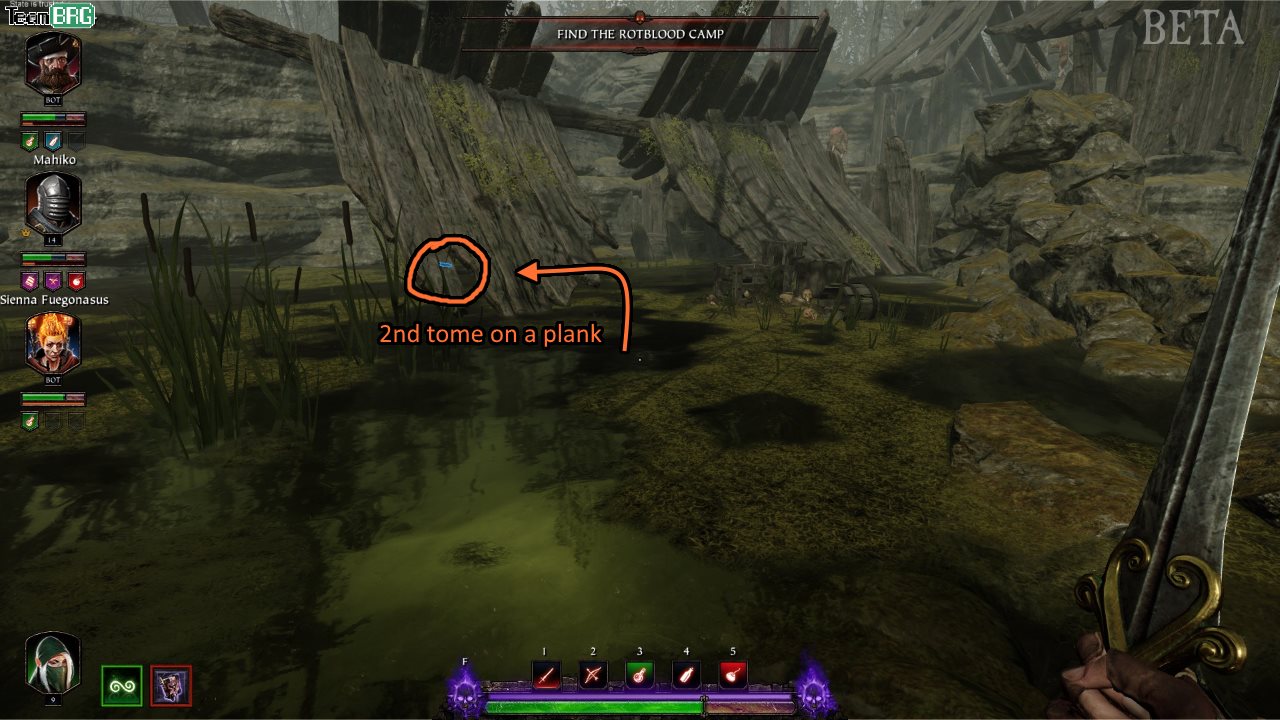
Map Objective: Head Into the Swamp
It’s in the same village as Grimoire 1, at second half that’s more submerged. Get it right before you exit the village area.
Find it inside the second to the last house on the left – it’s in plain sight inside.
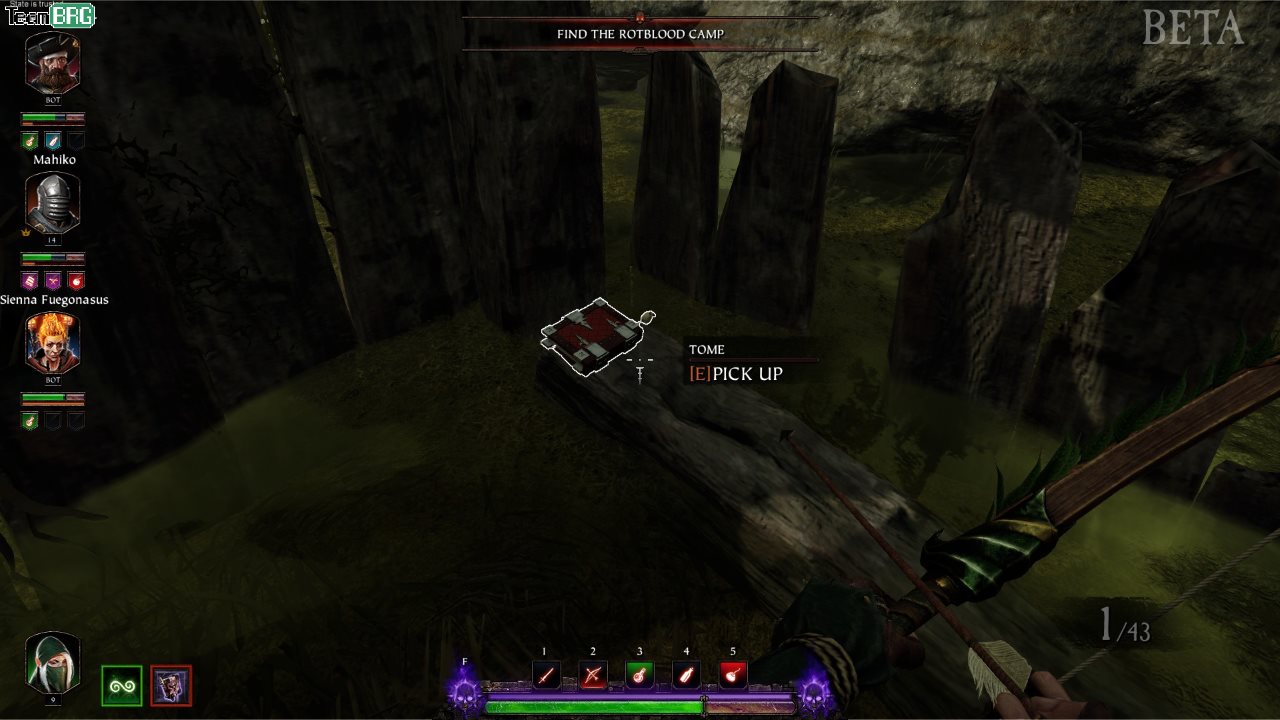
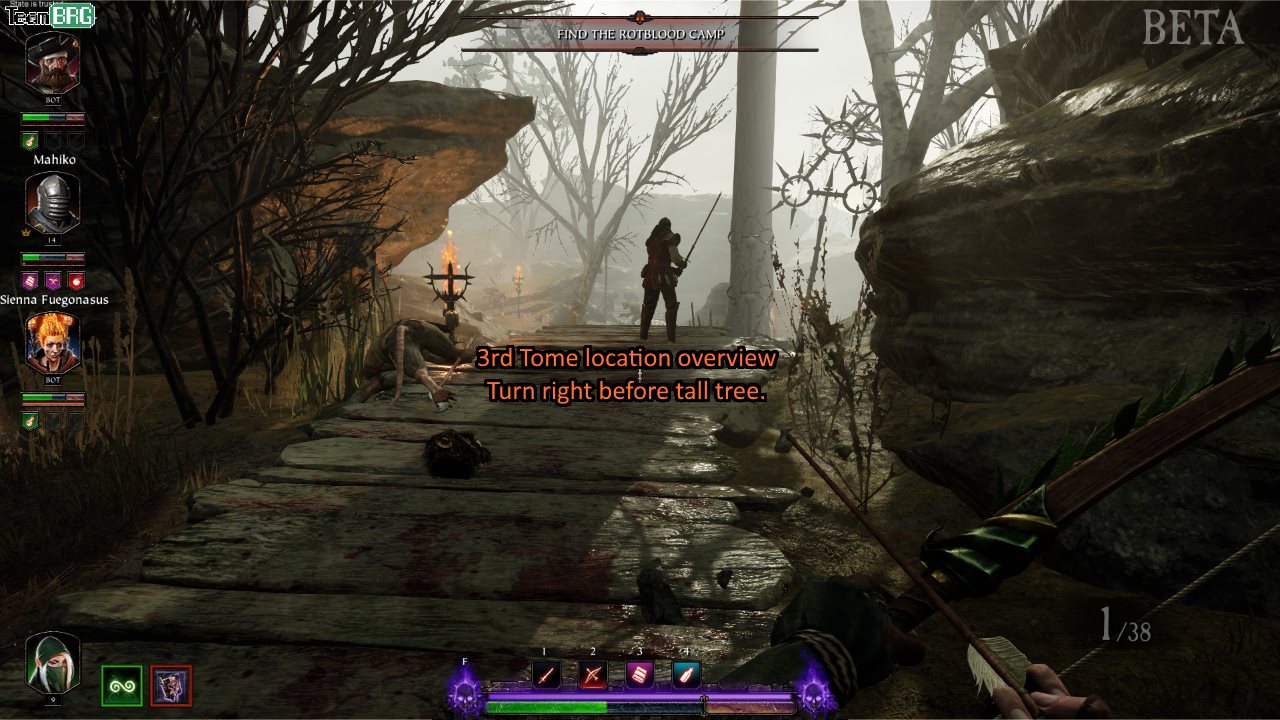
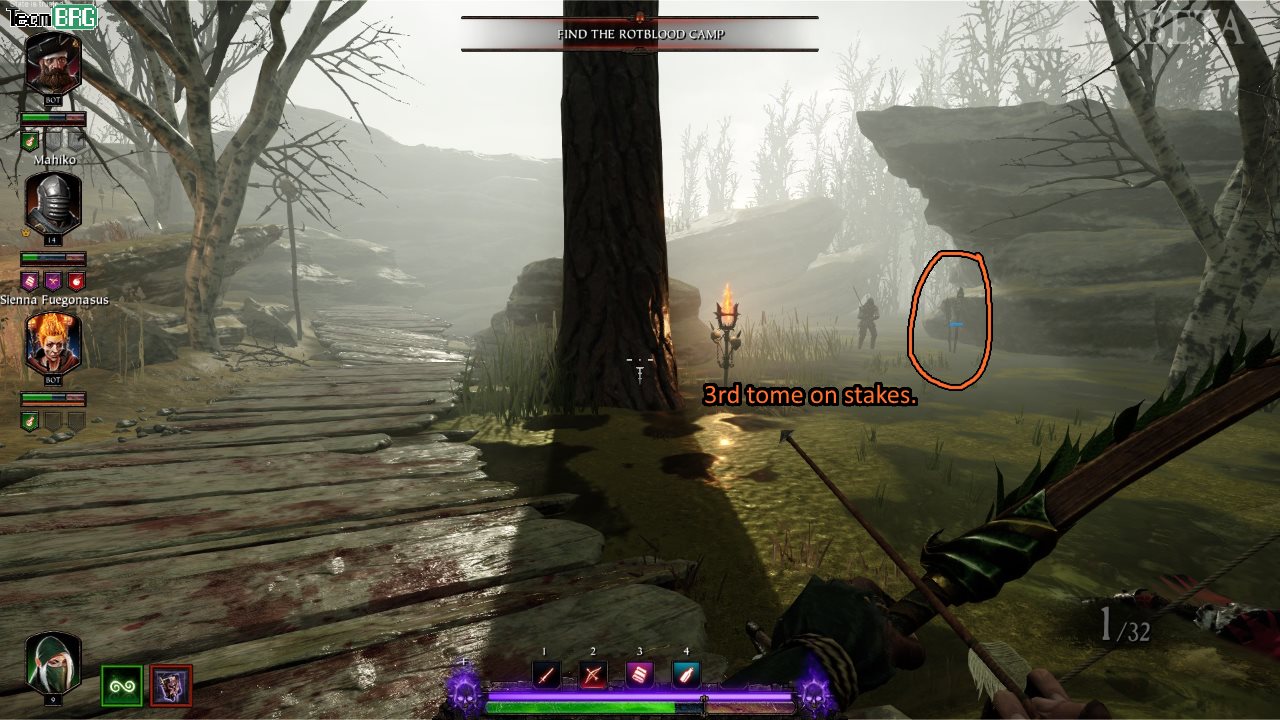
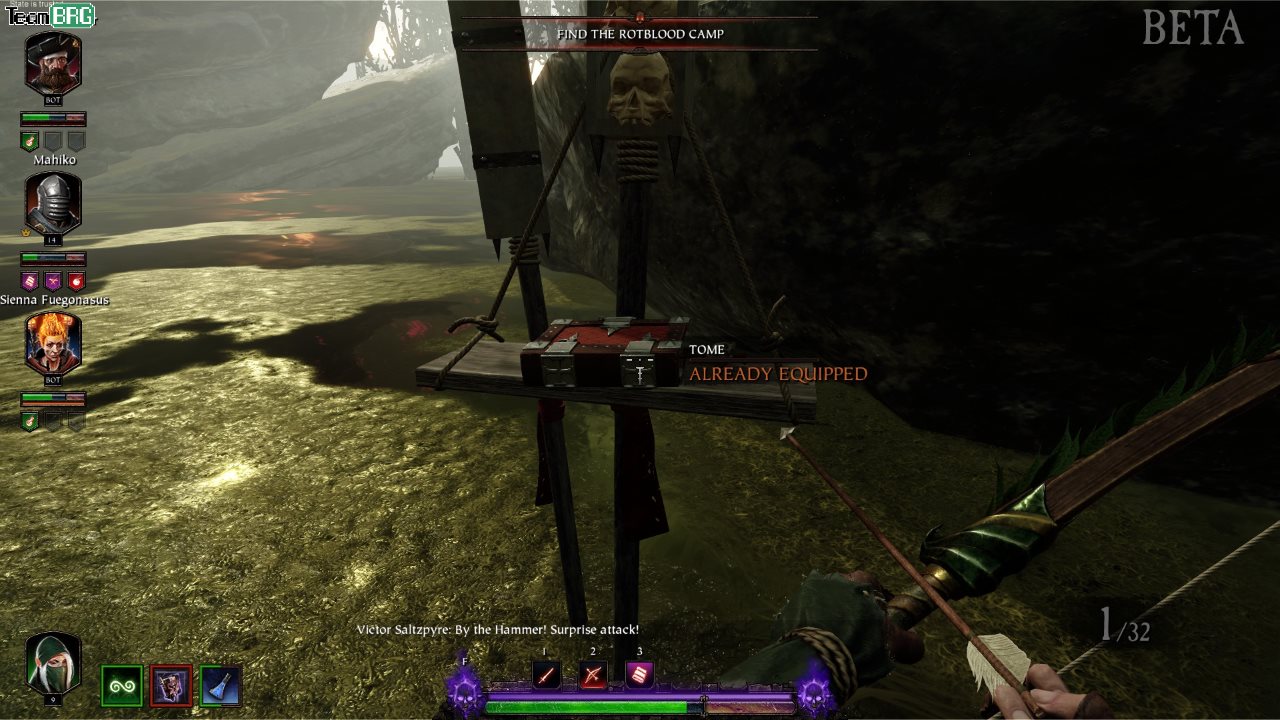
Map Objective: Find the Rotblood camp
The area of this tome is hard to explain… Once you enter Zuhause Gully (first campsite with tent, I think), there’s gonna be a boardwalk soon. Make a right once you see this huge tree by the boardwalk. Tome will be on some staves.
Map Objective: Find the Rotblood camp
Is a bit of a process. It’s all within the “Large marsh before the hanging tree”, easily remembered when you jump down a few large rock shelves. You must trigger three candles, then the grimoire will reveal itself.
Candle 1: In the same rock shelves you dropped down on. It’s in a nook on the right, under the largest boulder in the “entrance” to the zone.
Candle 2: On the “forward right” area of 1st candle, under a boulder behind the tent. The area is pretty obvious as its an isolated tent in the water.
Candle 3: On the “forward left” area of 1st candle, drop down the wooden bridge to the “lake”, then look as the base of the cliff-side.
The grimoire will reveal itself on a pedestal a little forward of the first candle area, right of the wooden bridge.
PICTURES TO FOLLOW. I CANT SEEM TO GET “THE RIGHT MIX!”
OTHER MAPS WILL BE UPDATED AS I PLAY
SCREENSHOTS IN THE TABS, VIDEOS TO FOLLOW
Well, that’s it for now. I’ll be continually updating the tome and grimoire locations as I play.


 | 2.7.5")

This is fantastic, thanks!!
Thank you so much. Rexdl rocks.
Thanks for all guys !!!!! You’re Awesome.
Great Job !!